There are three ways to do this:
- using the contextual menu
- using the Insert -> Instantiate From Document menu item
- using a catalog
Using the Contextual Menu Item:
-
Select the PowerCopy feature from the specification tree.
-
Right-click to display the contextual menu, and choose the PowerCopy.1 object -> instantiate menu item.
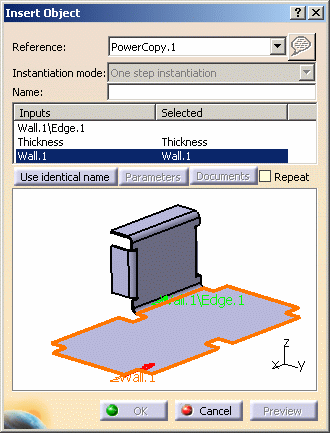
The Insert Object dialog box is displayed. -
Complete the Inputs within the dialog box by clicking the use identical name button.
-
You can also click on the Parameters button to display the Parameters dialog box and modify values, if needed.

-
Use the Create formulas button to automatically create a formula on every parameters with the same name provided there are any.
-
Click OK in the Parameters dialog box.
-
Click OK to create the PowerCopy instance.
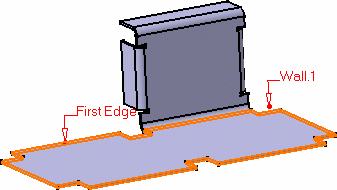
The PowerCopy is instantiated in context, meaning its limits are automatically re-defined taking into account the elements on which it is instantiated. 
Using the Insert Menu:
-
Select the Insert -> Instantiate From Document menu item.
The Select PowerCopy dialog box is displayed allowing you to navigate to the document or catalog where the power copy is stored. 
-
Select the document containing the Powercopy.
The Insert Object dialog box is displayed. Use the Reference list to choose the correct PowerCopy when several have been defined in the document.
-
Continue the instantiation as described in Using the Contextual Menu item, step 3.
Using the catalog:
- using the Catalog capability, see the Infrastructure User's Guide.
- using the Insert -> Knowledge templates -> Save in Catalog... menu item.
-
Click Catalog
 .
.If accessing a catalog for the first time, you need to navigate to the catalog location. This location is stored in the settings for faster access later on. -
Select the catalog containing the PowerCopy you wish to instantiate.
-
Select the PowerCopy to be instantiated, then you can:
-
drag and drop it onto the reference element
-
double-click the PowerCopy
-
or right-click on the PowerCopy in the dialog box and use the Instantiate contextual menu.
From then on, you instantiate the PowerCopy as described Using the Contextual Menu item, step 3.

- You can only instantiate a PowerCopy if the PowerCopy itself and the features making it up have been created in the current view mode: i.e. you will be able to instantiate a PowerCopy created in 3D mode, only on a feature in 3D mode, not on an unfolded feature.
- The
 icon is always
grayed when instantiating Power Copies. It is available with User
Features and allows you to create and modify URLs.
icon is always
grayed when instantiating Power Copies. It is available with User
Features and allows you to create and modify URLs.
-
![]()