- Overview
- What Happens When the Update Fails? (scenario)
- Canceling Updates
- Interrupting Updates (scenario)
- Update All Command
Overview
The point of updating a part is to make the application take your very last operation into account. Although some operations such as confirming the creation of features (clicking OK) do not require you to use the Update command because by default the application automatically does it, some changes to sketches, features etc. require the rebuild of the part.
To warn you that an update is needed, the application displays the
update symbol next to the part's name
![]() and shows the
geometry in bright red.
and shows the
geometry in bright red.
Keep in mind that:
- To update the feature of your choice, just right-click that feature and select Local Update.
- Besides the update modes, you can also choose to visualize the update
on the geometry as it is happening by selecting Activate Local
Visualization from the Tools > Options > Infrastructure
> Part Infrastructure, General tab. In this case, as
soon as you have clicked the Update icon
 :
:
- the geometry disappears from the screen;
- each element is displayed as it is updated, including elements in No Show mode. Once they have been updated, they remain in No Show mode.
Two Update Modes
To update a part, the application provides two update modes:
- Automatic update, available in Tools > Options > Infrastructure > Part Infrastructure (General tab). If selected, the application updates the part when needed. By default, the Automatic option is selected.
- Manual update, available in Tools > Options->
Infrastructure > Part Infrastructure (General tab): lets you control the update
operations
of your design. What you have to do is just click the Update All
icon
whenever you wish to integrate modifications.
From V5R17 onwards, you can click Manual
Update Mode
 from the Tools toolbar if you are working in the Part
Design or Functional Molded Part workbench. It changes the update mode.
from the Tools toolbar if you are working in the Part
Design or Functional Molded Part workbench. It changes the update mode.
In Functional Molded Part Workbench
Contrary to Part Design application, Functional Molded Part does not run update processes once you have clicked on OK from any dialog box to confirm your current operation. In Manual Update mode, you always need to click on the Update icon
to integrate the modifications to the geometry. If, for example,
you have just edited a feature and clicked OK to
confirm the operation, the geometry turns red to indicate that
an update is required, nevertheless, updating immediately is not
mandatory: you still can go on designing your part.This specific behavior helps you control the application performances. Indeed, whenever you update your geometry, this is costly in terms of performances, this is why the manual update has been designed so as to let you modify the geometry as much as you want.
When designing, we therefore recommend the use of the Manual option.
Previewing Geometry
Note that when you click Preview buttons from definition dialog boxes, to get an idea of the results, even if the Manual mode is on, the application launches an update operation. Because that is a costly process, you should use that capability only when necessary.
The Update capability is also available via Edit > Update and via the Update contextual menu item.
What Happens When the Update Fails?
Sometimes, the update operation is not straightforward because for instance, you entered inappropriate edit values or because you deleted a useful geometrical element. In both cases, the application requires you to reconsider your design. The following scenario exemplifies what you can do in such circumstances.
-
Enter the Sketcher to replace the circular edge of the initial sketch with a line, then return to Part Design.
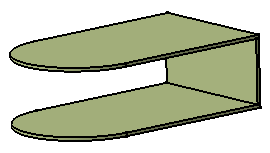
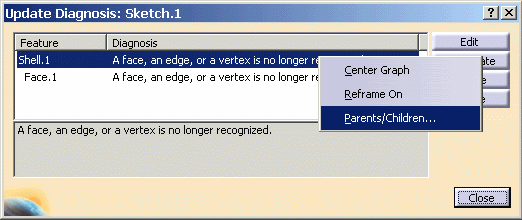
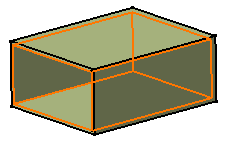
The application detects that this operation affects the shell. A yellow symbol displays on the feature causing trouble i.e. the shell in the specification tree. Moreover, a dialog box appears providing the diagnosis of your difficulties and the preview no longer shows the shell:
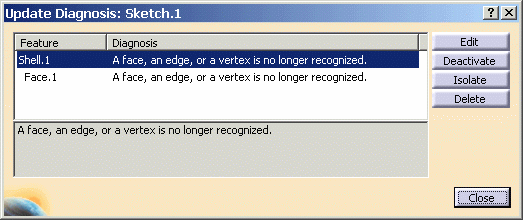
To resolve the problem, the dialog box provides the following options. If you wish to rework Shell.1, you can:- Edit it
- Deactivate it
- Isolate it
- Delete it
-
For the purposes of our scenario that is rather simple, click Shell.1 if not already done, then Edit.
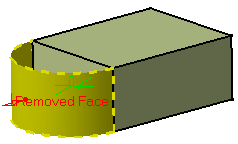
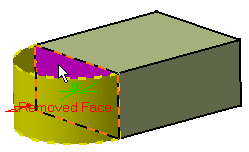
The Feature Definition Error window displays, prompting you to change specifications. Moreover, the old face you have just deleted is now displayed in yellow.The text Removed Face is displayed in front of the face, thus giving you a better indication of the face that has been removed. Such a graphic text is now available for Thickness and Union Trim features too.
-
Click OK to close the window.
The Shell Definition dialog box appears. -
Click the Faces to remove field if not already done and select the replacing face.
-
Click OK to close the Shell Definition dialog box and obtain a correct part. The shell feature is rebuilt.
Canceling Updates
You can cancel your updates by clicking the Cancel button available in the Updating...dialog box.
Interrupting Updates
This scenario shows you how to update a part and interrupt the update operation on a given feature by means of a useful message you previously defined.
-
Right-click Hole.1 as the feature from which the update will be interrupted and select the Properties contextual menu item.
The Properties dialog box is displayed. -
Check the Associate stop update option. This option stops the update process and displays the memo you entered in the blank field. This capability is available in manual or automatic update mode.
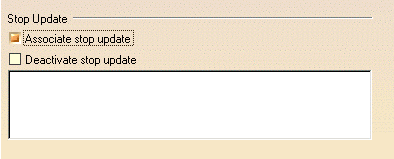
-
Enter any useful information you want in the blank field. For instance, enter "Fillet needs editing".
-
Click OK to confirm and close the dialog box.
The entity Stop Update.1 is displayed in the specification tree, below Hole.1, indicating that the hole is the last feature that will be updated before the message window displays.
-
Edit Sketch.1, which will invoke an update operation.
When quitting the Sketcher, the part appears in bright red. -
Run the update operation by clicking the
icon.
The Updating... as well as the Stop Update message windows are displayed. The Stop Update windows displays your memo and lets you decide whether you wish to stop the update operation or continue it.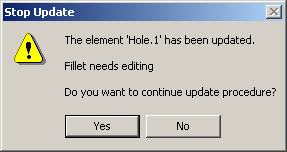
-
Click Yes to finish.
The part is updated. You can now edit the fillet if you consider it necessary.
-
If you decide not to use this capability any longer, you can either:
- right-click Hole.1, select Properties and
check the Deactivate stop update option: the update you
will perform will be a basic one. To show that the capability is
deactivated for this feature, red parentheses precede Stop
Update.1 in the specification tree:
 .
. - right-click Stop Update.1 and select Delete to delete the capability.
- right-click Hole.1, select Properties and
check the Deactivate stop update option: the update you
will perform will be a basic one. To show that the capability is
deactivated for this feature, red parentheses precede Stop
Update.1 in the specification tree:
Update All Command
The Update All command synchronizes copied solids linked to external references, but also updates the whole geometry of the part. For information about external references, refer to Handling Parts in a Multi-document Environment in the Part Design User's Guide.
There are cases where the command also displays the Replace Viewer window. This window either helps you redefine directions if needed or is merely informative and therefore lets you check the validity of your geometry.