![]()
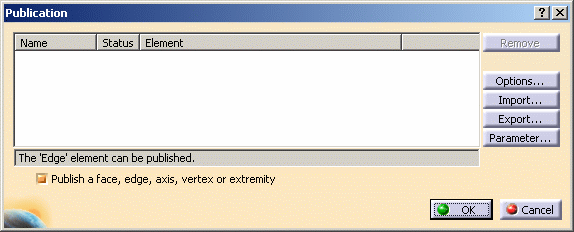
| Publishing geometrical elements is
the process of making geometrical features available to different users.
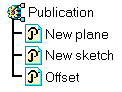
This operation is very useful when working in assembly design context This task shows you the method for making elements publicly available: you will publish a plane, a sketch then a parameter not visible in the specification tree. In this page, you will also find information about the following subjects:
|
||||||
|
||||||
|
|
If you are working in Assembly Design, the dialog box also displays a Browse button. For more information, refer to Publishing in Assembly Design. | |||||
|
||||||
|
|
To select axes, right-click cylindrical faces and select Other Selection. For more about this command, see CATIA Infrastructure User's Guide. |
|||||
|
 |
|||||
|
||||||
Notes
|
||||||
|
|
||||||
|
||||||
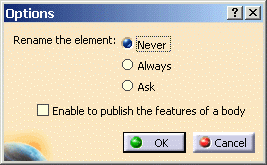
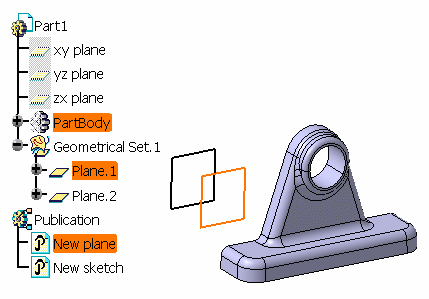
Publishing Part Design FeaturesPublishing Part Design Features requires that the Enable to publish the features of a body capability available in the Options dialog box is on. If your administrator did not lock the option, you can activate the option yourself. Publishing Geometrical Sub-elementsSelecting Allow publication of faces, edges, vertices and axis extremities allows you to publish the sub-elements of a mechanical or shape design feature. Mechanical FeaturesYou can publish the vertices, edges, faces and features of a body. Shape Design FeaturesYou can publish the sub-elements of a shape design feature (for example, the edge of a face, the face of a volume, the sub-part of a segmented geometrical element etc.). However, when selecting points, lines or planes, there is no ambiguity: the sub-element corresponds exactly to the feature itself. Concretely speaking, in that case the feature itself is published. This particular behavior for points, lines and planes enhances productivity and stability of publication usage in most of design scenarios: When you select a point, line or plane result in the 3D area (vertices, edges, planes), the feature itself is published. Moreover, this behavior is consistent with the selection performed via Generative Shape Design commands. Assembly Constraints and Published Generative Shape Design (GSD) GeometryDepending on your geometry, there are cases where constraints pointing to a certain type of published GSD features do not reconnect if, for example, you replace constrained parts. What happens is that links between constraints and the geometry do not take advantage of the publication. You can notice this behavior even if you selected the geometry through the Publication node. GSD features concerned are those whose geometrical results depend on the number and type of the parents used for the result. This is the case of features such as Intersect or Project. The solution to this, is to publish the geometrical result, not the feature itself. In concrete terms, rather than publishing the Intersect feature, you recommend you publish the vertex, not the point. The application reminds you of this behavior when you are setting constraints on published features through the following warning message:
|
||||||
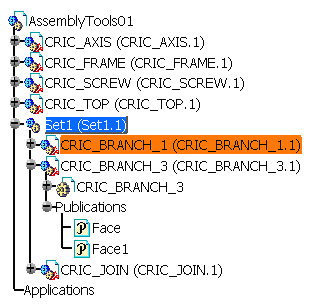
Publishing in Assembly DesignWhen publishing geometry in the Assembly Design workbench, the Browse button is available in the Publication dialog box. Clicking the button launches the Component Publication dialog box that displays only the published elements belonging to the levels inferior to the active level. In the following example, the user is publishing an element of CRIC_BRANCH_1. When clicking the Browse button, the Component Publication dialog box displays published faces belonging to CRIC_BRANCH_3. |
||||||
|
|
||||||
 This capability works as a filter: it does not display the whole publications of the assembly. Thus, you will use it as an help for selecting already published elements whenever you wish to replace published elements. Highlighting Published ElementsIn a CATProduct document, regardless of the active level and where the selection is made in the tree or in the geometry area, pointing at or selecting published elements highlights the published elements only, not the publications node in the tree. |
||||||
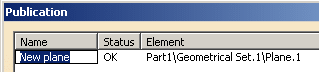
Naming RulesRules for publication names have been defined to follow naming rules used for database object names. Consequently, publication names must not contain any forbidden characters like: "!" or ":" or not valuated or "<" or ">" or " " at the end of the publication name. If you select an element whose name contains one of these forbidden characters, because the object's name is used as the default name for the publication, the application does not publish the element. What you need to do is edit the default name. Renaming a Published ElementRenaming a published element may affect an external CATPart or CATProduct document that uses the publication via any CATIA mechanisms available (for instance via Import with Links). When renaming a published element, the operation is performed in the active document. Once the publication is confirmed, the application checks and detects the documents in session which are affected by the new name assigned to the published element. If impacted linked documents need to be updated, a window opens for each impact found. The application then proposes to reconnect the links in the impacted documents in session. You can update your documents if you have validated the Publication operation (click OK). You can then save your active and impacted documents. RecommendationsWe recommend you follow the procedure above to avoid any corrupted data links in your documents. If you do not reconnect your links, you may be not able to recover the documents that have links to the original publication, and later on, not even able to re-synchronize your data. Generally speaking, do not rename publications when this induces impacts. We strongly recommend you always rename published elements with caution, and this when you are sure that the publication is not used elsewhere or if the whole product is loaded (impacts are detected only in session, if impacted documents are not loaded, impacts are not taken into account). Replacing a Published Element
|
||||||
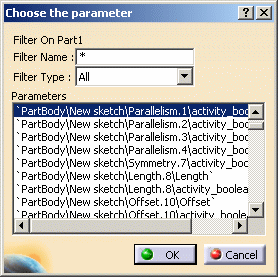
Publishing Parameters
|
||||||
Importing and Exporting Published NamesPublished names can be gathered in ASCII .txt files. To export published names to an ASCII .txt file,
To import published names to an ASCII .txt file,
|
||||||
|
|
|||||
What Happens When Deleting a Published Element?When deleting a published element, the application informs you that this element is published. What you need to do is confirm the deletion (Yes) or cancel it (No). |
||||||