Templates that have been modeled and saved in Process Engineer can be imported into DPM for further detailing. The use of templates encourages process plan reuse and reduces time spent in planning. It can also serve as a tool to establish rules and best practices in the planning stage.
Inserting a process and/or resource from a template
-
Insert a project from the Manufacturing Hub via Insert > Manufacturing Hub Object > PPR from a Project.
-
Select Insert > Manufacturing Hub Object > Instantiate from Template, or click Instantiate from Template
 in the Manufacturing Hub Commands toolbar.
The Insert Processes/Resources From A Template dialog box appears: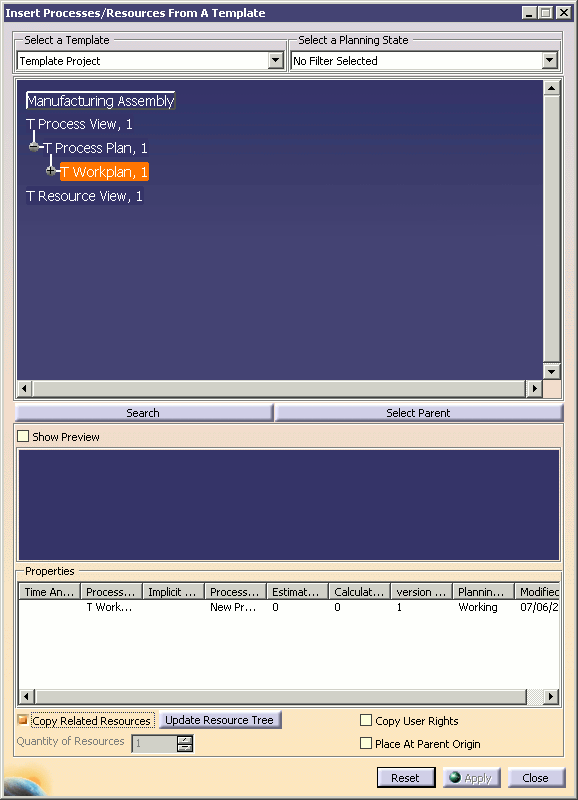
-
Selecting a template
All of the templates that are associated with the current master plantypeset are available in the Select a Template drop-down combo box:
The process/resource tree is displayed based on the template selected. Note that multiple processes, resources and manufacturing assemblies may be selected from the tree. The Properties section at the bottom of the dialog box is updated each time a process or resource is selected. Columns shown in the Properties section correspond to attributes configured as Display in Browser in Process Engineer.
-
Selecting a planning state
This drop-down combo box allows you to select a specific planning state to filter the processes, resources and manufacturing assemblies shown.
-
Searching for a process, resource or manufacturing assembly
The Search button can be used to locate processes, resources and manufacturing assemblies in the database. The PPR Search dialog box works identically to that described for the Manufacturing Hub Search command. User attributes defined in Process Engineer for the selected plantype can also be used as search criteria.
After a process or resource has been selected from the Search Results, the PPR Search dialog box is closed and the selected item is highlighted in the tree.
-
Selecting a Parent
See Instantiate from Template command behavior below. -
Previewing resources
Enable the Show Preview checkbox to display a selected resource in the preview window. (Note that the previewgraphic attribute must be set in Process Engineer to utilize this functionality.)
When multiple resources are selected, the first selected resource is shown in the preview.
-
Copying Related Resources
When selecting both processes and resources, Copy Related Resources can be enabled to copy the resources associated to any selected processes.
After the desired process node is selected, the resource tree can be expanded to highlight the related resources by selecting Update Resource Tree. -
Specifying a quantity
When a resource is selected, multiple instances can be inserted via the Quantity of Resources spin box. Type the desired value, or use the arrows to change the value to specify the number of resources to insert.
If any other type of element is selected (such as a process or manufacturing assembly), the spin box is disabled and reset to a value of "1".
Instantiate from Template command behavior
When selecting only Process(es)
Selecting a parent process
Upon selecting one or more processes, click Select Parent to select a valid parent process in the DPM PPR tree to insert the process(es) under. If the selected process is valid (in accordance with the plantypeset definition), the process(es) will be inserted under the selected parent. If a parent process is selected that does not have the add child access right and write lock, it cannot be selected as a parent.
When selecting only Resource(s)
Selecting a parent resource
Upon selecting one or more resources, click Select Parent to select a valid parent process in the DPM PPR tree to insert the resources under. If the selected resource is valid (in accordance with the plantypeset definition), the resource(s) will be inserted under the selected parent. If a parent resource is selected that does not have the add child access right and write lock, it cannot be selected as a parent.
Positioning inserted resources
To position the inserted resources in the DPM 3D window, either select a location in the 3D space or type an absolute location in the power input box for each resource inserted. Alternatively, all resources can be placed at the origin of the parent by checking the Place at Parent Origin checkbox. If this checkbox is enabled before the resource positioning is initiated, all inserted resources will be placed by default at the origin of the selected parent. However, if the positioning of some resources is performed manually (i.e., the Place at Parent Origin option is disabled), and then the Place at Parent Origin option is enabled, then all remaining resources that have not yet been positioned are automatically positioned at the parent origin.
Note that the dialog can be closed only after the inserted resources have been positioned.
When selecting both Process(es) and Resource(s)
The Copy Related Resources option must be enabled to copy the resources associated to any selected process(es).
Selecting a parent process and resource
Upon selecting one or more processes, click Select Parent to select a valid parent process in the DPM PPR tree to insert the process(es) under. If the selected process is valid (in accordance with the plantypeset definition), the process(es) will be inserted under the selected parent. If a parent process is selected that does not have the add child access right and write lock, it cannot be selected as a parent.
After selecting a parent process, the user is prompted to select a valid parent resource in the DPM PPR tree to insert the resource(s) under. If the selected resource is valid (in accordance with the plantypeset definition), the resource(s) will be inserted under the selected parent. If a parent resource is selected that does not have the add child access right and write lock, it cannot be selected as a parent.
Positioning inserted resources
To position the inserted resources in the DPM 3D window, either select a location in the 3D space or type an absolute location in the power input box for each resource inserted. Alternatively, all resources can be placed at the origin of the parent by checking the Place at Parent Origin checkbox. In this case, the relations between the process(es) and the resource(s) are also copied and loaded in DPM.
Note that the dialog can be closed only after the inserted resources have been positioned.
When selecting one or more Manufacturing Assemblies
When the Manufacturing Assembly root node is expanded in the template browser and an AST Manufacturing Assembly node is selected, the Apply button becomes activated. A parent node can be selected in the DPM Spec Tree. When the Apply button is clicked, the selected Manufacturing Assembly node is copied under the selected parent. If a parent is not selected before Apply is clicked, the selected Manufacturing Assembly is copied directly under the Applications > Manufacturing Products node of the PPR tree in the current DPM session.
When selecting multiple manufacturing assemblies to insert, any duplicate selections (e.g., assemblies that are already children of one or more other selected assemblies) are automatically resolved, and only one instance of the selected object is inserted in the current DPM session.