When loading processes, products and resources, these filters are applied and the document will be populated such that only the those objects which fit the criteria of the defined filters will be loaded in the document. The following types of filters are supported:
Applying filters
Using the Component Filter

-
Click the
 button at the right of each
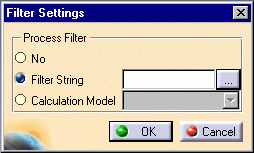
type (Process, Product, or Resource) to configure the filter settings for each. A Filter Settings dialog box is
displayed for the selected type:
-
Select one of the displayed options to indicate the type of filtering to be used. These options are defined as follows:
-
No: Do not use filtering.
-
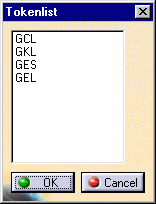
Filter String: Select from an administrator-defined list of code rules to display only those PPRs which match the selected code rules. When the
 button is clicked, a dialog box is
displayed which lists all of the code rules tokens defined in the database:
-
Calculation Model: Select from an administrator-defined list of calculation models to display only those PPRs that match the defined criteria.
-
Using the Extended Effectivity Filter

-
Click the
 button to display the Filter
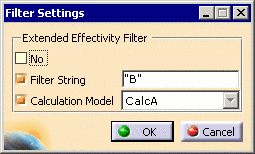
Settings dialog box for the Extended Effectivity Filter:
-
Select one of the displayed options to indicate the type of filtering to be used. These options are defined as follows:
-
No: Do not use extended effectivity filtering.
-
Filter String: Select from an administrator-defined list of code rules to display only those PPRs which match the selected code rules.
-
Calculation Model: Select from an administrator-defined list of calculation models to display only those PPRs that match the defined criteria.
Selection of the Filter String checkbox and the Calculation Model checkbox will concatenate them using the Boolean AND operator.
-
Using the Date Effectivity Filter
The Date Effectivity Filter allows for the selection of products, processes and resources based on an effective date range.
![]()
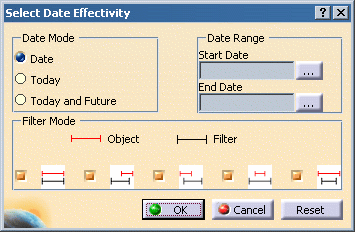
The Date Mode section allows for three different modes of date selection:
| Date | Allows for the selection of a user-specified range (defined via the Date Range section). |
| Today | Automatically sets the date range to start and end with the current date. |
| Today and Future | Automatically sets the Start Date to the current date, and leaves the End Date undefined (interpreted by DPM as infinity). |
Select the Date Range.
- If the Date Mode selected in the previous step is "Date", use the
 buttons to open a Select Date
dialog box and define Start and End effectivity dates.
 -
If the Date Mode is set to "Today" or "Today and Future", the Start and End effectivity dates are set automatically based on the current date.
The Filter Mode section determines how the Start and End Dates are applied. Each filter is represented by:
- a red line representing the start and end dates defined for an object, and
-
a black line representing the start and end dates defined in the Date Range section.
The five filters may be used in any combination, and are defined as follows:
| Show objects which both begin and end on the same dates as defined in the Date Range section. | |
| Show objects which begin after the Start Date and before the End Date defined in the Date Range section. | |
| Show objects which end within the Start and End dates defined in the Date Range section. | |
| Show objects which start after the Start Date and end prior to the End Date defined in the Date Range section. | |
| Show objects which start before the defined Start Date, and end after the the defined End Date. |
Using the Line Filter
The Line Filter allows for the selection of products, processes and resources based on a line number.
![]()
Click the ![]() button of the Line Filter to display the Select Line Number dialog box.
button of the Line Filter to display the Select Line Number dialog box.
Select the desired line number and click OK.
Using the Label Filter
The Label Filter allows for the selection of products, processes and resources based on a defined label.
![]()
Click the ![]() button of the Label Filter to display the Select Label Filter dialog:
button of the Label Filter to display the Select Label Filter dialog:
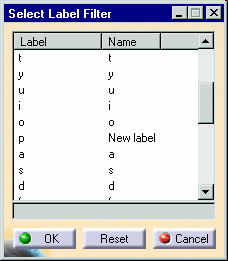
The labels and names may be sorted by clicking on either the Label or Name column headers.
Using the Attribute Filter
The Attribute Filter allows for the selection of products, processes and resources based on a user-defined set of attribute criteria.

-
Click any of the
 buttons of the Attribute Filter to
display the Specify Filter(s) dialog:
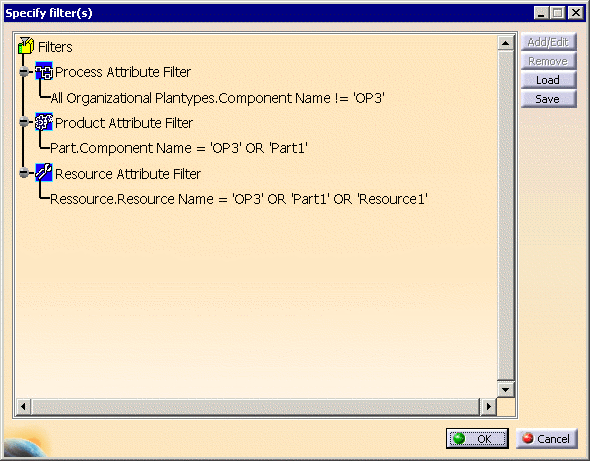
This dialog lists defined Process, Product, and Resource Attribute Filters, and allows for filters to be added or edited, removed, loaded and saved.
Adding a new product or resource attribute filter
-
Click Process Attribute Filter, Product Attribute Filter or Resource Attribute Filter to highlight it.
-
Click the Add/Edit button
 to display the Specify Filter
Criteria dialog box:
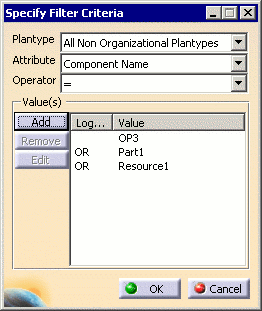
This dialog specifies four different areas of criteria, defined as follows:
Plantype
Allows for the creation of a criterion for a given plantype, or for either all of the organizational plantypes or all of the non-organizational plantypes of the filter scope (process, product or resource plantypes). Note that the values of the other fields of this panel are lost when the Plantype field is modified.Attribute
Lists the available attributes (all attributes with the "Display in Finder" option set in the Process Engineer Configuration manager) for the selected object type.Operator
Lists the different operators based on the the Attribute type selected (=, != LIKE, NOT LIKE for string attribute, =, !=, >, <, >=, <= for numerical attributes).Value
Displays the value(s) to use for filtering for this attribute. By default, only one value can be defined per attribute. However, if the operator used for the attribute is = or !=, then several values may be specified (combine with an OR operator for the = operator and by and AND operator for the != operator). Three buttons are available to manage the value(s):Add allows the user to enter a value for the attribute. When clicking on the button, a panel will be displayed to enter the value (with the value field empty when opening the panel):

Depending on the selected attribute, this field may be either a list box, date editor or text field.
Remove allows the user to remove a value from the list. This button is enabled only when an entry in the value list is selected.
Edit allows for an existing value to be edited. This button is enabled only when an entry in the value list is selected. When clicking on the button, a panel will be displayed to update the value selected in the list:

Saving a filter
The Save button
![]() is used to save a filter for
reuse. Filters are saved in the database and available for any user from any machine via the Load button (described
below), and are assigned to the master Plantypeset of the current project.
is used to save a filter for
reuse. Filters are saved in the database and available for any user from any machine via the Load button (described
below), and are assigned to the master Plantypeset of the current project.
When the Save Filters dialog is displayed, use the checkboxes to select a filter type to save and enter the name of the filter(s) to save in the Name field:
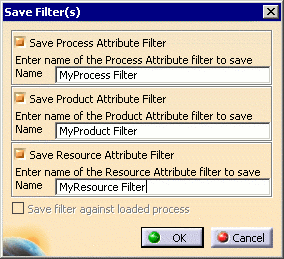 |
The Save filter against loaded process option is available is disabled when defining attribute filters at project load time. A filter can be saved an associated to a process only after a process has already been loaded, therefore the Load Manufacturing Context and Edit PPR Hub Document's Information commands allow for attribute filters to be saved against the loaded process.
Loading a saved filter
The Load filter button
![]() displays a panel combo boxes
listing the existing Process, Product, and Resource filters for the master plantypeset of the current project.
Select a filter and click OK to load it.
displays a panel combo boxes
listing the existing Process, Product, and Resource filters for the master plantypeset of the current project.
Select a filter and click OK to load it.
|
|
Delete buttons are available in this panel to delete a selected filter.
When filters saved in the database are loaded and used to filter the project, the saved filter names used for Process, Product and Resource components are displayed in the three edit boxes (Process, Product and Resource), respectively.
When any process, product or resource filter saved in the database is loaded using the Load filter button, the next time the Save Filters dialog is displayed the checkbox to save that type of filter (Process, Product or Resource) will be checked by default and the name of the loaded filter will be set by default in the corresponding edit box in the Save Filters dialog.
When the filters dialog is opened, the last used filters (if any) are displayed by default.
Prior to loading a process in DPM: The last set of filters applied by a given user for a given master Plan Type Set are remembered by default. The last used filters are stored for the user as a default, and will be present in the filter tree the next time the user loads a project of the same master Plan Type Set and invokes the filters dialog. These filters are automatically applied for this user when re-opening a project of the same Plan Type Set.
After a process is loaded in DPM: The last set of filters saved for a particular process is remembered and displayed in the filters dialog if that process is loaded and the filters dialog is invoked through the Edit PPR Hub Document's Information command. If filters are not saved against that particular process, then the last set of filters applied against the same master Plan Type Set of the project are displayed.
Attribute filter limitations
- The attribute filter will work on attributes of type string, float, and Boolean. (It will not work on effectivity or code rule attributes, for example.)
- An elementary condition will have the form <attribute name> <comparison operator> <value>
- Comparison operators are:
== equal != not equal LIKE sub-string match, only for string NOT LIKE negated sub-string match, only for string < inferior to, not for string > superior to, not for string <= inferior or equal to, not for string >= superior or equal to, not for string - Only attributes configured as Display in Finder in Process Engineer can be filtered.
- The list of attributes available for the Search in PPR Hub command are also configured as Display in Finder in Process Engineer. Therefore, any attribute configured for use in the Search functionality is also available for use in the attribute filtering functionality and vice versa.
- Only one set of filters (one each for Process, Product and Resource) can be saved against a process.
- The attribute filter name specified while saving the filter to the database must be unique across the Master Plan Type Set.
- The filter saved against a process can be modified only if that process is currently loaded in DPM and the process is in an In-Work state.
- With regard to product and resource attribute filters, there is no distinction between the manufacturing context attribute filter and the project attribute filter as both are a set of attribute criteria. These filters can be used transparently for filtering in either case.
Using Implicit Filtering
Typically, the activation of a component in an expansion tree is dependent only upon its effectivity based on the current project filter. When enabled, Implicit Filtering makes the activation of components defined as Link Activated or Sibling Activated dependent on the activation of related components, child components and sibling components.
 |
Behavior of Link Activated processes
A parent process defined as Link Activated in the Manufacturing Hub passes the project filter only if there is at least one visible child process for the current filter settings. A child process defined as Link Activated passes the project filter only if there is at least one linked product or resource that passes the filter.
Behavior of Sibling Activated processes
A process defined as Sibling Activated in the Manufacturing Hub passes the project filter only if there is at least one visible sibling component that is not defined as Sibling Activated for the current filter settings. Typically this feature will be used to handle non value-adding operations (e.g. cleaning operations) that only have to be performed when there is at least one effectivity driven, value-adding operation (e.g. drilling operation) under the same parent process.
Notes
Providing additional filter information
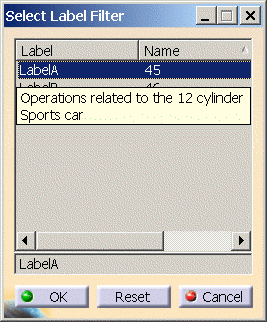
Additional information for line number, label, calculation model, and option code filters can be provided via a tooltip displayed in DPM. Information displayed by the tooltip is derived from the Note attribute defined for each filter in Process Engineer:
If the example above was defined for a label filter named LabelA in Process Engineer, the resulting tooltip would look like this in DPM when LabelA is selected:
|
|
Next, specify an action proxy and a mod statement, as well as specify a planning state if this is a Change Management Controlled project.

