Create the Keywords
-
From the Start menu, access the Infrastructure>Catalog Editor workbench. The Catalog Editor opens.
-
Click the Add Family icon to add a family to your catalog. Click OK in the Component Family Definition dialog box. Double-click the family in the tree.
-
Click the Add Keyword icon
 or select Insert > Add Keyword... from the main menu to
display the Keyword Definition dialog box.
or select Insert > Add Keyword... from the main menu to
display the Keyword Definition dialog box. -
Specify a name for the new keyword, Logical Name.
-
Use the drop-down list to select the keyword Type, String. This list provides all knowledge types, i.e. Integer, String, Boolean, Angle, and so on.
-
Click the Add Keyword icon
or select Insert > Add Keyword... from the main menu to
display the Keyword Definition dialog box. -
Specify a name for the new keyword, Type.
-
Use the drop-down list to select the keyword Type, String.
-
Check the With discrete list of values check box and click OK. The Legal Value Definition dialog box is displayed. Enter the following values and click OK when done.
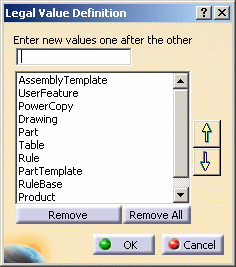
- AssemblyTemplate
- PowerCopy
- Drawing
- UserFeature
- Product
- RuleBase
- PartTemplate
- Rule
- Analysis
- Part
-
Click the Add Keyword icon
or select Insert > Add Keyword... from the main menu to
display the Keyword Definition dialog box. -
Specify a name for the new keyword, Usage.
-
Use the drop-down list to select the keyword Type, String. Click here to open the created catalog.
Add Components
-
Open the KwrUDF.CATPart file.
-
In the Catalog Editor, Click the Add Component icon (
 ).
The Description Definition dialog box opens.
).
The Description Definition dialog box opens. -
Click Select external feature and click Pad2 in KwrUDF.CATPart.

- If you work with Rules, Rule Bases, PowerCopies, User Features, Assembly Templates and Part Templates, open the document that contains this feature, and use the Select external feature command in the Catalog Editor to select it. If you don't use this command, the document that contains the feature will be selected and not the feature itself.
- If you work with files, click Select Component and select the file in the File Selection window. Click Open when done.
-
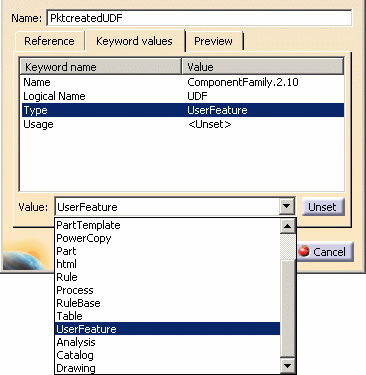
Click the Keyword values tab.
-
Click the Logical Name line and enter the desired logical name, UDF in the Value field. Click OK when done.
-
Click the Type line and select the corresponding type (UserFeature) from the drop down list. Click OK when done.
- In a shared directory
- In SmarTeam (inside a document or not)
- In ENOVIA V5 (inside a document or not).