- Diffusion laws:
 Constant
Law: deforms all the selected control points identically.
Constant
Law: deforms all the selected control points identically.
Using this law, you can translate all selected points at a time, even if they belong to several surfaces or curves, provided the active support options Normal to compass and Compass Plane. Linear
Law: deforms all the selected control points with a linear law.
Linear
Law: deforms all the selected control points with a linear law. Concave
Law: deforms all the selected control points
positioned on a linear
concave.
Concave
Law: deforms all the selected control points
positioned on a linear
concave.
This option is P2-only. Convex Law:
deforms all the selected control points
positioned on a linear convex.
Convex Law:
deforms all the selected control points
positioned on a linear convex.
This option is P2-only. Bell Law:
deforms all the selected control points with a bell law.
Bell Law:
deforms all the selected control points with a bell law.
This option is P2-only.
- To link/unlink the diffusion laws with the cross diffusion laws:
 Link Laws:
diffusion laws with the cross diffusion laws are linked, the selected
cross diffusion law selects automatically the equivalent diffusion law.
Link Laws:
diffusion laws with the cross diffusion laws are linked, the selected
cross diffusion law selects automatically the equivalent diffusion law. Unlink Laws:
diffusion laws with the cross diffusion laws are unlinked.
Unlink Laws:
diffusion laws with the cross diffusion laws are unlinked.
-
Click the Control Points icon:

The Control Points dialog box appears. 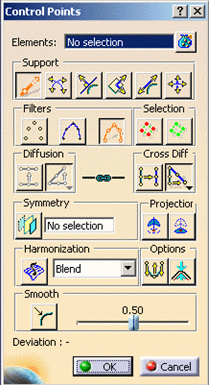
-
Move the Compass onto Surface.3.

-
Click the Normal to compass icon if not already selected:

-
Click the Mesh only icon from the Options frame:

-
Click the Cross Constant Law icon if not already selected:

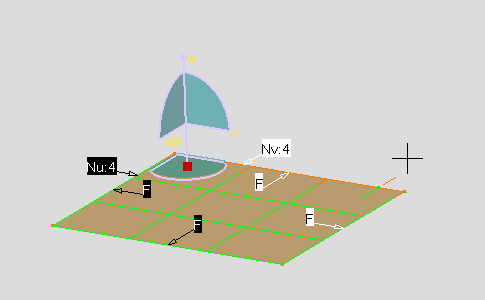
Constant Law
Follow steps 1 to 5 and then work on the steps mentioned below.
-
Select the mesh line.
-
Drag the control point to the corner of the surface, close to the cursor has shown in the image below.

The deformation applied to one point is applied to all other selected points.
In the image below, the manipulator is displayed in a corner of the surface, but all points lying on the selected mesh lines undergo the same translation.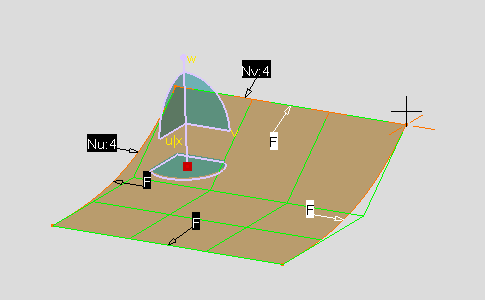
-
Click OK to validate the modifications and close the dialog box.
Linear Law
Follow steps 1 to 5 and then work on the steps mentioned below.
-
Select the mesh line.
-
Drag the control point to the corner of the surface, close to the cursor has shown in the image below.
The deformation progresses along a straight line between the most distant selected points. 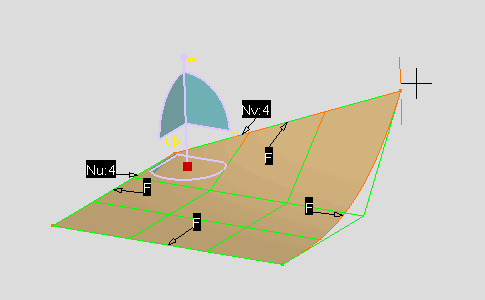
-
Click OK to validate the modifications and close the dialog box.
 Concave Law
Follow steps 1 to 5 and then work on the steps mentioned below.
-
Select the mesh line.
-
Drag the control point to the corner of the surface, close to the cursor has shown in the image below.
The deformation progresses along a concave curve between the most distant selected points. 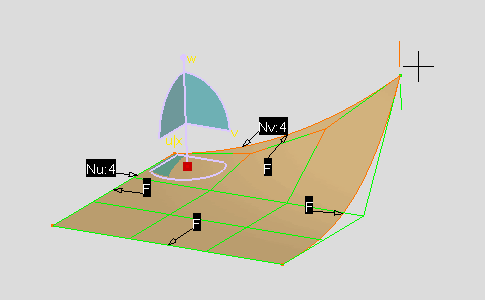
-
Click OK to validate the modifications and close the dialog box.
Convex Law
Follow steps 1 to 5 and then work on the steps mentioned below.
-
Select the mesh line.
-
Drag the control point to the corner of the surface, close to the cursor has shown in the image below.
The deformation progresses along a convex curve between the most distant selected points. 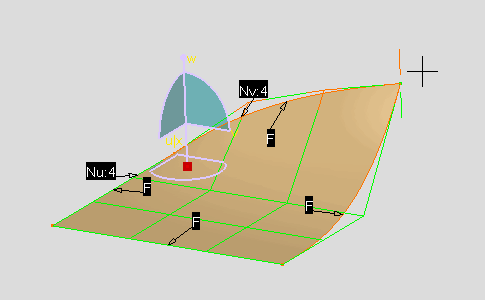
-
Click OK to validate the modifications and close the dialog box.
Bell Law
Follow steps 1 to 5 and then work on the steps mentioned below.
-
Select the mesh line.
-
Drag the control point to the corner of the surface, close to the cursor has shown in the image below.
The deformation progresses along a concave curve up to the mid-point of the most distant selected points then switches to a convex law. 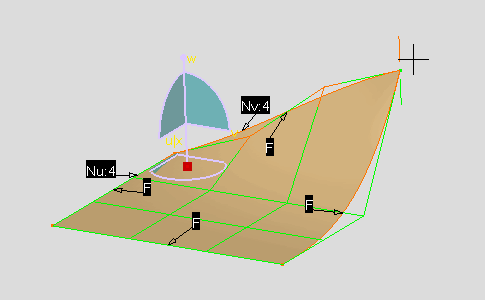
-
Click OK to validate the modifications and close the dialog box.