This task explains how to create surfaces by clicking three points in pre-existing geometry or space.
Open a new .CATPart document.
-
Click the 3-Point Patch icon
 in the Surface Creation toolbar.
-
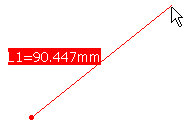
Successively click two points in space, or on already existing geometry, to define the first direction of the patch.
A line is displayed to show the direction, and a text indicates the length of the segment.
-
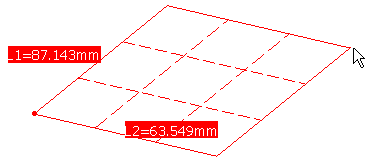
Drag the pointer.
A planar patch is pre-visualized and evolves as the pointer moves in space: the first two points making up the direction, the second length of this same patch being given by the distance between the first line and the normal projection from the pointer location onto the privileged plane containing the first point.
You can also right-click, and choose the Edit Dimensions menu item, to display the Dimensions dialog box that allows you to define exactly the second length of the patch.
-
Click a third point to define the second direction of the patch as well as its area.
The planar patch is created.

- Right-click and choose the Edit Orders menu item to edit the surface orders (U and V) at any time during the creation.
- Use the Ctrl-key to create a patch symmetrically on each side of the segment defined by the first two points.
![]()