|
This task shows how to analyze
the connection between surfaces' borders, and between a surface's border
and its projection on a surface.
|

|
Checking Connection Between a Surfaces' Border
|
 |
Open the
FreeStyle_08.CATPart document. |
|
|
-
Select both surfaces to be analyzed.
|
| |
-
Click the Surface-Surface Connection icon:

|
| |
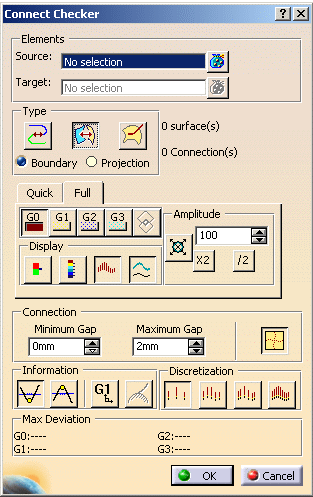
The Connect Checker dialog box is
displayed as well as another dialog box showing the color scale and
identifying the maximum and minimum values for the analysis type. |
| |
|
| |
The Auto Min Max button enables to
automatically update the minimum and maximum values (and consequently all
values between) each time they are modified. |
| |
 |
|
Check the
Internal edges option if you want to analyze the internal
connections.
By default, the icon is inactivated. |
 |
Two cases are available:
-
Surfaces are isolated.
Only geometrical connections are checked, that is all pairs of
neighboring surface edges within the tolerance given by the Maximum gap.
Depending on the Maximum gap value, interference connections may be
detected, for instance when surfaces have a size smaller the Maximum gap.
In this case, you must decrease the Maximum gap value or join the
surfaces to be analyzed (see next point)
-
Surfaces are joined (using the Join command
for instance) and the Internal edges option is checked.
Topological connections, that is all edges shared by
two topological surfaces are checked first. Then, the corresponding pairs of surface edges
are checked to detect any geometrical connections within the tolerance
given by the Maximum gap.
|
| |
-
Choose the analysis type to be performed: Distance
(G0),
Tangent (G1), Curvature (G2) and Curvature-Tangency (G3).
|
| |
-
Set the Maximum gap
above which no analysis will be performed. All elements apart from a
greater value than specified in this field are considered as not being
connected, therefore do not need to be analyzed.
Be careful not to set a Maximum gap
greater than the size of the smallest surface present in the document.
|
| |
-
Select any of the two color scale mode:

-
The Auto Min Max
button enables to automatically update the minimum and maximum values (and
consequently all values between) each time they are modified.
|
| |
|
|
|
 |
The color scale settings (colors and values) are
saved when exiting the command, meaning the same values will be set next
time you edit a given connection analysis capability.
However, new settings are available with each new connection analysis. |
|
-
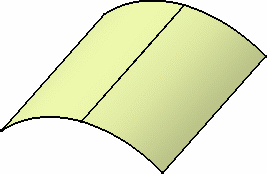
Check the analysis results on the geometry.
|
| |
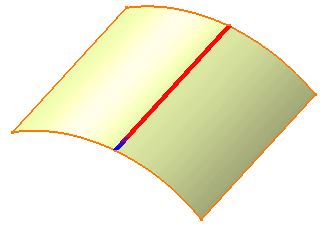
Here we are analyzing the distance between the
surfaces. Each color section indicates on the geometry the distance between
the surfaces. |
| |
 |
|
|
There may be a tangency discontinuity while a
curvature continuity exists. This may appear for instance in the case of
two non tangent planar surfaces. |
|
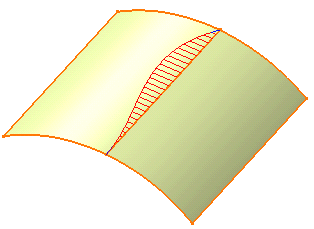
From the Connect Checker dialog box, you can
choose a number of visualization and computation options:
-
the comb: that is the spikes
corresponding to the distance in each point
-
the envelope: that is the curve
connecting all spikes together
-
Information: that is the minimum
and maximum values displayed in the 3D geometry
|
| |
Finally, the scaling option lets you define the
visualization of the comb. In automatic mode the comb size is
zoom-independent and always visible on the screen, otherwise you can define
a coefficient multiplying the comb exact value. |
|
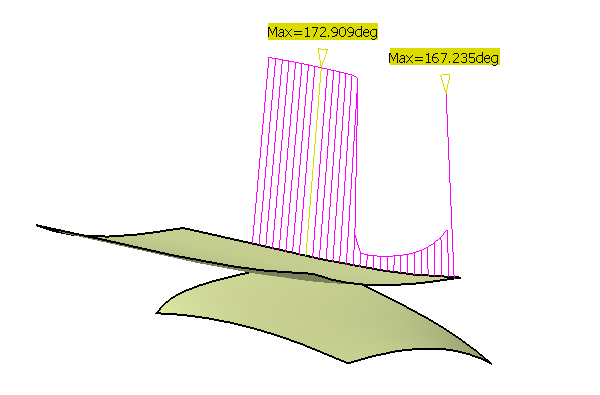
-
Check the Information button.
|
| |
Two texts are displayed on the geometry
localizing the minimum and maximum values of the analysis as given in the
Connect Checker dialog box. |
| |
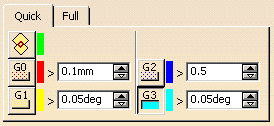
 |
|
You can also choose the discretization, that is
the numbers of spikes in the comb (check the Comb option to see
the difference.
The number of spikes corresponds to the number of points used for the
computation:
-
Light: 5 spikes are displayed.
This mode enables to obtain consistent results with the visualization of
sharp edges.
An edge is considered as sharp if its tangency deviation is higher than
0.5 degree. To only detect tangency deviations on sharp edges, specify a
deviation of 0.5 degree minimum.
To visualize sharp edges, make sure the View > Render Style >
Shading with Edges and Hidden Edges option is checked.
-
Coarse: 15 spikes are displayed
-
Medium: 30 spikes are displayed
-
Fine: 45 spikes are displayed
|
| |
 |
|
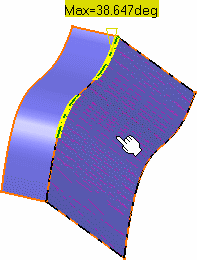
The number
of selected elements and the number of detected connections are displayed
at the bottom of the dialog box. |
|
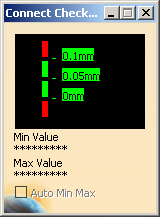
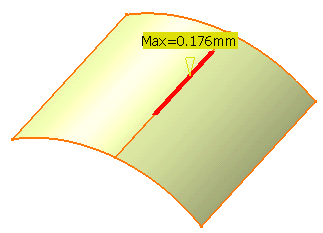
-
Click the Quick... button to obtain a
simplified analysis taking into account tolerances.
|
| |
The comb is no longer displayed.
The Connect Checker dialog box changes to this dialog box.
The Maximum
gap and information are retained from the full analysis.
The maximum deviation value is also displayed on the geometry. |
| |
|
| |
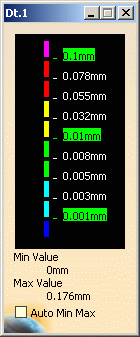
You can use the check button to select one or
several analyses (up to three). As a consequence, the colorful area
displaying the deviation tolerance between the surfaces shows the
continuity whose value is the lowest. |
|
|
In the case you select several types of
continuity, the Information button is grayed out. |
| |
-
You can check the Overlapping
button to highlight where, on the common boundary, the two surfaces
overlap. In this case the other analysis types are deactivated.
-
You can check the Information
button to display the minimum and maximum values in the 3D geometry, or
uncheck it to hide the values.
|
|
-
Use the spinners to define the deviation tolerances.
|
| |
For example, the red area indicates all points
that are distant of more than 0.1 mm.
The maximum deviation values on the current
geometry are displayed to the right of the dialog box. |
| |
 |
|
-
Click OK to create the analysis.
|
| |
The analysis (identified as Connect Checker Analysis.x) is added to the specification tree (P2 only).
This allows the automatic update of the analysis
when you modify any of the surfaces, using the control points for example.
If you do not wish to create the analysis, simply click Cancel. |
 |
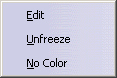
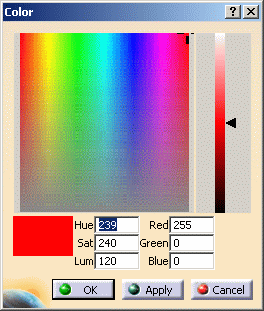
-
You can edit the color range in both dialog
boxes by double-clicking the color range manipulators (Connect Checker)
or color areas (Quick Violation Analysis) to display the Color
chooser.
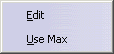
-
If you wish to edit the Connection Analysis,
simply double-click it from the specification tree.
-
If you no longer need the Connection Analysis,
right-click Connect Checker Analysis in the specification tree, and
choose Delete.
-
The curvature difference is calculated with
the following formula: (|C2 - C1|) / ((|C1 + C2|) / 2)
The result of this formula is between 0% et 200%.
|
|
|
In the case of a curvature analysis type, the
result is not guaranteed if a tangency discontinuity exists. |
|
|
|
|
|
|
Connection Analysis will be done only if
Projection result of Source Surface border on Target Surface is of type
“edge” only. |
|
|
Checking Connections Between a Surface's Border and Its Projection on a
Surface
|
|
|
Open the
FSS_CCK_Surface_Surface01.CATPart document. |
| |
-
Select both surfaces to be analyzed.
-
Click the Surface-Surface Connection
icon:
and Projection option
in the Connect Checker
analysis dashboard.
The
Connect Checker
dialog box is
displayed as well as another dialog box showing the color scale and
identifying the maximum and minimum values for the analysis type.
|
| |
|
| |
The Auto Min Max button enables to
automatically update the minimum and maximum values (and consequently all
values between) each time they are modified.
Check the Internal edges option if you want to analyze the internal
connections.
By default, the check box is unchecked.
|
| |
Two cases are available:
-
Surfaces are isolated.
Only geometrical connections are checked, that is all pairs of
neighboring surface edges within the tolerance given by the Maximum gap.
Depending on the Maximum gap value, interference connections may be
detected, for instance when surfaces have a size smaller the Maximum gap.
In this case, you must decrease the Maximum gap value or join the
surfaces to be analyzed (see next point)
-
Surfaces are joined (using the Join command
for instance) and the Internal edges option is checked.
Topological connections, that is all edges shared by
two topological surfaces are checked first. Then, the corresponding pairs of surface edges
are checked to detect any geometrical connections within the tolerance
given by the Maximum gap.
|
| |
-
Choose the analysis type to be performed:
Distance
(G0),
Tangency
or
Curvature
(G1), Tangent
(G2) and
Curvature
(G3).
-
Set the
Maximum gap
above which no
analysis will be performed. All elements apart from a greater value than
specified in this field are considered as not being connected, therefore
do not need to be analyzed. Be careful not to set a
Maximum gap
greater than the
size of the smallest surface present in the document.
-
Set the
Minimum Gap
to get
connection between two input elements, the gap between those two
elements must be greater than or equal to
Minimum Gap.
-
Check the analysis
results on the geometry. The subsequent sections show the result of
connecting a curve and a surface with a combination between G0, G1 or G2
and Projection.
|
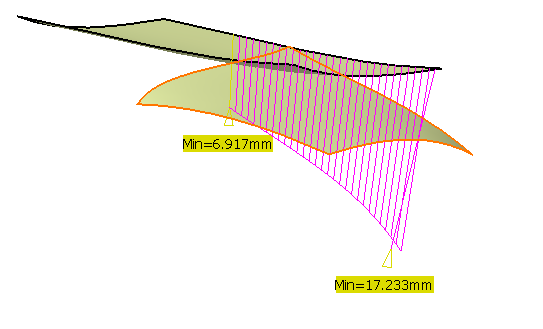
|
G0 Continuity
|
| |
 |
|
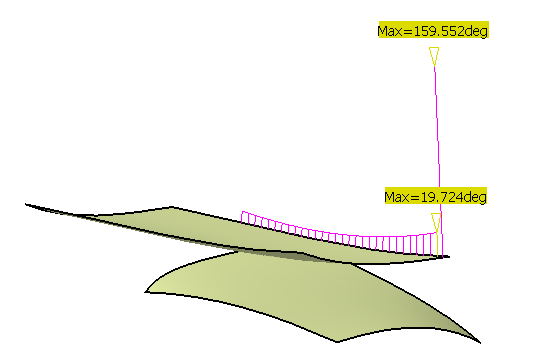
G1 Continuity
|
| |
 |
|
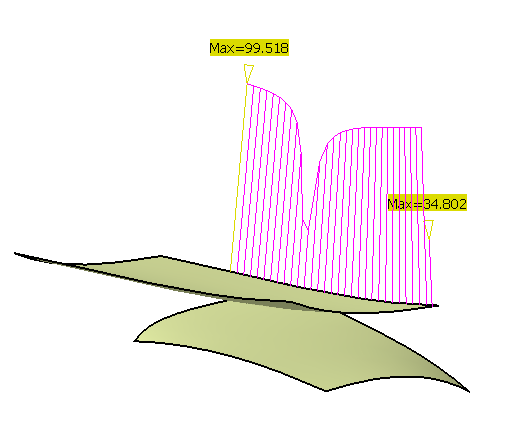
|
G2 Continuity
|
| |
 |
|
|
G3 Continuity
|
| |
 |