Create a new drawing.
-
Click Text
") in the Annotations toolbar.
in the Annotations toolbar. -
Click anywhere in the drawing. A green frame appears, as well as the Text Editor dialog box.
-
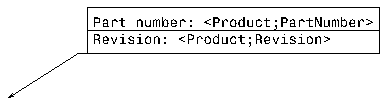
In the Text Editor dialog box, type Part number:.
-
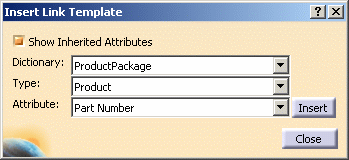
Without closing the Text Editor dialog box, right-click the frame and select Insert link template.

-
In the Insert Link Template dialog box which is displayed, select the ProductPackage dictionary, the Product type and the PartNumber attribute, and click Insert.
-
Back in the Text Editor dialog box, press the Enter key and type Revision:.
-
Back in the Insert Link Template dialog box, select the Revision attribute (leave the other fields as is), click Insert and then Close.
-
Click OK in the Text Editor dialog box. The text template is now created.

-
Make sure the text template is selected and click Frame
 in the Text Properties toolbar.
 -
From the Frames sub-menu, choose the Scored Rectangle frame
 .
. -
Right-click the text template, and select Add Leader.
-
Click in the drawing to end the leader creation. The text template is now set.
-
Right-click the text template, and select Properties.
-
Click the Feature Properties tab in the Properties dialog box which is displayed.
-
In the Feature Name field, type Part number & Revision and click OK. You will use this feature name to identify this text template in the future.
-
Create another text by repeating steps 1 to 3, this time typing Part name: in the Text Editor dialog box.
-
Repeat steps 4 and 5, this time selecting the Name attribute in the Insert Link Template dialog box.
-
Click Close in the Insert Link Template dialog box and then OK in the Text Editor dialog box. The text template is now created.
-
Make sure the text template is selected and in the Graphic Properties toolbar, choose green from the Color list. The text template is now set.

-
Repeat steps 13 to 15, this time typing Part name in the Feature Name field. You will use this feature name to identify this text template in the future.
-
Select File > Save As and save the drawing as a .CATDrawing document.
Now that your text templates are defined, you need to store them in a catalog.
![]()