- sketched elements
- generative elements
- part-sketched, part-generative elements
In this task, you will learn how to create an area fill on a drawing containing a mix of sketched and generative elements.
Open the GenDrafting_Area_Fill.CATDrawing document. This drawing is a generative one.
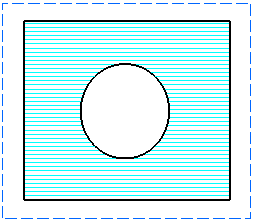
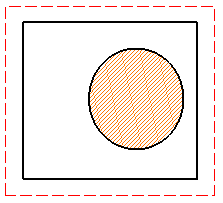
Define your area fill profile by creating lines so that your drawing looks like the figure shown here. In this example, sketched elements (the ones you create) are selected (they are shown in red), and generative elements are shown in black.
|
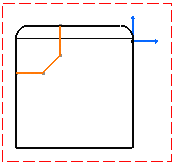
The area fill profile will therefore consist of both sketched and
generative elements.
You do not need to activate the
view in which you are going to create an area fill.
-
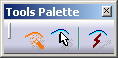
Click Area Fill Creation
") in the Dress-Up toolbar.
in the Dress-Up toolbar.The Tools Palette toolbar appears.
Click Automatic Detection
") (the complete toolbar is described below) and then click inside the area
for which you just defined the profile, under the line which represents
the fillet edge.
(the complete toolbar is described below) and then click inside the area
for which you just defined the profile, under the line which represents
the fillet edge.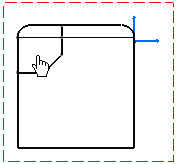
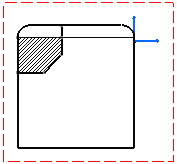
The software automatically detects the area to fill based on where you clicked and fills this area with the selected pattern. The Tools Palette toolbar disappears.
Optionally, you can select another pattern for your area fill. To do so:
Make sure the area fill is selected and click the down arrow besides the Pattern
 icon in the Graphic
Properties toolbar.
icon in the Graphic
Properties toolbar.In the Pattern Chooser dialog box, select a pattern for your area fill and click OK.
More About Area Fill Creation
Tools Palette Toolbar Description
|
Selecting one of the first two icons (Automatic Detection or Profile Selection) lets you define your area fill selection mode.
Selecting or not the third icon (Create Datum) lets you define if the area fill you create should be isolated or not.
You can specify the area you want to fill before or after choosing the option in the Tools Palette toolbar.
For each option, examples illustrate what kind of area fill you will get depending on where you click. Note where the cursor is located on the figures.
-
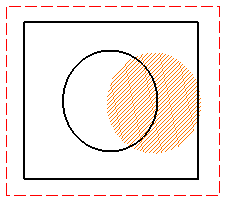
Automatic Detection
Automatically detects the area to fill based on where you click: just click inside the area you want to fill.If you click in this area: You get this area fill: 
 Profile Selection
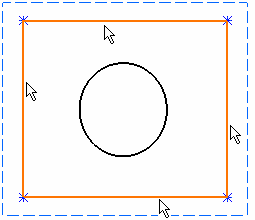
Lets you specify the area to fill: select all the 2D elements that make up the profile of the area you want to fill, and then click inside this area.
As you select elements on a view, intersection symbols (stars) appear where elements intersect. This enables you to know where the profile is open: in this case, intersection symbols do not appear. As you cannot apply an area fill to an open profile, make sure all elements intersect.
If you select these elements:
You get this area fill:
Create Datum
When activated, this icon automatically creates isolated area fill, i.e. area fill not surrounded by support geometry.When this icon is not activated, the area fill is associative with the 2D geometry, thanks to the support geometry created.
Isolated area fill Associative area fill
If the profile selected for an area fill is entirely made of generated geometry, the created area fill is always isolated, whether the Create Datum icon is activated or not.


Miscellaneous Remarks About Applying Area Fills
- Whichever option you choose in the Tools Palette toolbar, make sure the profile you select is closed, i.e. that all elements that make up its profile intersect. An error message will appear if you select a profile which is not closed.
- When you create an area fill on part-sketched, part-generative elements, extra sketched elements are added over the generative elements which make up the profile of the area fill. Also, coincidence constraints are created between the original generative elements and the added sketched elements.
- On generative drawings, the area fill is not associative with the 3D part. If you modify the original 3D part and then update the generative drawing, the area fill will not be changed.
- When a view is isolated, any area fill on the view is isolated as well. Consequently, there is no longer any relationship between the area fill and its profile.
- Select elements carefully: the area will be filled according to the elements you selected.
- If you apply modifications to the filled area, the pattern will be modified accordingly.
- In the case of superposed views, the area fill will be created on the active view (provided the active view is one of the superposed views).
- If you create text in a filled area, the background of the text will
be blanked as shown here.

- If you resize an area so that a closed profile is no more available, the area fill disappears. In the case of a rectangle that is modified so that a single line is displayed, for example.
- For more information about hatching or dotting patterns, refer to the
General remarks about patterns section in Administration Tasks > Setting
Standard Parameters and Styles > Setting Standard Parameters > Patterns.
What you have before applying the pattern:
What you get if the pattern cannot be displayed:
![]()