| Square butt weld | ||
| Singe V butt weld | ||
| Single bevel butt weld | ||
| Flare V butt weld | ||
| Flare bevel butt weld | ||
| Single U butt weld | ||
| Single J butt weld | ||
| Fillet weld | ||
| Spot weld | ||
| Back weld | ||
| Steep-flanked single-bevel butt weld | ||
| Steep-flanked single-V weld | ||
| Plug weld | ||
| Removable backing strip used | ||
| Permanent backing strip used | ||
| Surfacing weld | ||
| V flare weld | ||
| Spot weld |
|
|
Weld with flat face | |
|
|
Weld with convex face | |
|
|
Weld with concave face | |
|
|
Flush finished weld | |
|
|
Fillet weld with smooth blended face |
|
|
C finish symbol | |
|
|
F finish symbol | |
|
|
G finish symbol | |
|
|
H finish symbol | |
|
|
M finish symbol | |
|
|
R finish symbol |
| Field weld | |
| Weld-all-around | |
| Weld text side (up or down) | |
| Indent line side (up or down) | |
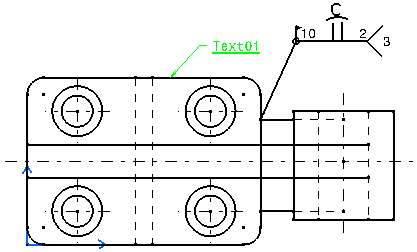
| Weld tail | |
| Reference |
-
Click the Welding Symbol icon
") from the Annotations toolbar (Symbols sub-toolbar).
from the Annotations toolbar (Symbols sub-toolbar). -
Select an element or click in the free space to position the leader anchor point, and then click to validate. The welding leader will appear.
")
-
Move the cursor to position the welding symbol and then click at the chosen location.
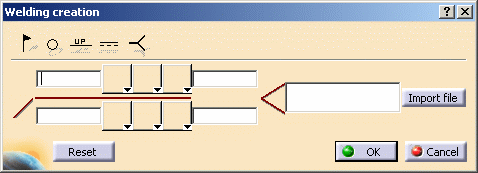
The Welding creation dialog box is displayed.
-
Type the desired values in the upper and/or lower field(s).
-
Click the symbol buttons to choose the welding symbol, complementary symbols and/or finish symbols.

The welding symbols available depend on your standard. -
If you want to add complementary indications like a field weld or a weld tail, for example, click the appropriate button.

-
Click OK.
The welding symbol is created.
-
If needed, modify the welding symbol position by dragging it to the required location.
-
Double-click on the welding symbol to edit it, and change the weld text side for example by clicking the Up/Down switch button.

- If you have selected the Use style values to create new objects
option in Tools > Options > Mechanical Design > Drafting >
Administration tab, the Welding creation dialog box is pre-filled
with custom style values (as defined in the Standards Editor). In this
case, Properties toolbars and the Tools Palette are disabled during the
creation of the welding symbol.
On the other hand, if you have not selected this option, the Welding creation dialog box is pre-filled with the last entered values (if any). In this case, Properties toolbars and the Tools Palette are active during the creation of the welding symbol. - You can reset the current style values in the Welding creation dialog box at any time using the Reset button.
- You can close the tail (reference) using a rectangle variable-size
frame
 . For more
information about adding frames, refer to
Adding Frames or Sub-Frames.
. For more
information about adding frames, refer to
Adding Frames or Sub-Frames. - At any time, you can modify the welding symbol. To do this, double-click the welding symbol to be modified and enter the modifications in the displayed dialog box.
- You can import a plain text file (.txt) to use as a reference (specification, process or other) by clicking the Import File button.
![]()