 |
This reference describes interference
results which differ depending on the interference type selected for the
analysis. |
 |
The following illustrates expected results
for the different analysis combinations:
|
| |
Clash
|
| |
Given for information only. This option is
not available. |
| |
| Clash |
No clash |
 |
 |
|
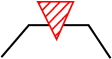
| |
Contact + Clash
|
| |
- If red zones overlap, a clash is detected.
|
| |
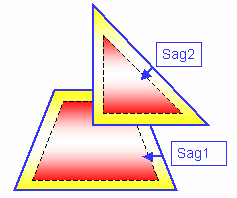 |
Legend:
- Blue contour: triangular mesh. Note: the topology is not
represented.
- Dotted line: inner sag tolerance.
- Red zone: clash zone.
- Yellow zone: contact zone based on inner sag.
|
|
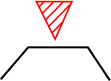
| |
- If yellow zones only overlap, a contact is detected.
|
| |
 |
Legend:
- Blue contour: triangular mesh. Note: the topology is not
represented.
- Dotted line: inner sag tolerance.
- Red zone: clash zone.
- Yellow zone: contact zone based on inner sag.
|
|
| |
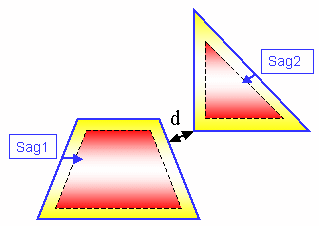
- If the shortest distance (d) between the yellow zones is less than
the total sag (sag1 + sag2), a contact is detected:
d < sag1 + sag2
|
| |
 |
Legend:
- Blue contour: triangular mesh. Note: the topology is not
represented.
- Dotted line: inner sag tolerance.
- Red zone: clash zone.
- Yellow zone: contact zone based on inner sag.
|
|
| |
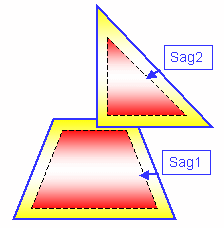
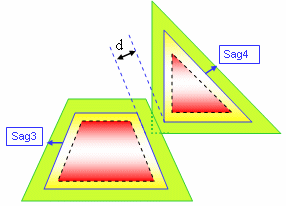
- Same illustration as below showing outer sag (green zone)
|
| |
 |
Legend:
- Blue contour: triangular mesh. Note: the topology is not
represented.
- Dotted line: inner sag tolerance.
- Red zone: clash zone.
- Yellow zone: contact zone based on inner sag.
- Green zone: contact zone based on outer sag.
- Yellow + Green zones: total contact zone.
|
|
| |
Clearance + Contact + Clash
|
| |
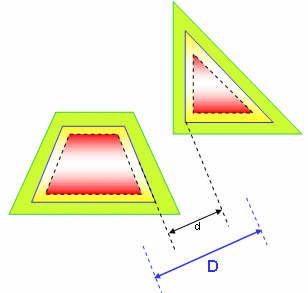
- If the total sag (sag1 + sag2) is less than the shortest distance
(d), and the shortest distance (d) is less than the specified clearance
distance (D), a clearance is detected:
sag1 + sag2 < d < D
|
| |
 |
Legend:
- Blue contour: triangular mesh. Note: the topology is not
represented.
- Dotted line: inner sag tolerance.
- Red zone: clash zone.
- Yellow zone: contact zone based on inner sag.
- Green zone: contact zone based on outer sag.
- Yellow + Green zones: total contact zone.
|
|
| |
Penetration Depth
|
| |
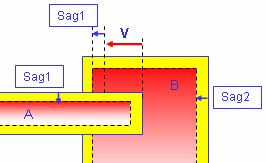
- V is the penetration vector and visualizes the penetration depth.
|
| |
| Clash |
Contact |
 |
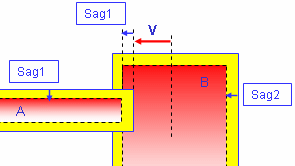 |
|
| |
- In the second illustration above, if you translate product A by V,
both products are in contact.
Important: If V < sag1 + sag2, a clash may be detected (see below).
|
| |
| Clash |
Contact |
 |
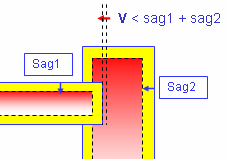 |
|
| |
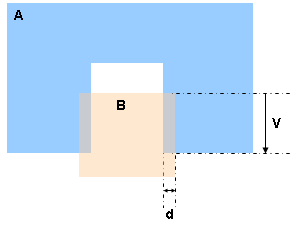
Penetration Depth versus Authorized Penetration
|
| |
- The penetration depth (an interference result) is not to be confused
with authorized penetration (an input).
- A clash is detected between products A and B.
- V is the penetration vector and visualizes the penetration depth.
- Note that V is greater than the authorized penetration in our
illustration.
- If the authorized penetration is greater than distance d,
no clash is detected.
|
| |
 |
| |
Sag
|
| |
The sag corresponds to the fixed sag value
for calculating tessellation on objects (3D fixed accuracy) set in the
Performances tab of Tools > Options > General > Display.
By default, this value is set to 0.2 mm. The sag value set in this tab is
offset from the skin inwards (blue contour) on both selection 1 and
selection 2. |