When creating or editing a feature
-
Click Split
 .
. -
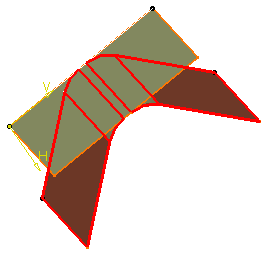
Select Extrude.1 as the Element to cut and Extrude.2 as the Cutting element.
The Warnings dialog box is displayed, listing all the problems detected during the build of the feature. 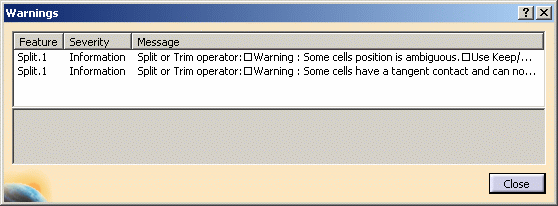
There are two types of warning messages: - Information: an information along with an advice
- Warning: it is highly recommended to solve this problem as it
may lead to potential errors

These warnings do not prevent the creation of the feature.
-
Select one of the warning messages to display the whole information in the Warnings dialog box and visualize the error in the 3D geometry.
-
Click Close to exit the dialog box.

- The Warnings dialog box behaves independently from the current
command:
- If you exit the current command or if you create the feature and there are still warnings, the Warnings dialog box stays open.
- If all warnings have been corrected, the Warnings dialog box automatically closes.
- If you close the Warnings dialog box, all warnings and error visualizations disappear. Re-update the feature to retrieve them.
- In case of an automatic update, the warning detection applies to the edited feature or the feature being created as long as all the features being updated during the command.
- The Warnings dialog box behaves independently from the current
command:

When deleting an Optional Element
-
Create a point by coordinates (X=0mm, Y=0mm and Z=0mm)
-
Create a second point using Point.1 as the Reference Point (X=100mm, Y=0mm and Z=0mm).
-
Now delete Point.1 using the Delete contextual item.
The Delete dialog box opens. -
Uncheck Delete all children to keep the geometry based upon the element to be deleted.
A warning flag appears as Point.2 is based upon Point.1. 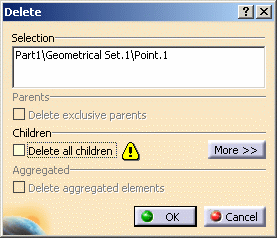
-
Click OK to confirm the deletion.
The Warnings dialog box is displayed along with an information message listing the problem.
You are advised to edit Point.2 to solve the problem. Otherwise, the Warnings dialog will be displayed each time you want to modify Point.2.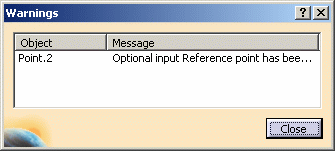
You can select and right-click the line and choose one of the contextual items:
-
Center graph: to center the selected feature in the specification tree
-
Reframe On: to reframe the 3D geometry window on the selected feature
-
-
Click Close to exit the dialog box.
-
Double-click Point.2 (in the specification tree or in the 3D geometry) to edit it.
-
Click OK to confirm the new result.
Point.2 is recomputed using the Origin (Default) as the Reference point.
![]()