Several cases are worth surveying:
Open the Blend1.CATPart document.
-
Click Blend
 .
.The Blend Definition dialog box is displayed. 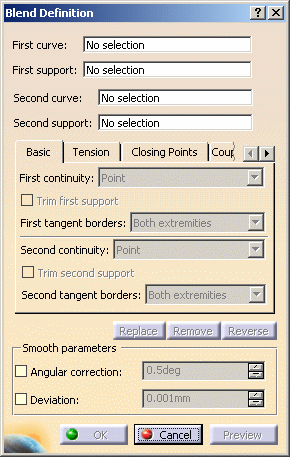
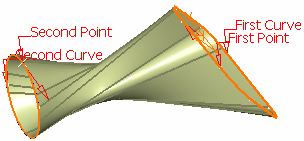
Creating a Blend between Curves
-
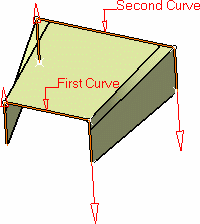
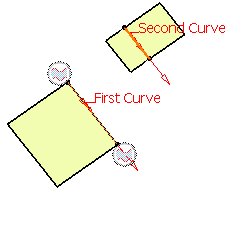
Successively select the first curve and its support, then the second curve and its support.
These can be surface edges, or any curve.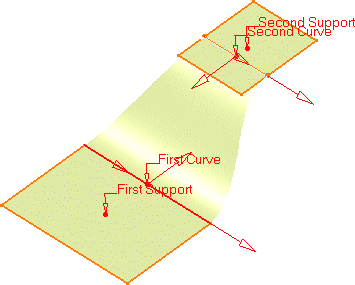
-
Set the continuity type under the Basic tab.
It defines the continuity connection between the newly created surface and the curves on which it lies. The illustration above, shows the Tangency continuity, and the following illustrations show the Point and Curvature continuity types: 
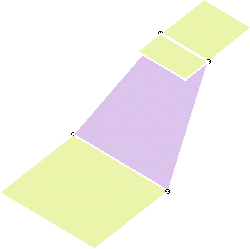
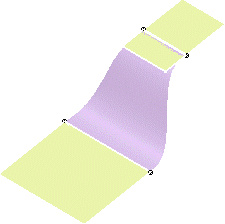
Point continuity on both limits Curvature -
Activate the Trim first/second support option, on one or both support surfaces to trim them by the curve and assemble them to the blend surface:
-
Set the tension type under the Tension tab.
It defines the tension of the blend at its limits. It can be constant or linear, and can be set for each limit independently.
A third tension type is available: S Type. It enables to set a variable tension.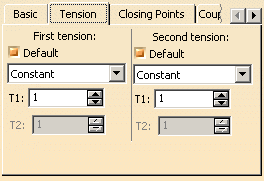

If you choose any of the tension types in the drop-down list, the Default option is deselected. -
Click OK to create the blended surface.
The surface (identified as Blend.xxx) is added to the specification tree.
Creating a Blend between Closed Contours
-
Successively select two contours.

-
Click Preview.
The surface to be generated is twisted.
To avoid this you need to define a closing point. 
This capability only applies to closed curves. By default, the system detects and highlights a vertex on each curve that can be used as a closing point, or it creates an extremum point (you can also manually select another one if you wish). -
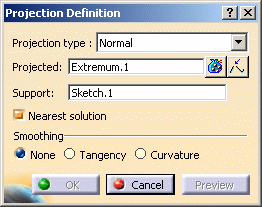
Under the Closing Points tab, use the contextual menu and choose Create Projection on the First closing point field.
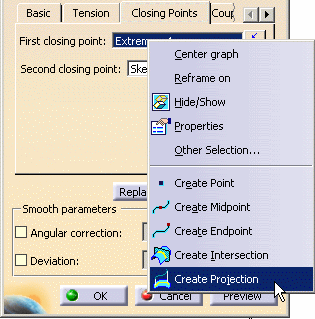
The Projection Definition dialog box is displayed. -
Select the closing point on the second contour, then the first curve onto which the point is to be projected.
-
Click OK in the Projection Definition dialog box.
-
Click OK in the Blend Definition dialog box to create the blended surface.
The surface (identified as Blend.xxx) is added to the specification tree. 
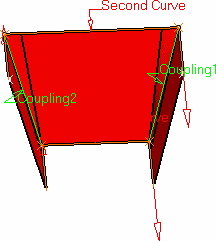
Creating a Coupling Blend
-
Select the elements to be blended and click Preview.
-
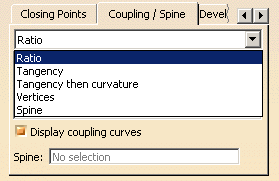
Select the Coupling / Spine tab and define the coupling type.
-
Ratio: the curves are coupled according to the curvilinear abscissa ratio.
-
Tangency : the curves are coupled according to their tangency discontinuity points. If they do not have the same number of points, they cannot be coupled using this option.
-
Tangency then curvature: the curves are coupled according to their tangency continuity first then curvature discontinuity points. If they do not have the same number of points, they cannot be coupled using this option.
-
Vertices: the curves are coupled according to their vertices. If they do not have the same number of vertices, they cannot be coupled using this option.
When using the above coupling types, the Spine field is disabled. Spine: the curve are coupled using a spine curve. This curve can either be a new curve or one of the curves already specified. If no spine is explicitly selected, the first curve is used as the default one.
Here is how the blended surface is computed using this coupling mode: at any given point on the spine, a plane normal to the spine is first computed then coupling points corresponding to the intersection of this plane with the limit curves are computed. The blended surface corresponds to the set of lines created with the coupled points. This construction is similar to the one used when creating swept surfaces using a linear profile and two guide curves.
In the Spine field, select the spine curve.
When using this option, the Display coupling curves option is disabled and any manual coupling is removed. -
-
Click in the coupling list or choose Add in the contextual menu and manually select a point on the first section.
The Coupling dialog box is displayed. 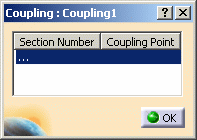
-
Select a corresponding coupling point on each section.
The Coupling dialog box is updated consequently, and the coupling curve is previewed, provided the Display coupling curves option is active.
When a coupling point has been defined on each section, this dialog box automatically disappears.
-
Click OK in the Blend Definition dialog box to create the blended surface.
The surface (identified as Blend.xxx) is added to the specification tree. 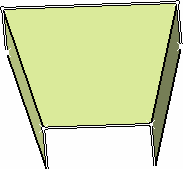

Defining Smooth Parameters
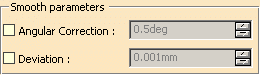
- Angular Correction to smooth the blending motion
along the reference guide curves. This may be necessary when small
discontinuities are detected with regards to the spine tangency or the
reference guide curves' normal. The smoothing is done for any
discontinuity which angular deviation is smaller than the input value,
and therefore helps generating better quality for the resulting blended
surface.
Over 0.01 degree, the smoothing is cancelled.
By default, the angular correction is set to 0.5 degree. - Deviation to smooth the blending motion by
deviating from the guide curve(s). A smoothing is performed using
correction default parameters in tangency and curvature.
By default, the deviation is set to 0.001mm, as defined in Tools > Options. Refer to General Settings for more information.
- Selecting a support is not compulsory.
- You can create closing points using the contextual menu directly on one of the selected curves, providing no closing point already exists.
- Use the Replace, Remove, or Reverse buttons, to manage the selected elements (curves, support, closing and coupling points).
- You can use the contextual menu on the texts displayed on the geometry to set the continuities, trim the supports or manage the curves and support in general.
![]()