Note that this topic only applies if you work in a Client/Server configuration.
A Collaborative Workspace is a shared directory. It is created from the CATIA V5 Wintop client depending on the rights granted to the user by the administrator on the Collaboration Server. It is stored in a dedicated repository defined on the Collaboration server.
A Collaborative Workspace is defined by a set of properties:
- A name
- A description
- A status corresponding to the current status of the workspace (Inactive, Active)
- A creation date
- An owner: The owner's identifier cannot be modified, and the list of the identifiers of all Members allowed to list and join the workspace is kept.
Note that the properties listed above can be accessed and modified by the owner and the administrator except for the creation date, the owner and the workspace identifier (UUID) attributes.
The purpose of a collaborative workspace is to:
- Centralize collaboration activities such as Collaboration Connectivity (Instant Messaging, Video, Audio, People Discovery), Collaboration Review (Whiteboarding, Application Sharing, Conferencing), Collaborative Navigation (Query / Expand, Where used analysis, Impact Analysis, Modification Notification, Actions and tasks), Collaborative Design (Management of the exchanged data).
- Gather involved users: Users that are involved in the Collaborative Workspace are linked to the P&O, described in the Collaborative Workspace data model that can be synchronized from a LDAP server. Each user has a pre-defined or a customized role. The role allows the user to perform some given commands.
- Gather related data (to the collaboration): Related data are managed by instance representation. The physical file is located in a specific vault server.
Please find below the list of actions that can be performed on workspaces:
- Creating a Workspace
- Adding a Member to a Workspace
- Joining a Workspace
- Leaving a Workspace
- Editing a Workspace
- Deleting a Workspace
- Managing a Workspace
- Listing Existing Workspaces
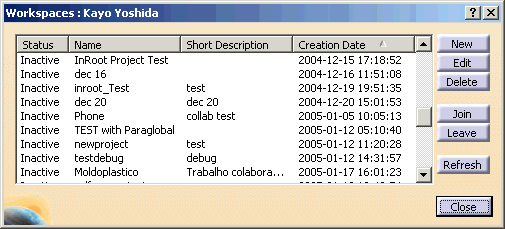
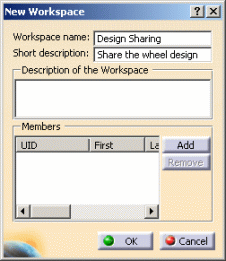
Creating a Workspace
To create a workspace, proceed as follows:
-
Click the Workspaces icon (
 )
in the Instant Collaboration toolbar. The workspaces dialog box opens.
)
in the Instant Collaboration toolbar. The workspaces dialog box opens.
|
 |
Note that:
- The created workspace will be available to the network neighborhood.
- Only one workspace can be active at a time. Its status is Active in the List dialog box.
![]()
Adding a Member to a Workspace
To add a member to the workspace, proceed as follows:
|
|
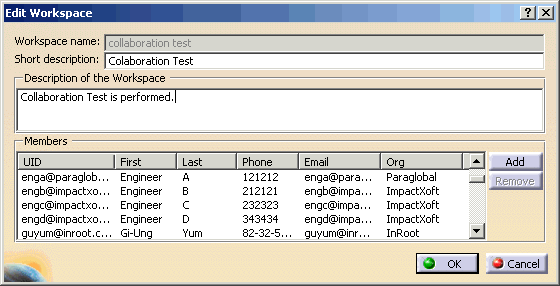
Note that adding members to a workspace also enables you to limit the access to the workspace.
![]()
Joining a Workspace
It is possible for users to join a workspace created on the server. To join a workspace, proceed as follows:
-
Click the Workspaces icon (
)
in the Instant Collaboration toolbar. The workspaces dialog box opens. -
Select the workspace you want to join in the list.
-
Click the Join button. The workspace status turns to active.
-
Click the Close button when done.
 |
Note that joining another workspace automatically closes the current one.
![]()
Leaving a Workspace
Leaving the workspace ends the session to which the user is currently participating.
To leave the workspace, proceed as follows:
-
In the Workspaces dialog box, select the workspace that you want to leave.
-
Click the Leave button. The workspace status turns to Inactive.
-
Click the Close button when done.
![]()
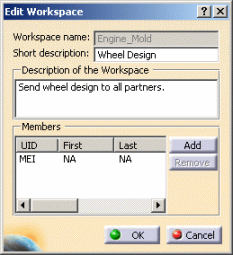
Editing an Existing Workspace
You can edit a Design Collaboration workspace. To do so, proceed as follows:
|
 |
![]()
Deleting a Workspace
To delete a workspace, proceed as follows:
-
In the Workspaces dialog box, select the workspace that you want to delete.
-
Click the Delete button. A warning displays asking you if you want to continue.
-
Click OK to confirm. The workspace is deleted.