- You select the first edge,
- then you can pick the next edges manually and click OK to create the parting line,
- or you define the parameters according to your needs and let Chaining Edges select the edges,
- a join feature is created from the selected edges. It can be edited.
Open the GettingStarted.CATPart from the samples directory.
-
Click Chaining Edges
 in the
Curves toolbar. The dialog box is displayed but not yet active.
in the
Curves toolbar. The dialog box is displayed but not yet active. -
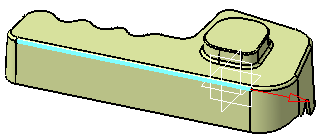
Select a first edge. It is highlighted in blue, and a red arrow proposes you a chaining direction.
The dialog box becomes active.
-
First check that the chaining direction is correct. If not, click the red arrow to invert it.
As the chaining goes on, a text displayed above the red arrow informs you of the process stage reached. -
Select the edges that you will join to create the parting line:
- either by picking them,
- or using the edge selection,
- or selecting the Automatic check box.
- These selection modes can be mixed together.
You can also modify the Propagation zone by adding or removing geometrical sets or hybrid bodies or part bodies which will be analyzed to retrieve their edges.
-
Click Apply to join the selected edges.

Each time you click Apply, you create a join. Click OK to validate the creation of the join and exit the dialog box. A Join.x feature is created in the specification tree.
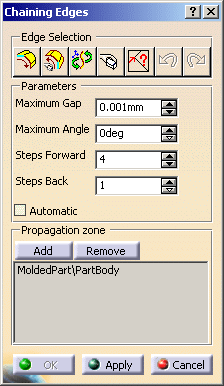
Edge Selection
-
Define the number of
- Steps Forward: the propagation of the chaining stops when the number of Steps Forward is reached, e.g. if Steps Forward is set to 4, the propagation stops when 4 edges have been chained to the one you have selected.
-
Steps Back: that is the number of edges
that will be removed when you click Remove edges from the
selection
 .
.
-
Click Navigate on Belt of Edges
. This will select all
(as defined by Steps Forward) edges that are tangent to the one
you have selected. Then the question Next ? appears above the
red arrow. Click Navigate on Belt of Edges
again or pick an edge
to continue your selection.Undo and Redo and the following buttons are also available: 
Reverses the propagation direction. 
Resets the selection and the propagation zones. 
Hides or shows the direction arrow.
Automatic
-
Select the Automatic check box and the last edge to be chained as shown below:
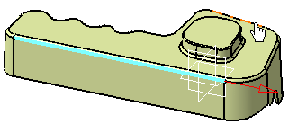
-
The edges are chained as follows:
- the gap between the last selected edge and the next edge must be less than the Maximum Gap,
- the angle between the tangent of the next edge and the tangent to the last selected edges must be less than the Maximum Angle.
- If there still more that one candidates, the one that makes the smallest angle is preferred.
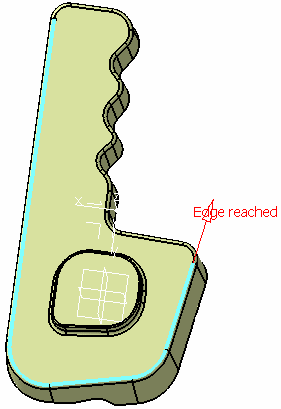
The text Angle appears above the red arrow, to inform you that the Maximum Angle value does not enable the chaining of the edges.
Increase the value of Maximum Angle to 0.5 deg and reselect the last edge.
The edges are highlighted and the text Angle is replaced by Edge reached, meaning that the operation was successful.
![]()