- either by extrusion: you will create a surface around a portion of the outer boundary of the reference support, by extrusion.
- or by loft.
When creating a parting surface by extrusion, you can:
- select a sketch, from which the direction and length of the extrusion
will be deducted.
The extrusion direction is: - located in the plane of the sketch,
- normal to the selected edge.
The extrusion length is defined as follows:
- when the parting surface is seen in the direction of the sketch, it seems to reach it completely.
- or enter directly a direction and a length.
You first need to define the main pulling direction, and a sketch, if you want to use one:
-
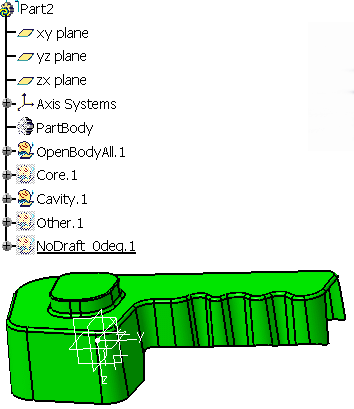
In the Core and Cavity Design workbench, import the GettingStarted.CATPart using the Import model command.
-
Define the main pulling direction using the Pulling Direction command.
-
Send Core.1, Other.1 and NoDraft_1deg.1 to the NoShow.
-
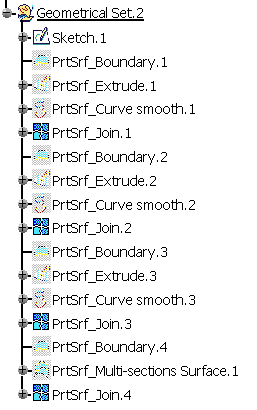
Create a Geometrical set and make it the Define in Work Object.
Click Sketch and select the xy plane to draw a rectangle around the part.
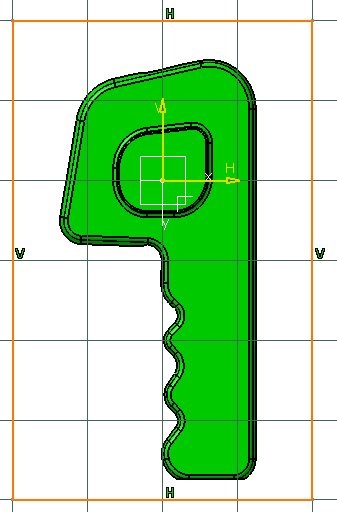
Exit the sketcher.
- you create the sketch in a plane perpendicular to the pulling direction,
- you include the directions that will define the extrusion directions.
Note that the size of the sketch is used to control the length of the
parting surfaces.
In short, the sketch is essential in the definition of the parting
surfaces.
For Both Modes
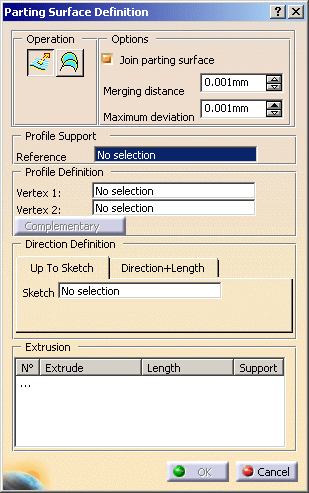
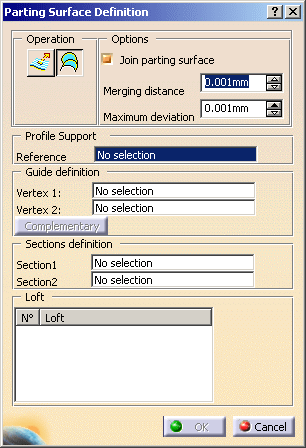
- Merging distance is the distance at which two sections are considered to be in the same place for join purposes.
- Maximum deviation is used to define the curve smooth.
- Select the Join parting surface check box is you want to create a join as the result. If this check box is not selected, only extrusion or loft surfaces will be created.
Creating a Parting Surface By Extrusion
You need to:
- select a part around which you will create the parting surface (Reference in Profile Support),
- define a portion of that part by selecting two points (Vertex 1 and Vertex 2 in Profile Definition)
- define the direction and length of the extrusion, either in the Up to Sketch tab or in the Direction+Length tab.
-
Click Parting Surface
 in the Surfaces toolbar. The dialog box is
displayed.
in the Surfaces toolbar. The dialog box is
displayed. -
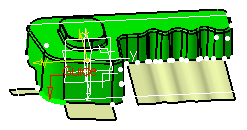
Select Surface.3 in Cavity.1 as the Reference, i.e. the part around which you want to create parting surfaces.
Once the part is selected, all vertices located on outer boundaries are made available and are displayed as white dots.
Select two vertices to define a portion of the outer boundary as the basis of the parting surface.
This portion is highlighted and the Vertex 1 and Vertex 2 fields are updated.
Click Complementary if you want to use the other portion of the outer boundary. 
Make sure the Extrusion icon is selected:
-
If you want to use a sketch, go to the Up to Sketch tab and place your cursor in the Sketch field.
Select an edge of the sketch you have created.
The Sketch tab in the dialog box is updated accordingly (it is emptied as soon as the parting surface is displayed).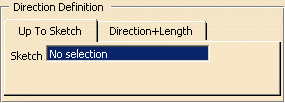
This edge defines both the extrusion direction and the extrusion length for the parting surface.
If you want to enter a direction and a length directly, go to the Direction+Length tab and place your cursor in the Direction field:
- you can select an existing line or plane,
- or you can create a line or a plane using the contextual
menu
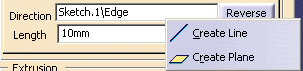
- click Reverse if you want to reverse the direction,
- enter the length required for the extrusion.
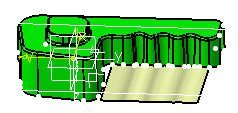
The parting surface is computed and displayed.
The Profile Definition and the Sketch or Direction fields are reset, ready for creating a new parting surface. The Length field keeps the value you have entered.The parting surface created is listed in the Extrusion field.

a contextual menu is available:
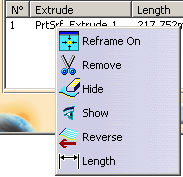
Length enables you to edit the length of any parting surface created by extrusion, using either a sketch or direction+length. The Extrude Length Definition dialog box is displayed where you can modify the value of Length. Click OK to validate this change.Reverse enables you to reverse the extrusion direction of the parting surface.
-
Click OK to exit the dialog box and create the parting surfaces as extrude features.
A join is also created if the Join parting surface check box is selected.
Creating a Parting Surface By Loft
You need to:
- select a part around which you will create the parting surface (Reference in Profile Support),
- define a portion of that part by selecting two points (Vertex 1 and Vertex 2 in Profile Definition) as a Guide,
- define the two sections of the loft (Section 1 and Section 2 in Section Definition)
-
Create those parting surfaces by extrusion
-
In the dialog box, make sure you have selected the Loft icon
-
Select the two vertices that define the guide.
Vertex 1 and Vertex 2 fields are updated and the portion selected is highlighted as Guide.
-
Then select the two sections of the loft:
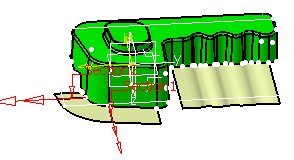
The proposed loft may be twisted due to the incoherent directions of the sections.
In that case pick one red arrow to invert the direction of one section.The parting surface is created and displayed.
It is listed in the Loft field of the dialog box.A contextual menu is available

-
Click OK to validate the ulti-sections surface and exit the action.
The loft is created as a PrtSrf_Multi-sections Surface.x if the Join parting surface option is not selected.
A join is also created if the Join parting surface option is selected.
![]()