- to facilitate unmolding of the part or
- to allow a face that belongs to two different zones to be divided so that it can be placed in the right areas (core, cavity, slider/lifter areas).
The output replaces the original face.
Split surfaces can be joined again, with the option "Simplification".
More information about the parameters is available in the
Split Mold Area Parameters chapter
-
Still in the same CATProduct, hide all elements in the MoldedPart apart from the PartBody.
-
Make MoldedPart the Define in Work Object with its contextual menu
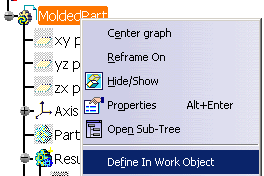
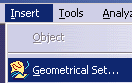
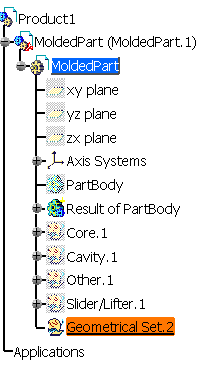
and insert a new Geometrical set.
-
You are now going to create two lines that will define the edge of the face split.
Click Create a Line .
Choose tangent to curve as line type. For the first line:
.
Choose tangent to curve as line type. For the first line:
Pick this curve,
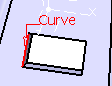
this point (element 2),
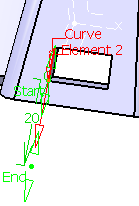
and this support
If necessary, click Reverse Direction.
Click OK to create the line. -
Create the second line with the same support but with this point and this curve:

-
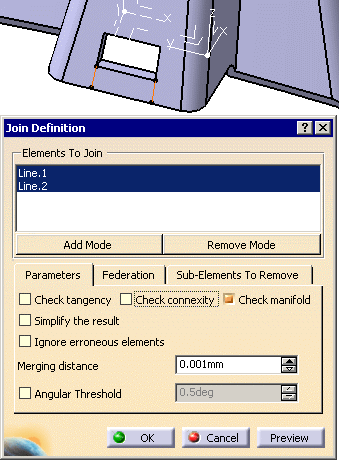
Now we are going to join the lines. Click Join
 .
.
Make sure that the Check connexity check box is not selected and select the two lines that you have just created.
-
Click OK.
-
In the tree, hide the PartBody and show all of the other elements in the MoldedPart.
-
You are now going to split the face with the hole with the join that you just created.
Click Split Mold Area in the Pulling Direction toolbar.
 -
Select the face with the hole as the Element to Cut and the join you just created as the Cutting Element.
-
Click Apply.
-
Select Surface.16 in the dialog box, give Slider/Lifter.1 as the destination and click Change Destination button.
Repeat this for Surface.17 that you will send to Cavity.1.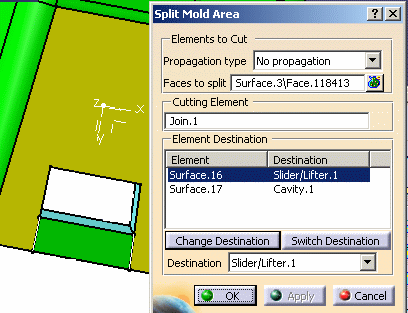
-
Click OK.
![]()