 |
This scenario aims at providing the expert user with a use example of
the Onxxx behaviors.
In this scenario, the expert user tracks the insertion of a vehicle. When
the vehicle is inserted, the Heel_pt_Line publication is checked. If
Heel_pt_Line is published, a message is fired indicating that the
publication is ok, if not, a message is fired indicating that the
publication is missing. |
 |
-
From the Start>Knowledgeware menu, access the
Business Process Knowledge Template workbench.
-
Open the onxxx.CATfct
file.
-
In the Behaviors View, double-click the IndirectVision's
Behaviors then IndirectVision in the Behaviors tab.
-
Expand the Define vehicle data combination.
-
Click the Define vehicle data combination and click the
On Done Behavior icon ( ). ).
-
Right-click the On Done behavior, select OnDone
object>Reorder and click the Define vehicle data combination.
 |
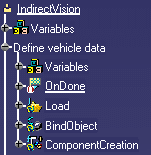
At this stage of the scenario, your workbench is
similar to the graphic opposite. |
 |
-
Click the On Done behavior in the Behaviors tab and click
the Information Behavior icon ( )
to create the Information behavior that will display a message. )
to create the Information behavior that will display a message.
-
Double-click the Information node and enter the following
string in the Message field of the opening dialog box: Heel_Pt_Line
published. Click OK to validate.
-
Click the Define vehicle data and click the On
Cancel Behavior icon ( ). ).
-
Right-click the On Cancel behavior, select OnCancel
object>Reorder and click the On Done behavior.
-
Click the On Cancel behavior in the Behaviors tab and
click the Information Behavior icon ( )
to create the Information behavior that will display a message. )
to create the Information behavior that will display a message.
-
Double-click the Information node and enter the following
string in the Message field of the opening dialog box: Heel_Pt_Line
publication missing . Click OK to validate.
-
Click the Define vehicle data and click the On Done
Behavior icon ( ). ).
-
Double-click the On Done behavior. The On Done window is
displayed.
-
Enter When vehicle data is inserted... in the
Name field and click OK to validate.
-
Right-click the When vehicle data is inserted...
behavior, select When vehicle data is
inserted...object>Reorder, and click the OnCancel behavior. The
When vehicle data is inserted... behavior is now located below
the On Cancel behavior. (See picture below.)
-
Click the When vehicle data is inserted...
behavior and click the Bind Object behavior icon. BindObject is displayed
in the Behaviors tab.
-
Double-click the BindObject node. The BindObject editor
is displayed.
-
Click the When vehicle data is inserted...
behavior and click the Bind Publication behavior icon ( ).
BindPublication is displayed in the Behaviors tab. ).
BindPublication is displayed in the Behaviors tab.
-
Double-click the BindPublication behavior. The Bind
Publication window is displayed.
-
Click the Starting from: field, expand the BindObject
node and click the output link. =BindObject\Link
is displayed in the Starting from field.
-
In the Relative Name field, enter Concept_Surfaces.1/Heel_Pt_Line.
-
Double-click the OnDone behavior, click the Object
to Survey field and click the When vehicle data is inserted
behavior in the behaviors tree.
-
From the Children Objects list, select
BindPublication and click the right arrow. BindPublication is now
is displayed from the Child Object to Survey list. Click OK to
validate.
-
Double-click the OnCancel behavior, click the Object
to Survey field and click the When vehicle data is inserted
behavior in the behaviors tree.
-
From the Children Objects list, select
BindPublication and click the right arrow. BindPublication is
displayed from the Child Object to Survey list. Click OK to
validate.
-
Double-click the When vehicle data is inserted sequence,
click the Object to Survey field and click the
ComponentCreation behavior in the behaviors tree.
-
From the Children Objects list, select Update
and click the right arrow. Update is displayed from the Child Object to
Survey list. Click OK to validate.
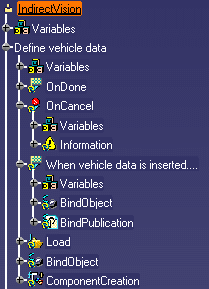
 |
At this stage of the scenario, your workbench is
similar to the graphic opposite. |
 |
-
Save your .CATfct file in the Graphics
directory. (Click here to open
the created .CATfct.)
-
Click the Generate Applicative Workbench icon
( )
to generate a user workbench. Enter the name of the workbench, Insert
Vehicle in this example, as well as the workbench type (Product here). )
to generate a user workbench. Enter the name of the workbench, Insert
Vehicle in this example, as well as the workbench type (Product here).
-
From the Tools>Options>Knowledgeware>Business
Knowledge Template menu, select All Users from the
Access Rights scrolling list and click OK to work in a User
environment.
-
In the User Workbench, select Product1 in the
specification tree and select the IndirectVision check box to type the
root product. Its name is now IndirectVision:Product1.
-
Right-click IndirectVision:Product1(Product1) and select
IndirectVision (Product1) object>Define vehicle data.
-
Select the
Vehicle_Data_with_Publication.CATPart file and click Open
(Note that this vehicle contains a Heel_Pt_Line publication). The vehicle
is inserted and a message is fired indicating that Heel_Pt_Line is
published.
-
Right-click IndirectVision:Product1 (Product1) and select
IndirectVision (Product1) object>Control_Define vehicle data.
-
Click Yes when prompted to withdraw the Define vehicle
data combination.
-
Right-click IndirectVision:Product1 (Product1) and select
IndirectVision (Product1) object>Define vehicle data.
-
Select the
Vehicle_Data_without_Publication.CATPart file and click Open
(Note that the Heel_Pt_Line publication is missing in this part). The
vehicle is inserted and a message is fired indicating that the
Heel_Pt_Line publication is missing.
|
![]()