-
Select Tools > Customize or right-click any icon in any toolbar then select Customize to open the Customize dialog box.
-
Access the Toolbars tab if it is not already activated:
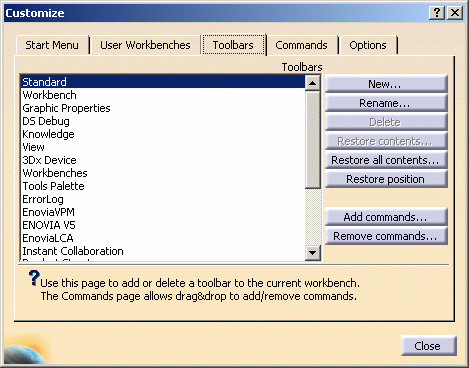
The Toolbars tab lists the currently available toolbars, and provides the following commands: - New... for creating new toolbars
- Rename... for renaming toolbars
- Delete for deleting toolbars
- Restore contents... for restoring the original content of selected toolbars
- Restore all contents... for restoring the original content of all toolbars. Do not forget that when using this button, new toolbars are deleted as well
- Add commands... for adding commands to the selected toolbar
- Remove commands... for removing commands from the selected toolbar.
-
Click New... to create a new toolbar.
The New Toolbar dialog box appears with a default toolbar name (NewToolBar001), and an empty toolbar appears: 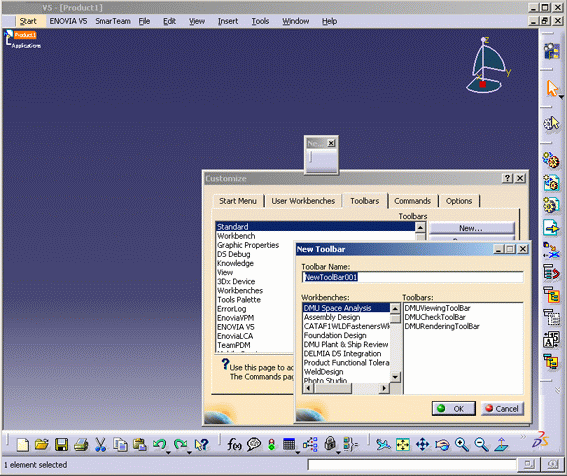
-
Enter the name of the new toolbar, then click OK.
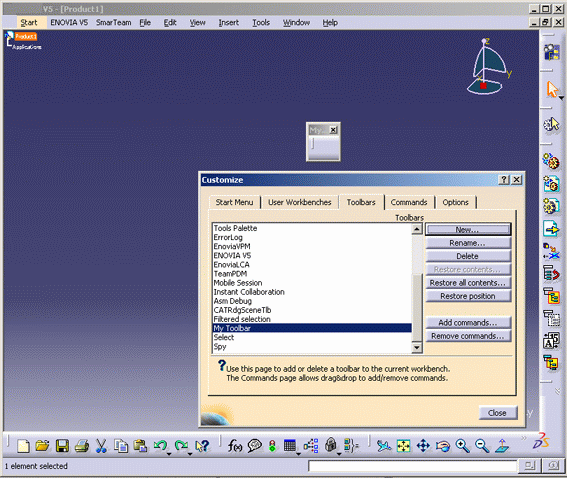
The new toolbar is added to the bottom of the list, and an empty toolbar is added to the right of the main application window. In our example, the toolbar "My Toolbar" has been added to the list:
-
Click the Commands tab and drag and drop commands onto the new toolbar.
In our example, the toolbar "My Toolbar" contains three icons: 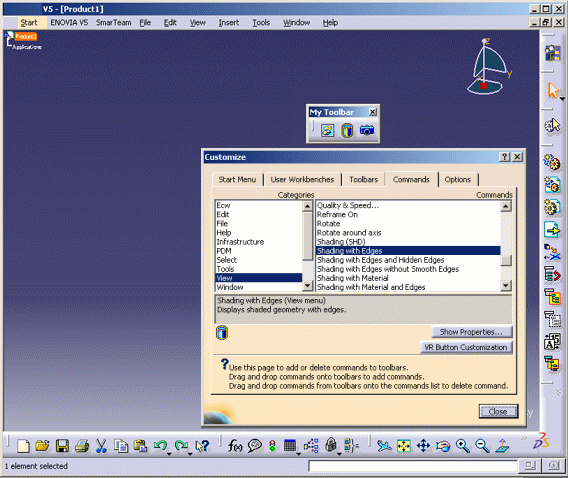
-
To rename a user-defined toolbar, click the Toolbar tab again, select a toolbar, click Rename... and enter the new name, then click OK.
-
To delete a user-defined toolbar, click the Toolbar tab again, select a toolbar, click Delete..., then click OK.
-
To restore the original contents of a toolbar, click the Toolbar tab again, select a toolbar, click Restore..., then click OK.
-
To hide or display a user-defined toolbar, click the Toolbar tab again, select a toolbar, and click Hide or Show to toggle toolbar display on or off, then click OK.
Your customization is stored in the settings only when exiting the session.
If you intend to acquire or remove licenses using Tools > Options > General > Shareable Products, you need first to exit then restart your Version 5 session before accessing this tab in order to recover your customization.
Acquiring or releasing shareable products implies that all the toolbars and menus are regenerated. The user interface is recomputed using the last settings saved and therefore, if your customization has not been previously saved, it will be lost.
Working with ENOVIA LCA: Optimal CATIA PLM Usability
The Safe Save mode prevents the user from creating or
editing data in CATIA that cannot be correctly saved in ENOVIA V5.
Working in this mode means that certain commands are unavailable (i.e.
grayed out) as you enter the workbench.
However, these unavailable commands are not grayed when displaying the list of commands using Tools > Customize. As a consequence, if you drag and drop one of these commands onto a toolbar then use it, bear in mind that the created data will not be saved in ENOVIA V5.
![]()