A visualization filter is a group of layers. You then apply the filter to visualize (or not) only those objects located on the layers in the filter.
-
Select Tools > Visualization Filters.
The Visualization Filters dialog box appears: 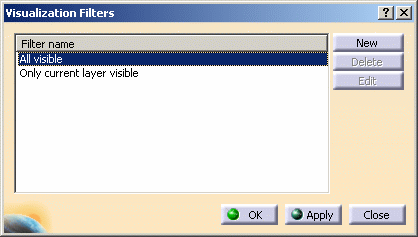
The default current filter All visible is applied automatically: it lets you see all the contents of the document. This filter cannot be deleted. -
Click New.
-
Click in the Criterion box (where you see 0), delete 0 then type 1 so that the filter syntax now looks like this:
Layer = 1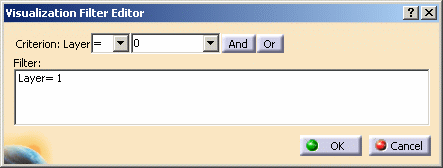
-
Click OK.
This creates a new filter Filter001(with the default filter syntax) in the Visualization Filters dialog box: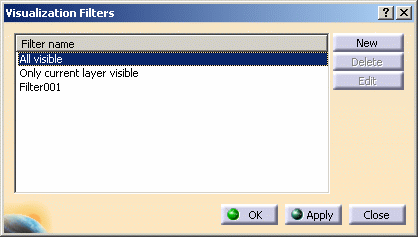
When pointing to the desired filter name, a tooltip indicates whether the filter definition location is stored in the document or in the user settings (i.e. the CATSettings directory).
However, bear in mind that this tooltip is displayed for information only, you cannot modify the storage location which has been set as explained below:- for CATProduct documents, the definition is stored in the user settings. This means that your visualization filters will be kept throughout the whole session and from one session to another. This also means that they can be administered
- for CATPart documents, the definition (if there is one) is stored in the document. If no definition is stored in the document, the CATPart documents use the definition stored in the user settings. These visualization filters cannot be administered because it is not relevant for the administrator (he would only be able to lock the instance of the currently edited document)
- for CATDrawing documents, the definition is stored in the document. These visualization filters cannot be administered (same explanation as above).
Filters stored in the document cannot be administered because it is not relevant.
Note that you can also customize the filter application. For more information, refer to Layer Filter.
-
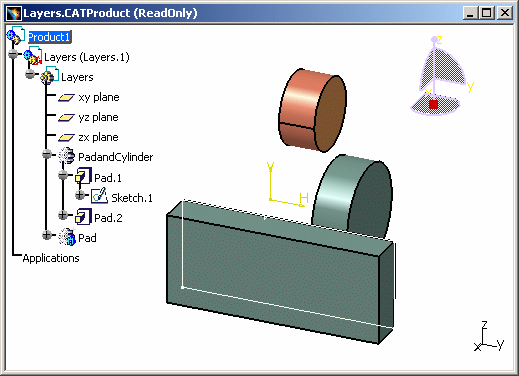
Select the root object PadandCylinder in the tree, then select View > Toolbars > GraphicProperties to display the Graphic Properties toolbar.
-
Click the Layer list, then type
0.The root object is now assigned to the layer number 0. -
Select Pad.1 in the tree, click the arrow on the Layer list and check that the Layer list looks like this:
 .
. -
Select Sketch.1 in the tree, click inside the Layer list, then type
1.Sketch.1 is assigned to Layer 1. The Layer list now looks like this:  .
. -
Select Filter001 in the Visualization Filters dialog box and click Apply.
The objects under PadandCylinder are no longer displayed, and the filter remains active. 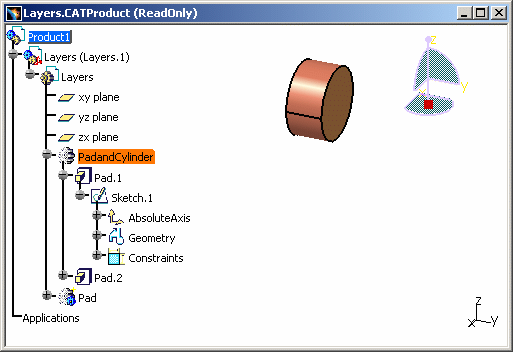
Why are these objects no longer displayed? All the features below the root object in the tree are considered to be on layer 0 if applying the visualization filter makes the objects invisible. This remains the case even if you assign the objects to layers other than layer 0.
-
This time, select the root object PadandCylinder in the tree, click the Layer list, then type
1to assign it to layer 1.The filter is still active, but this time the object Sketch.1 becomes visible: 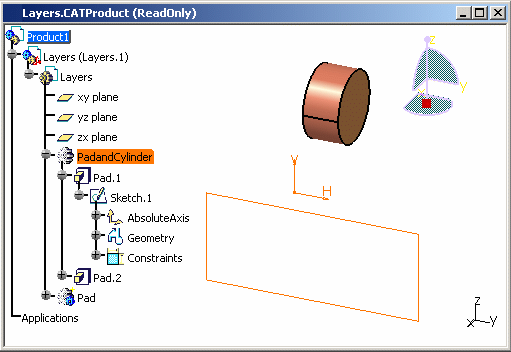
Why is only the Sketch object displayed? This time applying the visualization filter has the effect of making objects visible, so the Sketch object becomes visible.

To see all the objects again, select the All visible filter then click Apply.

About Version 4 documents
If you apply Version 5 visualization filters to Version 4 elements, note
that Version 4 elements have their own way of managing such filters (this
is done via a specific menu named Layer Filter).
Depending on the visualization mode you are using, there are two different
behaviors:
- in Design mode, the .cgr format of the component is changed into the original editable component document (geometry is available). Therefore, the assembly contains the real Version 4 data and, as explained above, Version 4 elements are visualized according to their own filter even though the Current filter on all documents option in Tools > Options > General > Display > Layer Filter is activated. This is why some elements might not be filtered as expected
- in Visualization mode, documents appear in .cgr format. Only the external appearance of the component is visualized (geometry is not available). As .cgr elements are Version 5 data, visualization filters can be applied as for any other Version 5 element and the result will be as expected.
Regarding dittos, refer to Layers and Layer Filters for Dittos.
![]()