Graphic Properties vs. Edit > Properties
The graphic properties available
in this toolbar are identical to those of the Properties dialog
box, except for the Layer list.
However, do not forget that this toolbar does not behave like the
Properties dialog box:
-
When modifying a color, the Properties dialog box modifies the color of the selected object whereas the Graphic Properties toolbar may sometimes modify the color of a non-selected object in order to make the color displayed on screen change.
For instance:-
when changing the color of an object inheriting the color from its product via the Properties dialog box, this change is not displayed on the object. You need to deactivate the inheritance for the product to see the result
-
when changing the color of an object inheriting the color from its product using the Graphic Properties toolbar, this modifies the product color (and not the one of the object).
-
-
The Graphic Properties toolbar has not the same granularity level as the Properties dialog box. When selecting multiple objects, the toolbar impacts the selection as a whole, whatever the geometry types selected (Assembly, mesh, point, etc.). This means that in a multiselection, you can modify simultaneously Assembly and lineic objects, for instance. Or, if you select a triangle, you can apply a different color to points and lines.
This is not the case with the Properties dialog box which differs according to the object type: if you select an Assembly object, a specific dialog box opens. Therefore, you cannot modify the color of a mesh, a line, a point or an Assembly object at the same time.
-
To display the Graphic Properties toolbar (which is hidden by default), select View > Toolbars > Graphic Properties.
The Graphic Properties toolbar appears and the values displayed correspond to the element you selected, for instance: 
The capture below shows which box impacts which graphic property: 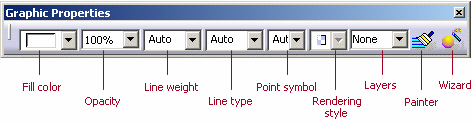
-
Painter
 lets you apply graphic properties from one object to another. To do so:
- select the object(s) on which you want to apply new graphic properties
- click Painter
- select the reference object, i.e. the object from which you will copy the graphic properties.

Painter does not allow you to copy all the graphic properties of an object, but only a set of graphic properties for each list.
In case of a part body, for instance, it is not possible to modify the color of edges, or the color of edges and faces at the same time. Only the color of faces can be modified.
The reason is that the Painter has the same effect as the lists displayed in the Graphic Properties toolbar. When you use the fill Color list, you modify only the color of faces. Therefore, when you use the Painter to modify a color, only the color of faces is impacted.When you modify one of the graphic properties for a pad, the new graphic property supersedes the one applied to the father element (i.e. the Part Body). The pad will no more inherit the part body's graphic properties, even if you reset the modified graphic property to its original state.
To reset the inheritance from the father to the children, set the modified graphic property to Auto in the Graphic Properties toolbar. -
Choose the color to be applied to the object using the fill Color list.
A list appears containing: - a blank color box (No Name)
- the Automatic option (which lets you make the color standard)
- a list of sixteen default colors from the color palette, ready for use
- the More Colors... option
- the No Color option (for Assembly objects only).


The No Color option lets you apply a color onto a face without having to modify the product color. To do so: - select the product in the specification tree
- choose No Color in the Color list
- select the face onto which you want to apply the color
- select the desired color from the Color combo box.
-
Select the desired color.
The selected color is now displayed in the list. Pointing the cursor over the combo box displays the name of the selected color. -
To access more colors, or to create your own colors, click More Colors... at the bottom of the list to access the color palette.
Refer to Displaying and Editing Graphic Properties for detailed information. -
Click the custom color, then Apply. The color is now displayed in the Color fill list of the Graphic properties tab.
-
To display an object as transparent, use the Transparency list. For instance, "100%" corresponds to a full visibility, "50%" to a semi-transparency and "0%" to a non-transparency (the object is opaque).
Note that the visual feedback differs according to the transparency mode you set: - Alpha Blending: similar to looking through clear glass. You can choose a value between 1 and 255
- Screen Door: similar to viewing an object through a mesh or a
screen. This mode lets you use only two values:
- "0" (the object is opaque)
- between 1 and 255 (1 pixel out of 2 is represented, which gives the illusion that the transparency has been set to "50%" or "127/255").
via the Performance tab in Tools > Options. For more information, refer to Customizing Performance Settings.
When setting an Assembly object as transparent, any other element located at a lower level in the specification tree inherits this opacity and the list displays the visibility of the Assembly object. However, the opacity modification impacts only the display at rendering level and not the graphic properties. This can be useful to make an object transparent without altering its graphic properties.
To deactivate the inheritance mechanism, select an element then click the Opacity list and choose No Opacity: all the elements located at a lower level have their own transparency back. -
Set edge line type and weight using the appropriate lists.
If you have selected a line or a curve, you can set the line and curve color as well as the linetype and weight the same way as for parts.
-
Set the point symbol you want to use to represent the point using the appropriate list.
You can set the point color in the same way as for parts. -
The Rendering Style list lets you select the rendering style to be applied to the selected object, provided that is supports rendering style attributes.
By default, no specific style is applied. You can choose among the following styles:- Auto
- Transparent
- Wireframe
- Shading
- Shading with Edges.
This option is identical to the one provided in the Properties dialog box. Refer to Displaying and Editing Graphic Properties for detailed information.
-
Use the Layer list to choose among the list of named layers and assign the chosen layer to the selected objects: "None", "0 General", "1-999" (according to the number of layers in the Layer list).
The Layer list indicates the number of layers the selected objects are assigned to. Otherwise (when nothing is selected) it indicates the current layer.
Refer Displaying and Editing Graphic Properties for detailed information.
When pointing at the Layer list, a tooltip displays the layer name (if any), the layer number as well as the storage location of the layer definition: 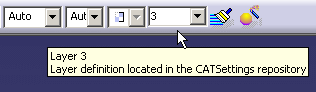
The layer definition location is stored either in the document or in the user settings (i.e. the CATSettings directory).
However, bear in mind that you cannot modify the storage location which has been set as explained below:- for CATProduct documents, the definition is stored in the user settings
- for CATPart documents, the definition (if there is one) is stored in the document. If no definition is stored in the document, the CATPart documents use the definition stored in the user settings
- for CATDrawing documents, the definition is stored in the document.
When using the list, you can also select Other Layers... to open the Named Layers dialog box in which you can create and rename layers but also modify layer numbers.
For instance, to rename a layer, slowly click twice the line containing the layer name. This makes the box editable and you can enter the new layer name as shown below: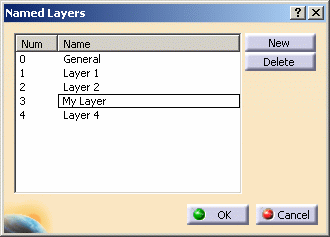
Then, click anywhere outside the editable box to confirm the name before clicking OK to validate.
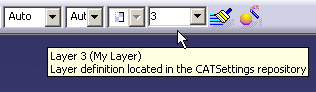
For detailed information on how to use the Named Layers dialog box, refer to Adding and Naming Layers.When pointing again at the Layer list, you can see that the tooltip information is updated and the new layer name is displayed:
-
Click Graphic Properties Wizard
 in
the Graphic Properties toolbar to access the Graphic
Properties Wizard. Refer to Using the
Graphic Properties Wizard for detailed information.
in
the Graphic Properties toolbar to access the Graphic
Properties Wizard. Refer to Using the
Graphic Properties Wizard for detailed information.
![]()