CD1 works in client/server mode only and in order to work in client/server mode requires both WebSphere and ENOVIA V5 VPM.
Setting Up CATIA Instant Collaborative Design
This is how CATIA Instant Collaborative Design, ENOVIA V5 VPM, Sametime and WebSphere work together:
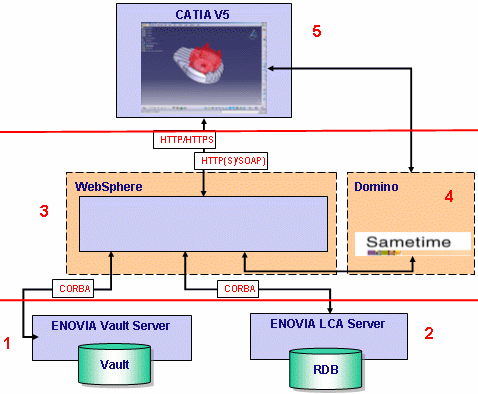
The CATIA Instant Collaborative Design application is based on a 3-layer system:
- Storage layer: The first layer is made up of the ENOVIA Vault Server
(1) and of the ENOVIA V5 VPM Server (2). The physical data (briefcases
created by the users) are stored in the ENOVIA vault (1).
Sharing data (design collaboration data, and workspaces, data concerning which briefcase belongs to which workspace) are stored in the ENOVIA V5 VPM database (2). - Communicating layer: The second layer made up of the WebSphere (3) and the Domino (4) servers, enables the ENOVIA Vault Server (1), and the ENOVIA V5 VPM Server (2) to communicate with CATIA (5). Websphere is dedicated to collaboration, whereas the Domino server is dedicated to connectivity.
- Design layer: The last layer made up of CATIA (5) enables the user to design.
To set up CATIA Instant Collaborative Design:
- Install CATIA Instant Collaborative Design on the CATIA client.
- Install WAS on the server.
- Install the the
ENOVIA V5 VPM runtime view on the server:
- Media: ENOVIA V5 VPM
- Configuration: VDS
- Go the following directory, for example on UNIX:
$install_path/$os/code/dictionary
edit the following file:
VPMAdmin.adm
and remove the comments preceding and following each of the lines containing the COLLABWS declarations. - Go to the following directory, for example on UNIX:
$install_path/$os/code/bin
and reload the application using the following command:
catstart -run LoadAdmin
followed by the full path to the VPMAdmin.adm file you just modified, like this:
catstart -run LoadAdmin <path to vpmadm.adm>/vpmadm.adm
- Copy from another vault, the file:
VaultClient.properties
to:
$install_path/$os/docs/java
in the ENOVIA V5 VPM runtime view you are going to deploy in the WAS.
- Deploy the runtime view in the WAS, and follow all the necessary steps described elsewhere in this guide.
- Start the WebSphere Application Server if it is not already started.
- In a web browser, type the following URL:
http:<host_name>.<domain>:<webapp_port>/<rootURI>/html/CollaborationConfigFor example:
http://loug3dsy.dsy.ds:9080/B18/html/CollaborationConfigThe Web browser displays the following Server Administration page:
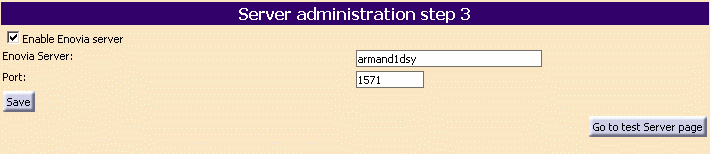
- Check the Enable Enovia server option, and provide the name of the machine hosting the server and the port number. The objective is to test communications with the ENOVIA V5 VPM server.
- Click Go to test Server page:

- Click test Web Services:

- Click Next:

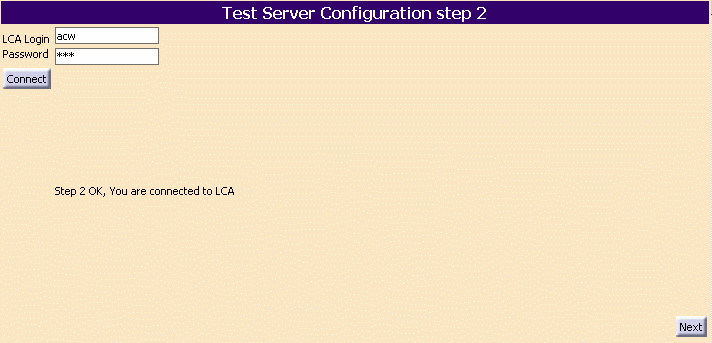
- Provide your
ENOVIA V5 VPM login and password, then click Connect:
- Click Next:
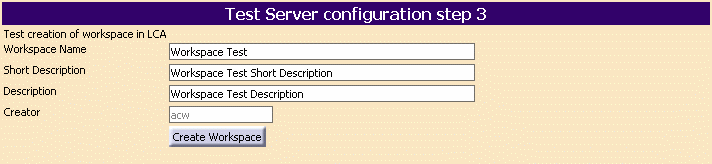
- To test the creation of a workspace in
ENOVIA V5 VPM, fill in the dialog box,
then click Create Workspace:
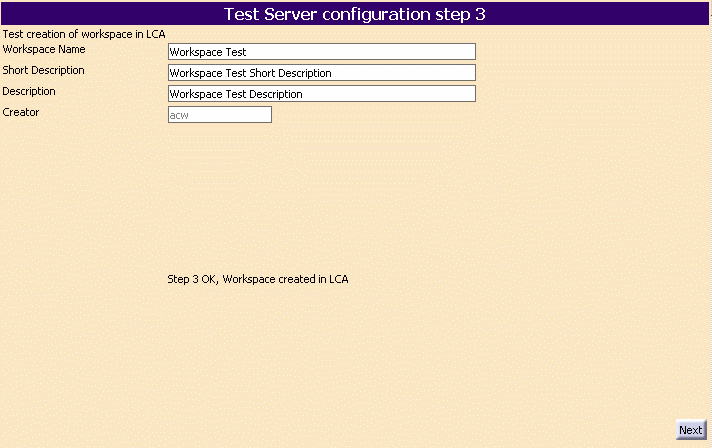
- Click Next:
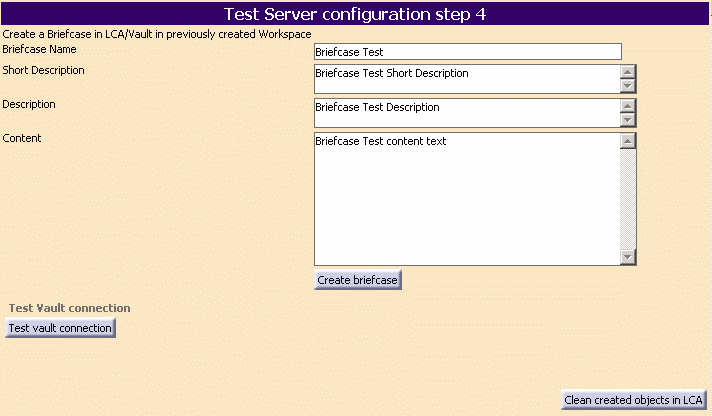
- Click Test vault connection:

- Click Create briefcase:
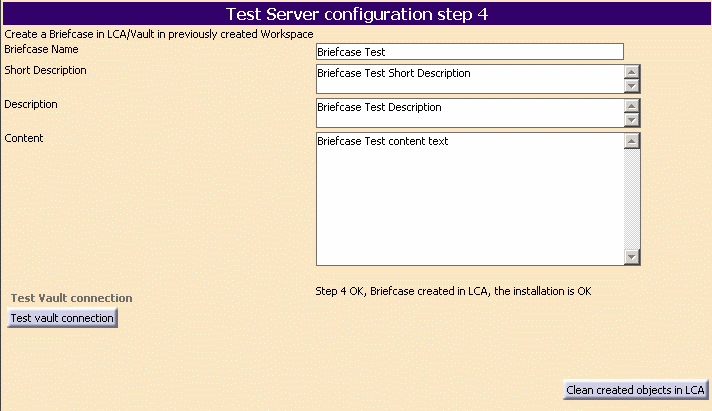
The configuration is completed. You can now exit the web browser.
- Restart the WAS.
![]()