|
| This tab deals with
the following categories of options:
|
|
|
 |
For each section, you have the possibility to
check the option: Customized display and the same
Configure window appears.
-
Click the Customized display box and the
Configure button become active.
-
Press the Configure button and the
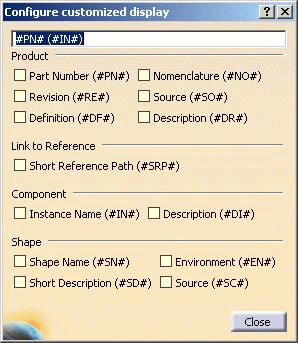
Configure customized display window is displayed:
|
|
In this window, you can select different
options:
Product:
-
Part number (#PN#),
-
Revision (#RE#),
-
Definition (#DF#)
-
Nomenclature (#NO#),
-
Source (#SO"),
-
Description (#DR#).
|
Link to Reference:
- Short Reference Path (#SRP#)
|
Component:
- Instance name (#IN#),
- Description (#DI#).
|
Shape:
- Shape Name (#SN#),
- Short Description (#SD#),
- Environment (#EN#),
- Source (#SC#).
|
|
|
You can click the box of your choice and the
diagram of this option (#DR# for Description, for instance) is
automatically reported in the empty field, in the top of the window. By
default, the #PN# option is always selected. You can directly replace
the diagram (#PN#,#RE#,...) by the term of your choice (between two #) and
it will appear in the Product Structure. By the same way, you can add a
comma and a blank space between these parameters. |
|
|
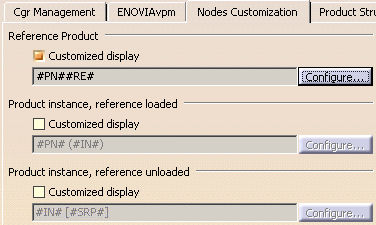
Reference Product
|
 |
 |
By default, this option is not selected. |
 |
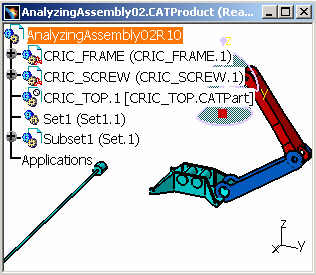
Open
AnalyzingAssembly02.CATProduct and unload CRIC_TOP.CATPart. For more
information about unloading components, please refer to the Product
Structure User's Guide.
|
Reference Product:
- Customized display: if you select this option, you will
decide what will be seen at the root product level, in the Specification
Tree. For example:
|
-
Select Properties in the contextual menu of
AnalyzingAssembly02.CATProduct.
-
Enter a number in the Revision field (10 for instance)
and click OK.
-
Select the Tools -> Options -> Infrastructure ->
Product Structure command and click the Nodes Customization
tab.
-
Click the Customized display box under the
Reference Product section. Press the Configure
button.
-
In the Configure customized display field,
select select Revision (#RE#).
-
Click Close and then OK. You can
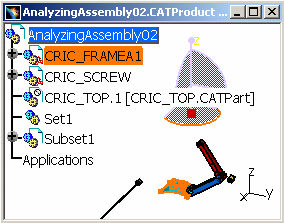
visualize the result in the second picture.
|
Product instance, reference loaded
|
 |
|
|
By default, this option is not selected. |
- Customized display: if you select this option, you will
decide what will be seen at the Instance level (Instance whose the
Reference is loaded), in the Specification Tree. For example:
-
Select Properties in the contextual menu of
CRIC_FRAME.CATPart.
-
Change the Instance Name ("first instance") and add a
Definition: "A1".
-
Select the Tools -> Options -> Infrastructure ->
Product Structure command and click the Nodes Customization
tab.
-
Click the Customized display box under the
Product instance, reference loaded section. Press the
Configure button.
-
In the Configure customized display field,
delete the Instance Name, therefore the Instance name will not be
visible in the Specification Tree even if it has been redefined
previously via the Properties command.
-
Click the Close and then OK. You
can visualize the result in the second picture.
|
Product instance, reference unloaded
|
 |
|
|
By default, this option is not selected. |
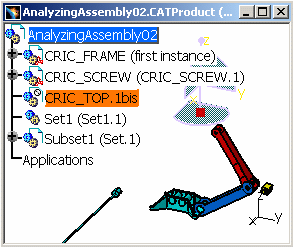
- Customized display: Check Customized Display.
-
Select Properties in the contextual menu of
CRIC_TOP.CATPart, which is unloaded (Visualization mode).
-
Modify the Instance Name ("bis").
-
Select the Tools -> Options -> Infrastructure ->
Product Structure command and click the Nodes Customization
tab.
-
Click the Customized display box under the
Product instance, reference unloaded section. Press the
Configure button.
-
In the Configure customized display field,
delete the Part Number diagram (#PN#), therefore the Part Number will
not be visible whereas the Instance name will be visible in the
Specification Tree.
-
Click Close and then OK. You can
visualize the result in the second picture.
|
 |
If you are using CATIA "with
cache system", the information that you can usually display on each
node will not be available for the CATPart nodes when opening a
CATProduct. In this case, the
unavailable information is replaced by the character string '[?]'. There
is one exception: the "Part Number" (#PN#) is replaced by '[NNNN]' where
NNNN is the name of the file containing the CATPart (without the directory
name).
The unavailable information is made available when you use the
"Properties" command on a CATPart. At this moment, the '[?]' strings are
replaced by the real values for this particular node in the specification
tree. |
| |
 |
|
|
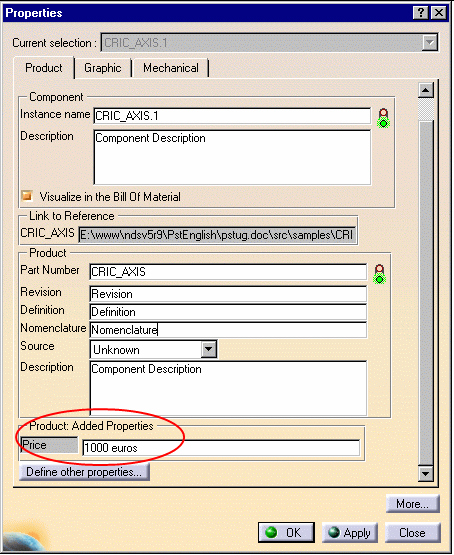
These attributes are also accessible in the
component's contextual menu: Edit -> Properties.
For instance, open the following example
ManagingComponents01.CATProduct and select the Edit -> Properties
contextual command of CRIC_AXIS.CATPart.The Instance name field
in the Properties dialog box show attributes of the first instance only,
and so authorize you to modify only the attribute of the first instance.
For more information
about Component Properties, please refer to Modifying Component Properties
in CATIA - Product Structure User's Guide. |
|
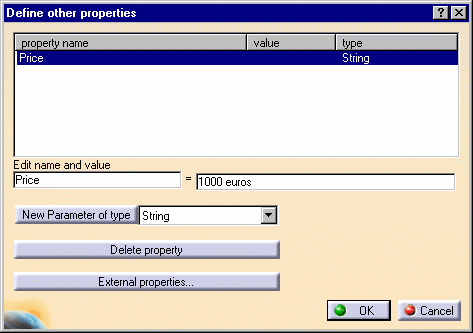
-
Click the Define other properties button to
add new attributes to CRIC-AXIS.CATPart and click the New Parameter
of type button. The following dialog box appears:
|
|
You can add the "Price" parameter in the Edit name and value
field:
|
|
And you can notice the modifications in the Properties dialog
box:
|
|
-
Click OK.
-
Select the Tools -> Options -> Infrastructure ->
Product Structure command and the Nodes Customization
tab. Check the option Customized Display and choose the
following settings:
|
|
To specify the Price parameter, you need to use these characters:
#@xxx@#.
|
|
-
Click OK. And you obtain in the following result in the
Specification Tree:
|