Wire Extremity Management
|
|
 |
Available/Favorites
|
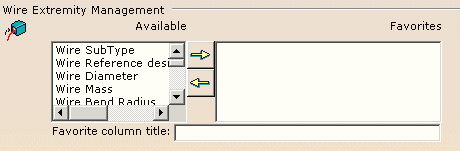
- To add properties to the list, select the property in the
Available list and click the --> arrow.
The Favorites list contains the properties displayed in the
Interconnection frame of the Wire Extremity Management dialog box.
- To remove properties, do the reverse: select the property from the
Favorites list and click the <-- arrow.
 By default, the Favorites list is blank.
 |
Favorite column title
|
|
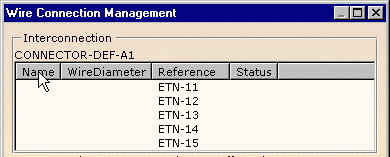
Select a property in the Favorites list and
enter a name in the Favorite column title field.
It is displayed in the Wire Connection Management dialog
box:
By default, this option is blank. |
 |
Separation Code File
|
|
 |
|
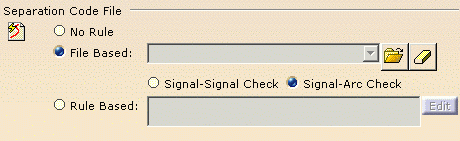
The Separation Code File area is used to define
Separation Code rules to optimize the routing.
Three options, mutually exclusive are available:
- No Rule: the separation code is not used.
The routing is done according to the shortest route found.
- The separation codes may be File Based. In that case,
define the path to access the
compatibility table by clicking Browse to choose
the separation code file.
This file is used during the Automatic Routing and the
Routing Simulation.
Two options are available:
- Signal-Signal Check manages compatibility between signals,
- Signal-Arc Check manages compatibility between signal and
pathways.
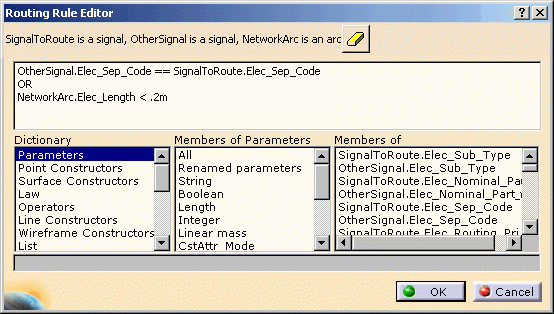
- The separation codes may also be Rule Based, using the
Knowledge language.
Only one rule can be implemented at a time, but this rule may combine
several conditions.
The line above the input field is a reminder of the knowledgeware syntax.
The Eraser icon is used to clear the input field.
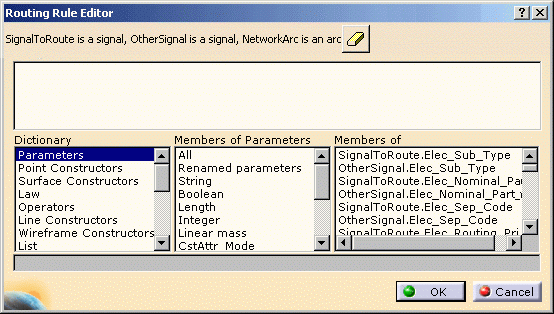
- Click Edit to enter a new rule: the
Routing Rule Editor is displayed.
- Enter the required elements by picking them from the lists.
| The rule is now displayed in the option box. |
 |
The default value is No Rule. |
|
|
Extremity Color
|
|
 |
|
The Color field is used to change the color of
the extremity boxes.
Select a color from the list box. the result looks like this:
 or or

|
|
|
Bundle Segment Update
|
|
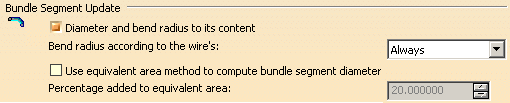 |
Diameter and bend radius to its content
|
| Selecting this check box means that, after
wire routing, bundle segment diameter and bend radius will be updated based
on the wires and wire groups routed through the segment.
Click to clear this option if you do not want bundle segment diameter
and bend radius to be updated. In case you clear this option, and you
subsequently need to update bundle segment diameter, you will have to force
the update of each multi-branchable document:
- Select the Diameter and bend radius to its content option
- Select Tools > Force Recompute Diameter.
By default, this check box is selected. |
Bend radius according to the wire's
|
|
Three mutually exclusive modes are available:
-
Never: no update of the
bundle segment minimum bend radius is performed.
-
Always: the greatest bend radius of the wires
routed in the bundle segment determines the segment bend radius to be
applied.
-
Conditional: the wire bend radius is taken
into account for update when it is greater than the bundle segment bend
radius.
The default mode is Always, and it is enabled if the Diameter and bend radius to its content
check box is selected. |
Use equivalent area method to compute bundle
segment diameter
|
|
|
|
|
|
|
|
|