![]()
This task explains how to customize Analysis and Simulation post processing image settings.
Save As New Template Folder

You can define the location of the
SPMUserTemplateImageDefinition.xml file or manage this file.
This file contains all the generated images that have been saved with the
Save As New Template contextual menu.
Output directory
This option lets you choose the directory in which you want to store the .xml file.
![]() By default, this field is empty.
By default, this field is empty.
Output file name
This option indicates the name of the associated .xml file. You can rename or remove the stored images.
|
|
Images must have been saved with the Save As New Template contextual menu and a .CATAnalysis document must be launched (in the opposite case, the Manage button is not available). |
If you click the Manage button, the Available Images dialog box appears.
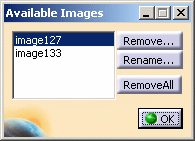
- Remove...: lets you remove the selected images (multi-selection is available).
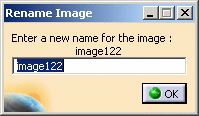
- Rename...: lets you rename a selected image.
- Remove All: lets remove all the images that are stored in
the xml file.
|
|
All modifications are updated only if you click OK
in the Options dialog box. |
Image Edition
![]()
Automatic preview mode
This option lets you preview automatically the changes you done in the Image Edition dialog box.
If this option is deactivated, the Preview button will be available in the Image Edition dialog box: the visualization will be launched only if you click the Preview button.
This option may be useful if you work with large models
because some parameters could take time to be taken into account.
In this case, deactivate the Automatic preview mode option.
![]() By default, this option is activated.
By default, this option is activated.
Text Properties
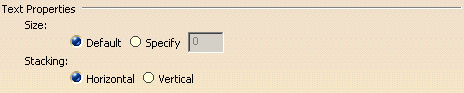
You can set the text properties in case of:
-
Text images
-
Text displayed when you move pointer over a displayed image.
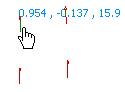
For example:-
over a Fringe image:

-
over a Symbol image:
-
-
Symbol images with Text option.
Size
This option lets you specify or not the size of the text.
-
Default: lets you visualize the text values with a default size.
-
Specify: lets you specify the size of the text values.
Example with a text image type:
|
Default size |
Specified size (equal to 3) |
|
|
|
![]() By default, the Default option is selected.
By default, the Default option is selected.
Stacking
This option lets you specify the stacking of the text.
-
Horizontal: lets you display the text horizontally.
-
Vertical: lets you display the text vertically.
Example with a text image type:
|
Horizontal stacking (default) |
Vertical stacking |
|
|
 |
![]() By default, the Horizontal option is selected.
By default, the Horizontal option is selected.