The Overlay settings page concerns the following settings categories:
A Overlay Settings tab page enables you to:
- define the text that should be displayed
- define the graphical properties and layout of the text
- activate / deactivate the overlay
Each setting can be locked by the administrator.
- The overlay is not visible in result and preview windows (group, clash, section, current selection etc.)
- The overlay is not integrated in Collaboration tools
Global
![]()
Always activate Overlay when opening a document
Note that it is not necessary to restart your session in order to take into account the modification of this checkbox.
![]() By default, this option is unchecked.
By default, this option is unchecked.
Text
![]()

In the text-entry field, enter the desired overlay text.
Customize
The following panel appears:
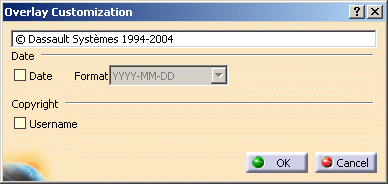
Date
![]() By default, this option is unchecked.
By default, this option is unchecked.
Format
Copyright Username
![]() By default, this option is unchecked.
By default, this option is unchecked.
Global Parameters
![]()
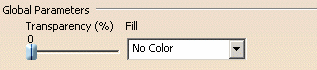
Transparency
To modify the transparency value, drag the Transparency slide button to the desired value.
![]() By default, this option is valuated to 0%.
By default, this option is valuated to 0%.
Fill
To modify the fill color, click the Fill selection button and choose the desired fill color from the proposed list.
![]() By default, this option is valuated to No Color.
By default, this option is valuated to No Color.
Text Properties
![]()

Font
![]() By default, this option valuated to Swiss.pfb.
By default, this option valuated to Swiss.pfb.
Size
![]() By default, this option valuated to 20.
By default, this option valuated to 20.
Color
![]() By default, this option is valuated to Yellow.
By default, this option is valuated to Yellow.
Position
![]()
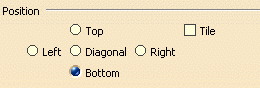
If you also wish the overlay text to be tiled, then click the Tile checkbox.
![]() By default, this option is set to Bottom and Tile
unchecked.
By default, this option is set to Bottom and Tile
unchecked.
![]()