It is essential to define Automotive BiW Fastening parameters in a product in order to create BiW features within this product. This task shows you how to set up the Automotive BiW Fastening parameters in a reference product. Nevertheless, Automotive BiW Fastening parameters are automatically defined when you create BiW Features (BiW Joint, BiW Joint, Body BiW Fasteners) in a reference product.
-
Click Automotive BiW Fastening Parameters
 .
.The Automotive BiW Fastening Parameters dialog box is displayed. 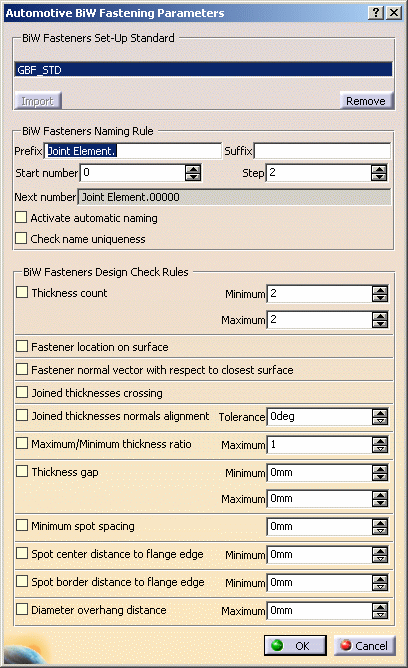
-
Click Import to import the default standard file.
The application standard file appears in the BiW Fasteners Set-Up Standard window. 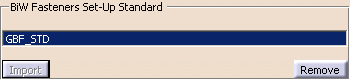
You can set up BiW Fastening rules: Naming Rules
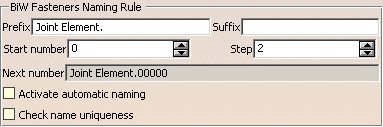
You can define a naming rule to automatically name fasteners that will be further created.
The naming rule consists in an alphanumerical prefix followed by a numerical part (the "number"), then by another alphanumerical suffix. The number has a fixed length as defined in the default standard file. -
Key in the naming rule's Prefix string. Each fastener's name will start with this prefix. A default prefix, Joint Element. is proposed.
-
Key in the naming rule's Suffix string. Each fastener's name will end with this suffix.

Prefix and suffix strings can contain blanks. -
Define the naming rule's Start number using the spinners.
Modifying this number automatically resets the Next number field that shows what the name of the next fastener to be created will be, if the naming rule is active. -
Define the Step to be added to the current number to obtain the next number.
The modification of the step does not change the value of the Next number, but will be effective for the computation of the next one. -
Activate automatic naming enables to activate the naming rule using the above parameters for all fasteners to be next created.
-
Check name uniqueness enables to check, each time a fastener is created or modified, that its name is not already defined in the product structure.
If the name is already given to another fastener, an error message is issued and you are prompted to manually set the ID. For instance, if the prefix is set to ''My Fastener'', the suffix to ''SSS'', the step to 10 and the start number to 100, the next fastener's name will be: ''My Fastener00100 SSS''. 
Note that quotes only show blanks, they will not be part of the resulting fastener's name. Check Rules
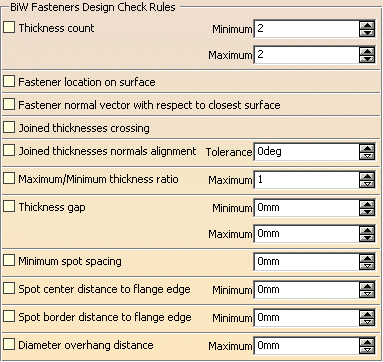
You can define design rules to automatically check parameters at creation or modification time. -
The Thickness count option enables to check the number of thicknesses when creating a joint body.
This number should be not be greater than the maximum thickness count defined here. -
The Fastener location on surface option enables to detect all fasteners that are not located on surfaces.
-
The Fastener normal vector with respect to the closest surface option checks that the fastener's normal vector is parallel to the computed normal at the projection point on the closest surface.
-
The Joined Thicknesses Crossing option enables to check whether the fastener crosses all the specified thicknesses of the joint body.
-
The Joined thicknesses normals alignment option enables to specify an angular accuracy (in degree) between the normal of the joint element and those of all crossed thicknesses.
-
The Maximum/Minimum thickness ratio option checks that the computed ration "max crossed thickness/min crossed thickness of a fastener is lower than the "max ratio" parameter associated to this rule.
The thickness ratio is computed from crossed thickness values as shown below: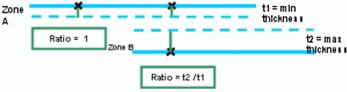
-
The Thickness gap option enables to check the gap value between two joined components crossed by a given fastener (this accounts for the thickness defined on each zone).
This value is included between a minimum and a maximum value defined here. -
The Minimum spot spacing option enables to check the minimum spacing between two spot points.
Selecting curves is not taken into account in any case (for instance if nothing is selected).
This number should be not be less than the minimum spacing defined here. -
The Spot center distance to flange edge option enables to specify a minimum distance (in mm) from the fastener's center location to the closest flange edge.
- The Spot border distance to flange edge option enables to specify a minimum distance (in mm) from the fastener's border location to the closest flange edge.
- The Diameter overhang distance option
enables to specify a maximum overhang distance (in mm) of the
fastener's diameter to the closest flange edge.
If one of the above rules fails, an error message is displayed and the joint element cannot be created.
-
-
Click OK to validate the parameters and close the dialog box.
The feature is added in the specification tree.
Had you activated all the rules, the specification tree looks like that: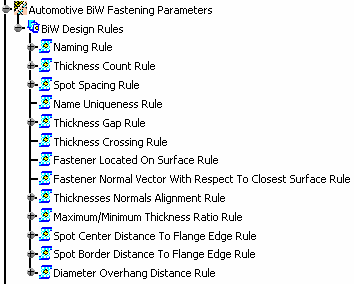
- You can edit the rules by double-clicking on one of them in the specification tree: the Automotive BiW Fastening Parameters dialog box opens.
- If you expand the tree (for the Naming Rules for instance), you can edit the parameters associated to the rule by double-clicking them.
![]()