The procedure in this section describes how to access a system that will not boot from the hard disk. Read "Troubleshooting an Installation from a System Backup" for instructions if a mksysb backup tape fails to boot.
This procedure enables you to get a system prompt so that you may attempt to recover data from the system or perform corrective action that will enable the system to boot from the hard disk.
Notes:
- This procedure is intended only for experienced users who have knowledge of how to boot or recover data from a system that is unable to boot from the hard disk. Most users should not attempt this procedure but instead should follow local problem-reporting procedures.
- This procedure is not intended for users who have just completed a New Installation, because the system will not contain data that needs to be recovered. If you are unable to boot from the hard disk after completing a New Installation, follow your local problem-reporting procedures.
The following steps summarize the procedure for accessing a system that will not boot.
Use this procedure if you are unable to boot from the hard disk. The beginning of this procedure is similar to the one you used to install the Base Operating System. You will, however, be using the maintenance screens instead of the installation screens to complete this procedure. The maintenance screen illustrations in this procedure are provided as examples only. The actual online screens may be somewhat different in appearance.
Notes:
- You may find that on specific hardware, the tape drive door will not open while the system unit is turned off. If you have trouble opening the tape drive door during installation, use the following procedure:
- On some models that have a door to the tape drive, there may be a waiting period of up to three minutes before the tape drive door opens after you have pressed the button to open the tape drive. Some models also require that the button for the tape drive door be held in the pressed position for a few seconds before the tape drive door will open.
- On some models, the eject button must be pressed for at least 2 seconds to eject a CD-ROM that is already in the disc caddy.
Note: If your terminal is an IBM 3151, 3161, or 3164, press the Ctrl+Setup keys to display the Setup Menu and follow the on-screen instructions to set these options. If you are using some other ASCII terminal, refer to the appropriate documents for information about how to set these options. Some terminals have different option names and settings than those listed here.
If you have more than one console, each terminal and direct-attach display device (or console) may display a screen that directs you to press a key to identify your system console. A different key is specified for each terminal displaying this screen. If this screen is displayed, then press the specified key on the device to be used as the system console. The system console is the keyboard and display device used for installation and system administration. Press a key on only one console.
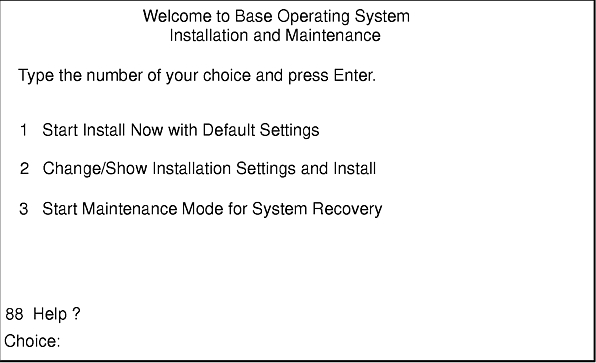
Note: If you customized the bosinst.data file in your installation media to specify a nonprompted installation, the installation and maintenance screens will not be displayed. The system will instead reboot from the installation media using the settings already defined in the bosinst.data file. To access the installation and maintenance screens, you need to override the nonprompted mode. An opportunity to do this occurs when three zeros are displayed on the screen. When you observe the three zeros, enter 000 (zeros) and then the Enter key at the terminal.You can select 88 to display help on this or any subsequent screen.
After you have selected the Start Maintenance Mode for System Recovery option, the Maintenance screen is displayed.
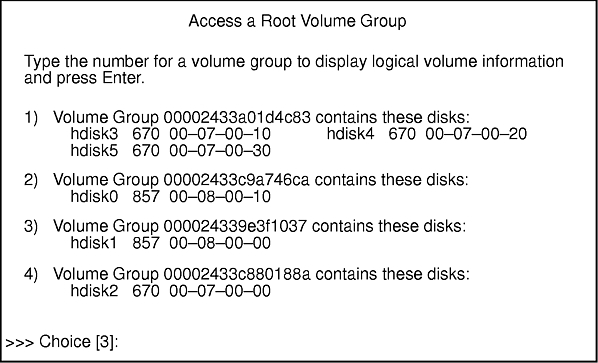
Note: Reviewing the disk and location code information on the Volume Group Information screen enables you to determine whether the volume group you selected was the root volume group. You can return to the Access a Root Volume Group screen if the choice you made was not the root volume group. If you have not chosen a root volume group, you will not be able to continue beyond the Volume Group Information screen.