
|
35.208 bytes |
Service Hints & Tips |
Document ID: MNOK-3ZXN43 |
Aptiva - 2138 Removals and replacements - Pentium II processor module
Applicable to: World-Wide
Follow these steps to remove the Pentium II CPU module from the slot.
1. Determine the type of processor you are installing and make sure the jumpers are set correctly. See "System Board Jumper Settings" on page 5-16.
2. Run the Setup Utility after correctly installing a processor. See "BIOS Setup Utility" on page 1-18"
ATTENTION: Processors are sensitive to static discharge.
Ą Unlock the latches that secure the processor module.
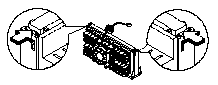
Figure 4- 21 Unlocking the Module Latches
Ą Firmly hold the processor module and pull it out of the socket.
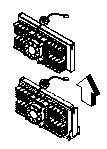
Figure 4- 22 Removing the Pentium II Processor
Pentium II Processor Install
If the retention module is not already installed on the system board:
Ą Place the EMC clip over the correct post on the screw bracket.
Ą Press the screw bracket onto the bottom of the system board.
Note: Be sure the EMC Clips are aligned with the holes with ground pad on the system board.
Ą Turn the system board over.
Ą Place the retention mechanism over the socket on the system board make sure the groove matches the one on the processor socket.

Figure 4- 23 Installing the Pentium II Retention Mechanism
To install processor to retention module:
Ą With the processor module golden fingers pointing downward, align the processor to the posts of the retention mechanism then lower it down.
Ą The golden fingers of the Pentium II module is slotted such that it only fits in one direction. Make sure that module groove matches the one on the processor socket.
|
Search Keywords |
| |
|
Hint Category |
Hardware Installation/Configuration, Processors, System Boards | |
|
Date Created |
05-11-98 | |
|
Last Updated |
09-03-99 | |
|
Revision Date |
09-03-2000 | |
|
Brand |
IBM Aptiva | |
|
Product Family |
Aptiva | |
|
Machine Type |
2138 | |
|
Model |
All | |
|
TypeModel |
| |
|
Retain Tip (if applicable) |
| |
|
Reverse Doclinks |