
|
100.269 bytes |
Service Hints & Tips |
Document ID: PMYS-3J6MAC |
Aptiva - 2134/2176 How to play WAV, MIDI and CD audio (Mwave)
Applicable to: World-Wide
To open "Audiostation": Click on "Start", go to "Programs", "Aptiva Entertainment", and click on "Audiostation".

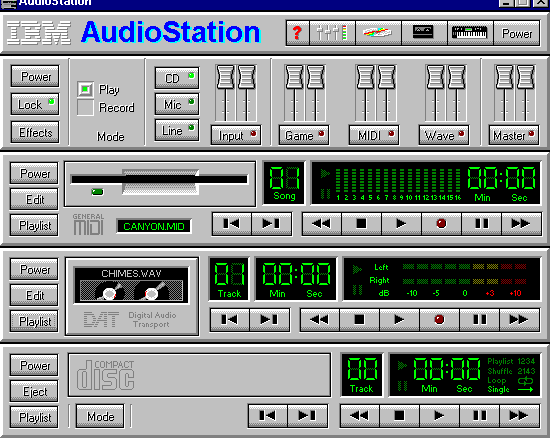
Figure 1. Audiostation with All Modules Open
Figure 1 shows the Audiostation, starting from the top to the bottom, with the PowerBar, the Audio Mixer, MIDI Player, Wave Player and CD Player modules. The PowerBar will always be at the top but the other modules may be in different orders or not present.
If any modules are missing, click to open the missing module from the PowerBar. Starting from the IBM Trademark on the PowerBar and moving right across the PowerBar, the icons are for the Audiostation Help, Audio Mixer module, The CD Player Module, Wave Module and MIDI Module. Click on the appropriate icon to open the module. If an error occurs, the customer will have to reload the Audiostation Application.
In order to do the testing; the Audiostation's mixer should be set to the appropriate settings as shown above. If the mixer says Reverb, Pitch, and Bass on the left side, the mixer is set to configure Effects. Click on the ALL OFF button and then click on the Effects button to reach the correct starting point as shown in Figure 1.
The audio mixer's settings should be:
1. Volumes all raised to the top. If they are not, then place the mouse cursor on the control, hold the left mouse button down and slide the control up.
2. All Mutes should be off. If they are not, simply click on the button with an LED on.
3. The CD LED should be on, if it is not then click on CD.
4. The Mode should be set to Play with a green led on the button, if it is not, then click on Play.
5. The audio mixer is now setup in order to do the testing.
CD Player
To test the CD Player, an audio CD such as a music CD is needed.
1. Insert the music CD into the CD-ROM drive.
2. The CD player should now look like the CD player above. The left side of the CD player will either say a title or Untitled and the right side of the CD player will say Trk 1. (It says Track 0 in the figure 1 above.)
3. Click on the right sided triangle to start playing the CD.
4. The music should be playing over the speakers with the time counting on the CD player.
5. To stop the CD player, click on the square next to the triangle.
MIDI Player
To test the MIDI player:
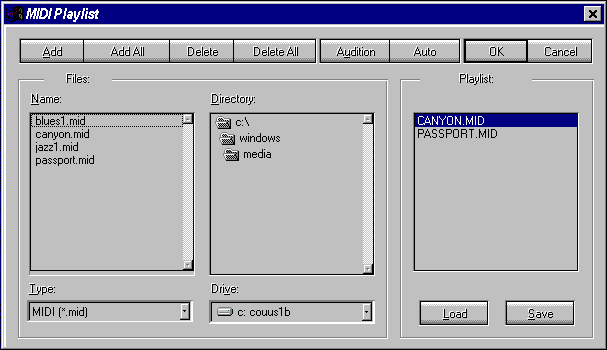
1. Click on the folder icon on the lower right of the MIDI Player to bring up the MIDI Playlist shown below in Figure 2.

Figure 2 MIDI PLAYLIST
2. This screen shot of the MIDI Playlist shows the canyon.mid in the first column or name column and in the third column or Playlist column.
3. Click on the first file in the name column. This will highlight the file.
4. Click on the icon in the name column to add the file to the Playlist.
5. When the file is in the Playlist column, click on the "OK" button on the lower right of the MIDI Playlist. This will return you to Audiostation.
6. The file should now show up in the MIDI Player. In the Audiostation example shown above, the file loaded is the Canyon.mid. The file selected should show as well. If the file is not named there, there is no file selected. Repeat the above procedures to select a file.
7. Click on the single right triangle on the right side of the square icon to play the MIDI file. The MIDI player's LEDs should flash and the MIDI file will be heard.
8. To stop the MIDI player, click on the square to stop it.
Wave Player
To play a wave file through the Wave Player:
1. Single left mouse click on the folder icon in the lower right of the Wave Player module. This should bring up the Wave Player Playlist. This Playlist is the same format as the MIDI Playlist shown above. Refer to the Playlist show above. The first column is the name column and the third column is the Playlist column.
2. Click on the first file in the first column or name column. This will highlight the file in the name column.
3. Click on an icon in left of third column or Playlist column. This will cause the file that was selected to show up in the third column or Playlist column.
4. When the file is in the column, click on the "OK" button on the lower right bottom of the Playlist screen. This will return you to the Audiostation.
5. The file should be listed in the MIDI player like the MIDI player module shown in the Audiostation screenshot above. In this example above, the Anarchy.wav file is loaded.
6. Click on the single right triangle to the right side of the square icon to play the wave file. The wave file should play and the LEDs should flash on the wave player.
7. Click the square on the Wave player to stop playing the wave file.
8. To close the Audiostation, click on the X in the upper right of the Audiostation Window. This will close the program and may bring up messages says that the Playlists have change. Click on the "No" button to close the messages.
|
Search Keywords |
| |
|
Hint Category |
Audio, Entertainment Software | |
|
Date Created |
18-06-97 | |
|
Last Updated |
01-12-98 | |
|
Revision Date |
04-11-99 | |
|
Brand |
IBM Aptiva | |
|
Product Family |
Aptiva | |
|
Machine Type |
2134, 2176 | |
|
Model |
6R8; 7R1; 7R3; 7R6; 7R7; 7R9; 7RO; 8R1; 8R8; 9R3; C23; C33; C35; C55; C56; C65; C66; C67; C6Y; C73; C76; C77; F23; 2176F33; F35; F67; 6R6; C21; C31; C32; 6R9; C31; F31; C6D; 8R6; 8R9; 9R4 | |
|
TypeModel |
| |
|
Retain Tip (if applicable) |
| |
|
Reverse Doclinks |