
|
47.577 bytes |
Service Hints & Tips |
Document ID: PMYS-3L5UCW |
Aptiva - Installing the latest video drivers
Applicable to: World-Wide
Installing the latest video driver on 2144/2168 Mxx & Axx systems:
For Windows 3.x:
1. Download the TRID_W31.EXE file from the IBM BBS or FTP sites, ftp://ftp.pc.ibm.com/pub/pccbbs/aptiva/trid_w31.exe or from the IBM Aptiva Web page. Make a note of the directory in which the file is stored.

|
2. Use the File Manager to open the directory to which you downloaded the TRID_W31.EXE file, and double-click on its icon. A DOS window will open with a message prompting you to insert a blank diskette and press Enter. Place a formatted floppy disk in the A: drive, and press Enter.
3. The driver files will be extracted to your diskette. This process will take about 2 minutes.
4. From the Program Manager window, click File, then select Run, type a: install in the dialog box, and then press Enter.
5. A menu will appear presenting a choice of Express or Custom installations. Click the Express Installation button.
6. A Display Driver Installation window will appear. Click the "Continue" button to accept the default destination paths.
7. The driver files will be copied to the hard drive. This will take approximately 1-2 minutes.
8. A "Display Driver and Utility" program group will be created, and an Install Completed Successfully window will be displayed. Click "OK" to complete the installation.
For OS/2:
1. Download the TRID_OS2.EXE file from the IBM BBS or FTP sites, ftp://ftp.pc.ibm.com/pub/pccbbs/aptiva/trid_os2.exe or from the IBM Aptiva Web page. Make a note of the directory in which the file is stored.
|
|
2. Use the Drives icon (located in the OS/2 System folder) to open the folder to which you downloaded the TRID_OS2.EXE file, and double-click on the file's icon. An OS/2 window will open with a message prompting you to insert a blank diskette and press Enter. Place a formatted floppy disk in the A: drive and press Enter.
3. The driver files will be extracted to your diskette. This process will take about 2 minutes.
4. From the OS/2 desktop, open the OS/2 System folder, double click the Drives object, and then double click on the icon for drive A. When the drive A folder opens, double-click on the icon for INSTALL.EXE. This will launch the installation program.
5. The first page of the installation program's window is the Screen Resolution selection page (see Figure 1). Your current screen resolution and color depth will already be highlighted, if you want to change these settings, select the desired resolution and color depth from the list.
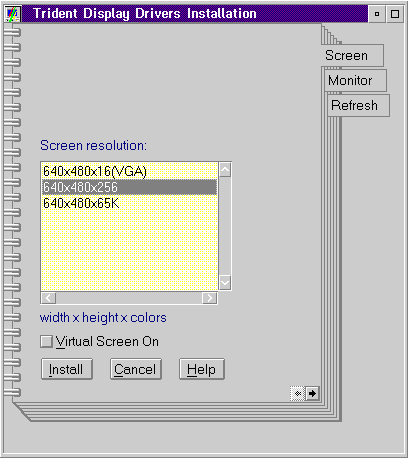
Figure 1: OS/2 driver installation utility.
6. Click the second page of the installation program's window. Select your monitor from the drop down list box, if you monitor is not listed, use the "default" setting.
7. The third page of the installation program window controls the monitor refresh rate. Unless you are experiencing flicker or other distortions in your monitor image, you do not need to modify this setting.
8. When you have set your screen resolution and monitor type, click "Install". The display drivers will be copied to the hard disk. This may take a few minutes.
9. When the file copy operation is completed, a window will appear stating that the driver installation was successful, and that OS/2 needs to be restarted for the new driver settings to take effect. Click "OK".
10. Remove the disk from drive A, and perform a normal shutdown (right-click on the desktop and select Shutdown). The driver installation is complete.
For Windows 95:
1. Download the TRID_W95.EXE file from the IBM BBS or FTP sites, ftp://ftp.pc.ibm.com/pub/pccbbs/aptiva/trid_w95.exe or from the IBM Aptiva Web page.
|
|
2. Once the file has been downloaded, click Start, select Find, then select Files or Folders. The Find dialog box will appear. Type trid_w95.exe in the Named: field, and click "Find Now". The TRID_W95 icon will appear in the lower half of the find window, double-click the icon. A DOS window will open with a message prompting you to insert a blank diskette and press Enter. Place a formatted floppy disk in the A: drive and press Enter.
3. The driver files will be extracted to your diskette. This process will take about 2 minutes.
4. Click Start, select Settings, then select Control Panel, and then double-click the Display icon.
5. Click on the Settings tab.
6. Click Change Display Type.
7. On the following screen, click Change (there are two change buttons on this screen, click the one in the Adapter Type section of the screen).
8. A list of compatible devices will be displayed, click the Have Disk button.
9. A default path of A: will already be entered in the box. Make sure that your driver diskette is still in the drive, and click OK.
10. A dialog box will appear listing the new Trident video driver. Click "OK". The updated driver files will be copied from the floppy diskette to the hard drive.
11. When the copy operation is complete, click "Close" on all the open windows until you are back at the Control Panel. At this point, a window will appear stating that you must restart Windows in order for the new settings to take effect. Remove the driver diskette from drive A, and click Restart Now.
12. Windows will restart and the driver installation is complete.
Installing the latest video driver on C21, C31, C32, C54, & C6D systems:
1. Download the SIS6205.EXE file from the IBM BBS or FTP sites, ftp://ftp.pc.ibm.com/pub/pccbbs/aptiva/sis6205.exe or from the IBM Aptiva Web page.
|
|
2. Once the file has been downloaded, click Start, select Find, then select Files or Folders. The Find dialog box will appear. Type sis6205.exe in the Named: field, and click Find Now. The SIS6205 icon will appear in the lower half of the find window, double click the icon. A DOS window will open with a message prompting you to insert a blank diskette and press Enter. Place a formatted floppy disk in the A: drive, and press Enter.
3. The driver files will be extracted to your diskette. This process will take about 2 minutes.
4. Click Start, select Settings, then select Control Panel, and then double-click the Display icon.
5. Click on the Settings tab.
6. Click Change Display Type.
7. On the following screen, click Change (there are two change buttons on this screen, click the one in the Adapter Type section of the screen).
8. A list of compatible devices will be displayed, click the Have Disk button.
9. A default path of A: will already be entered in the box. Make sure that your driver diskette is still in the drive, and click "OK".
10. A dialog box will appear listing the new SIS video driver. Click OK. The updated driver files will be copied from the floppy diskette to the hard drive.
11. When the copy operation is complete, click "Close" on all the open windows until you are back at the Control Panel. At this point, a window will appear stating that you must restart Windows in order for the new settings to take effect. Remove the driver diskette from drive A, and click Restart Now.
12. Windows will restart and the driver installation is complete.
Installing the latest video driver on 2134/2176 (except C21, C31, C32, C54, & C6D) and 2159 systems:
1. Download the latest driver file from the IBM BBS or FTP sites, ftp://ftp.pc.ibm.com/pub/pccbbs/aptiva/aptati.exe or from the IBM Aptiva Web page.
|
|
2. Once the file has been downloaded, click Start, select Find, then select Files or Folders. The Find dialog box will appear. Type aptati.exe in the Name: field, and click Find Now. The APTATI icon will appear in the lower half of the find window, double-click the icon. A DOS window will open with a message prompting you to insert a blank diskette and press Enter. Place a formatted floppy disk in the A drive, and press Enter.
3. The driver files will be extracted to your diskette. This process will take about 2 minutes.
4. Click Start, select Settings, then select Control Panel, and then double-click the Display icon.
5. Click on the Settings tab.
6. Click Change Display Type.
7. On the following screen, click Change (there are two change buttons on this screen, click the one in the Adapter Type section of the screen).
8. A list of compatible devices will be displayed, click the Have Disk button.
9. A default path of A: will already be entered in the box. Make sure that your driver diskette is still in the drive, and click "OK".
10. A dialog box will appear listing the new ATI video driver. Click "OK". The updated driver files will be copied from the floppy diskette to the hard drive.
11. When the copy operation is complete, click "Close" on all the open windows until you are back at the Control Panel. At this point, a window will appear stating that you must restart Windows in order for the new settings to take effect. Remove the driver diskette from drive A, and click Restart Now.
12. Windows will restart and the driver installation is complete.
Installing the latest video driver on 2136, 2137, 2140, 2142, 2161 and 2162 systems:
These systems can use the included Update Connector feature to obtain and install any available video driver updates. The Update Connector can be accessed by clicking Start, select Aptiva Installer to start the Aptiva Installer program, and then clicking the Update Connector tab. If video driver updates are available, they will be automatically downloaded and installed on the system.
|
Search Keywords |
| |
|
Hint Category |
Video, Software Installation/Configuration, OS/2, DOS/Windows 3.x, Windows 95 | |
|
Date Created |
21-08-97 | |
|
Last Updated |
22-01-99 | |
|
Revision Date |
10-12-99 | |
|
Brand |
IBM Aptiva | |
|
Product Family |
Aptiva | |
|
Machine Type |
2134, 2136, 2137, 2138, 2140, 2142, 2144, 2159, 2161, 2162, 2168, 2176 | |
|
Model |
all | |
|
TypeModel |
| |
|
Retain Tip (if applicable) |
| |
|
Reverse Doclinks |