
|
20.703 bytes |
Service Hints & Tips |
Document ID: DETR-42RPX8 |
Aptiva - 2158/2163 Removals and replacements - System board
Applicable to: World-Wide
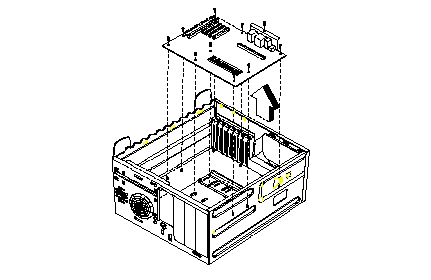
1. Remove all adapter cards.
2. Disconnect all cables connected to the system board. Note the location and orientation of all cables.
3ň Remove the screws securing the system board to the chassis.
4ň Lift the system board to remove from chassis.
5ň Remove memory (DIMM) if applicable.
6ň Remove processor if necessary.
NOTE: System Board Installation
1ň Before reinstallation, position the housing on its side. When installing a new system board, push the board to the rear and align it with the front locating pin. Visually verify that the board is aligned properly, then press the board down.
2ň Be sure to reinstall the processor, DIMMs, I/O port bracket onto the new system board if applicable.
3ň After installing the system board, secure with original screws.
4ň Change all jumper settings to match those of the original board.
5ň Reinstall other components into the machine i.e. drives, power supply, cables, etc.
6ň Upgrade the BIOS version on the new system board using the BIOS upgrade utility.
7ň Change the Machine Type and Serial Number in the BIOS to match the original planar BIOS settings.
8ň Reboot the system and run the Setup Utility.
|
Search Keywords |
| |
|
Hint Category |
Hardware Installation/Configuration, System Boards | |
|
Date Created |
01-12-98 | |
|
Last Updated |
02-03-99 | |
|
Revision Date |
01-03-2000 | |
|
Brand |
IBM Aptiva | |
|
Product Family |
Aptiva | |
|
Machine Type |
2158, 2163 | |
|
Model |
all | |
|
TypeModel |
| |
|
Retain Tip (if applicable) |
| |
|
Reverse Doclinks |