
|
304.568 bytes |
Service Hints & Tips |
Document ID: MNOK-3TAR5L |
Aptiva - How to setup Prodigy Internet
Applicable to: United States
Step 1 -- Install the Prodigy Internet Software
NOTE: If you have an Aptiva 2134/2144/2168/2176/2159, Prodigy is already installed on your computer. Double-click on the IBM Information Superhighway icon, double-click Prodigy and then proceed to Step 2 -- Select a Local Access Number.
Open the folder labeled Online Services on the desktop.
Double-click the icon labeled Setup Prodigy Internet.
Prodigy will copy files to prepare for Setup. This process will take a few minutes.
Prodigy Setup will begin. Click Next to continue.
The next window prompts for a folder to which Prodigy will install. We recommend that you keep the default by clicking Next.
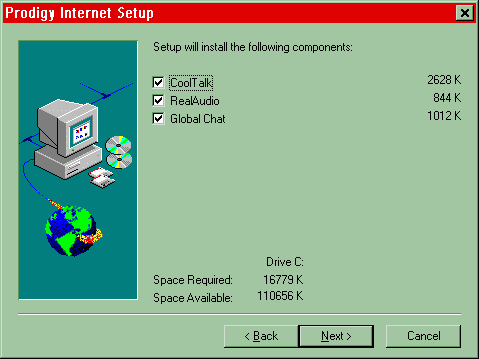
The next window shows which extra components will be installed. At the bottom of this window, please note the amount of space required. If the the space required is less than the space available, you should click cancel and free hard disk space before proceeding. Click Next.
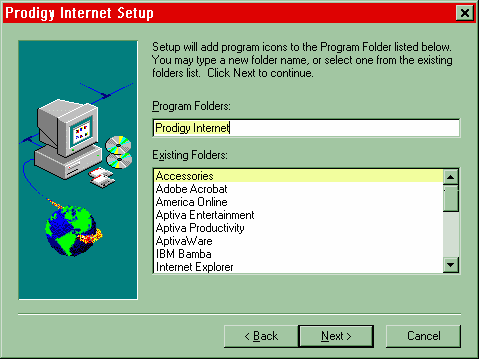
Prodigy next prompts for a program folder. This is where Prodigy will appear in the Start Menu. We recommend that you keep the default setting and click Next.
Prodigy will now copy program files. This process will take a few minutes.
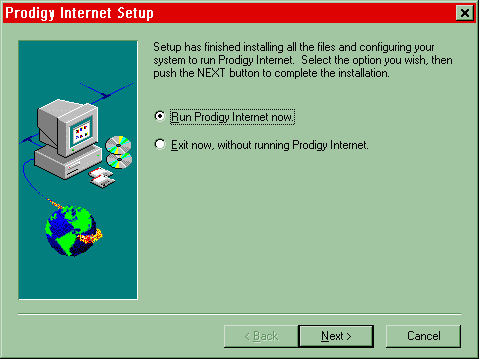
Once all files have been copied, Prodigy is ready to run. Click Run Prodigy Internet now. Click Next.
Prodigy will prepare to run. This process will take several minutes.
Step 2 -- Select a Local Access Number
Prodigy Internet enrollment begins here. Please read what Prodigy has to say about its service. Click Next to continue.

Choose "I would like to become a member of Prodigy Internet". Click Next.

Next, choose the modem that is preinstalled in your Aptiva (usually only one modem will be shown - just select that one). Click Next.
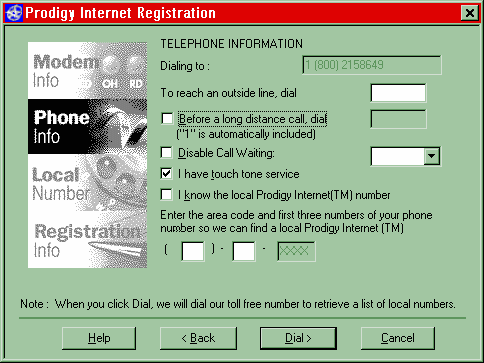
Next, you will describe your location to Prodigy Internet. By this we mean that Prodigy needs to know about any special dialing necessary from your location. For instance, if you need to dial a digit for an outside line (such as "9" from most hotels) that should be entered in the space provided. For more help with these options, click Help.
Enter your Area Code and the first three digits of your phone number. Click Next.
Prodigy will now dial a toll free number to retrieve a current list of local numbers. This will take a few minutes.
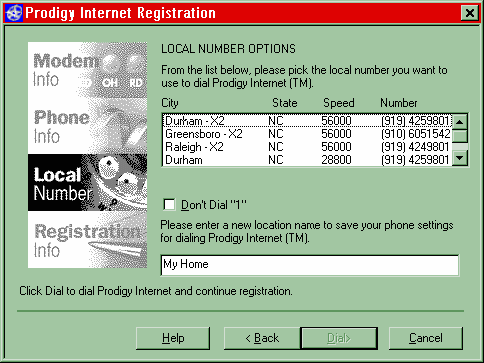
Choose a local number. Click Dial.
Prodigy Internet will now connect to the local number you selected. This process will take a few minutes.
Step 3 -- Register for the Service
Once connected to a local number, your browser starts and displays the following page. Click No.
Please fill in all of the requsted personal information. This information is necessary to continue registration. Click Continue.
Next, you will choose a User Name. This name becomes your online identity and your e-mail address, so please choose carefully. You will not be able to change your user name after you have registered.
Please read what Prodigy Internet says about User Names. Type in your selected user name. Click Continue.
PLEASE, read what Prodigy Internet has to say about passwords. Enter your password two times. Remeber that the password is case sensitive. Click Continue.
Choose a membership plan. Click Continue.
Read the Details of your membership plan. Click Continue.
Enter your billing information. Click Contine.
Please VERIFY all of the information that has been entered.
You may change the information if necessary, otherwise choose "Everything is correct. Continue."
Please take the time to read the Membership Agreement. Click "I accept the Membership Agreement. Register me now."
You are now a member of Prodigy Internet!
PLEASE make a note of your User Name, Password, and Email address. Click Continue.
Click Dial to connect to and use Prodigy Internet.
|
Search Keywords |
| |
|
Hint Category |
Communications Software, Software Installation/Configuration | |
|
Date Created |
06-04-98 | |
|
Last Updated |
09-12-98 | |
|
Revision Date |
07-12-99 | |
|
Brand |
IBM Aptiva | |
|
Product Family |
Aptiva | |
|
Machine Type |
2134, 2136, 2137, 2138, 2139, 2140, 2142, 2144, 2153, 2159, 2161, 2162, 2168, 2176 | |
|
Model |
C21; 6R6; E40; E14; E16; E24; E34; E26; E46; E76; E56; E96; L31; L5H; L51; L61; L71; L7M; S61; S6H; S62; S6S; 3R6; 4R1; 4R9; M31; M51; M52; M63; 2R9; 3R1; 3R3; 3R5; 3R7; 3R9; 4R0; 4R2; 4R3; M41; M53; M55; M56; M57; M61; M62; M71; M72; 5R5; M91; 5R1; 6R3; A10; A12; A14; 5R2; 5R3; 5R6; 5R8; 5R9; 6R0; 6R4; 6R5; A15; A40; A44; A45; A50; A51; A52; A90; A92; A94; 13R; 14R; 15R; 16R; 17R; 18R; 19R; 20R; S64; S66; S74; S76; S78; S7H; S80; S90; C3D; C3E; C85; C8E; C8F; C8H; C8M; C8X; C9E; C9F; C9S; C9X; 21R; 22R; 24R; 25R; 28R; 29R; 30R; 31R; 33R; 35R; 37R; 41R; S35; S3C; S8C; S8H; S9C; S9H; S9M; SIB; C23; C31; C32; C33; C35; C3X; C53; C55; C5X; C65; C66; C67; C6B; C6D; C6E; C6V; C6X; C6Y; C6Z; C73; C77; C7X; 6R8; 6R9; 7R0; 7R1; 7R2; 7R3; 7R6; 7R7; 7R9; 8R1; 8R6; 8R8 ; 9R1; 9R2; 9R3; 9R4; 9R5; 9R6; E2N; E3N; E4N; E5N; E6N; EP4; E5D | |
|
TypeModel |
| |
|
Retain Tip (if applicable) |
| |
|
Reverse Doclinks |