
|
57.489 bytes |
Service Hints & Tips |
Document ID: GSMH-3EFLBW |
TP 365X/XD - Checkout guide
Applicable to: World-Wide
Checkout Guide:
Use the following procedure as a guide for computer problems.
|
Note: |
|
Note: |
3. Use the following table with the verified symptom to determine which page to go to. Search the symptoms column and find the description that best matches your symptom; then go to the page shown in the 'Go to— column.
|
Symptoms (Verified) |
Go to |
|
Power failure. (The power indicator does not go on or stay on.) |
'Power Systems Checkout—. |
|
POST does not complete. No beeps or error codes are indicated. |
'Symptom-to-FRU Index—, and then use the No-Beep Symptoms table. |
|
POST beeps, but no error codes are displayed. |
'Symptom-to-FRU Index—, and then use the Beep Symptoms table. |
|
POST detected an error and displayed numeric error codes. |
'Symptom-to-FRU Index—, and then use the Numeric Error Codes table. |
|
The diagnostic test detected an error and displayed a FRU code. |
'FRU Codes—. |
|
The configuration is not the same as the installed devices. |
'Checking the Installed Devices List—. |
|
Other symptoms (such as LCD display problems). |
'Symptom-to-FRU Index—, and then use the Other Symptoms table. |
|
Symptoms cannot be recreated. (Intermittent problems.) Use the customer reported symptoms and go to |
'Symptom-to-FRU Index—. |
Memory Checkout:
DIMM cards are available for increasing memory capacity.
|
DIMM |
Displayed Value |
|
No DIMM installed |
7808KB |
|
8MB |
16000KB |
|
16MB |
24192KB |
|
32MB |
40576KB |
Memory errors might stop system operations, show error messages on the screen, or hang the system.
Use the following procedure to isolate memory problems.
|
Note: |
If memory problems occur intermittently, make sure the DIMM socket latches are latched completely. If the DIMM latches are securely latched, use the loop option to repeat the test. When the test detects an error, an error log is printed on the printer connected to the parallel port. See 'Error Log— for more information.
System Programs in Flash Memory:
System setup programs and diagnostic tests are stored in flash memory.
Flash Memory Update:
A flash memory update is required for the following conditions:
New versions of system programs.
New features or options are added.
To update the flash memory, do the following:
1. Get the appropriate diskette containing the update.
2. Insert the System Program Service Diskette into drive A and power on the computer.
3. Select Update system programs from the menu.
System Board and CPU Card Checkout:
The processing functions are performed by both the system board and the CPU card. Processor problems can be caused by either FRU. However, the CPU card generally has a lower probability of failure. When a numeric code calls the system board or the CPU card as a FRU, or the CPU card is called by a diagnostic test by showing FRU code 11, use the following procedure to isolate the problem:
1. Run the system board test to verify the symptom. This test verifies both the system board and the CPU card. If no error is detected, return to 'Checkout Guide—.
2. If FRU code 10 appears, replace the system board but do not replace the CPU card. Transfer the CPU card from the old system board to the new system board.
3. If FRU code 11 appears, reseat the CPU card.
4. Rerun the test to verify the fix.
5. If FRU code 11 remains, replace the CPU card.
If above procedure does not correct the problem, go to 'Undetermined Problems—.
Keyboard/Auxiliary Input Device Checkout:
Remove the external keyboard if the internal keyboard is to be tested.
If the internal keyboard does not work or an unexpected character appears, make sure that the three flexible cables extending from the keyboard are correctly seated in the connectors on the keyboard card.
If the keyboard cable connections are correct, check the keyboard card.
TrackPoint III Checkout:
If the TrackPoint III will not work, check the configuration in the ThinkPad Features program. If the configuration of the TrackPoint III is disabled, select Enable to enable it. If this does not correct the TrackPoint III problem, continue with the following steps.
The TrackPoint III does automatic compensations to adjust the pointer sensor. During this process, the pointer moves on the screen automatically for a short time. This self-acting pointer movement can occur when a slight, steady pressure is applied to the TrackPoint III pointer while the computer is powered on or while the system is running, or when re-adjustment is required because the temperature has exceeded its normal temperature range. This symptom does not indicate a hardware problem. No service actions are necessary if the pointer movement stops in a short period of time.
If a click button problem or pointing stick problem occurs, do the following:
1. Go to the Easy-Setup screen.
2. Select an item with the pointing stick.
3. Press either the left or right click button.
4. Verify that both buttons work correctly.
If either the pointing stick or the click button do not work, do the following actions one at a time to correct the problem. Do not replace a non-defective FRU.
Reseat the keyboard card cables.
Replace the keyboard.
Replace the keyboard card.
Replace the system board.
Port Replicator Game Port Checkout:
Do the following if a Port Replicator joystick problem occurs:
1. Connect the joystick to the Port Replicator game port.
2. Go to the Easy-Setup screen.
3. Select an item with the joystick.
4. Press any button of the joystick.
5. Verify that all buttons work correctly.
If either the joystick or a button does not work, replace the Port Replicator. If the problem still remains, replace the system board.
Diskette Drive Test:
Do the following to isolate the problem to a controller, drive, or diskette. A scratch, write enabled, non-defective 2HD diskette is required.
FDD-1 represents the built-in diskette drive for 365X. FDD-2 represents a diskette drive in the Port Replicator or a diskette drive attached through the external diskette drive connector.
|
Warning: |
Do the following to select the test device:
1. Select the advanced diagnostics mode and select Tool ; then select the FDD-1 or FDD-2 icon and press the spacebar.A | mark appears next to the selected icon. Insert a blank diskette when instructed.
2. Run the diskette drive test.
3. If the controller test detects an error, FRU code 10 appears. Replace the system board.
4. If the controller test runs without errors, the drive read/write tests start automatically.
5. If the drive test detects an error, FRU code 50 for FDD-1 or 51 for FDD-2 appears. If the diskette itself is known to be good, replace the drive.
Status Indicators Checkout:
If a status indicator LED problem occurs, do the following:
1. Power off the computer.
2. Power on the computer.
3. All the LEDs in the status indicator panel turn on for a moment soon after the computer is powered on. Verify that all indicators turn on correctly.
If some of the indicators do not turn on, replace the LED indicator card.
If the problem still remains, replace the keyboard card.
Power Systems Checkout:
To verify the symptom of the problem, power on the computer using each of the power sources as follows:
1. Remove the battery pack, diskette drive, and hard disk drive.
2. Connect the AC Adapter and check that power is supplied.
3. Install the diskette drive or hard disk drive one at a time, and check that power is supplied from each power source.
4. Disconnect the AC Adapter, remove the hard disk and diskette drive, and install the charged battery pack; then check that power is supplied by the battery pack.
If you suspect a power problem, see the appropriate power supply check listed below.
'Checking the AC Adapter—.
'Checking Operational Charging—.
'Checking the Battery Pack—.
'Checking the Backup Battery—.
Checking the AC Adapter:
You are here because the computer fails only when the AC Adapter is used.
If the power problem occurs only when a Port Replicator is used, replace the replicator.
If the power-on indicator does not turn on, check the power cord of the AC Adapter for correct continuity and installation.
If the operational charge does not work, go to 'Checking Operational Charging—.
|
Note: |
1. Unplug the AC Adapter cable from the computer and measure the output voltage at the plug of the AC Adapter cable.
See the following figure:
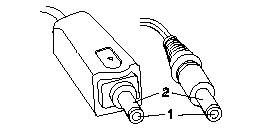
(16 - 10 V)
|
Pin |
Voltage (V dc) |
|
1 |
+ 14.5 to+ 17.0 |
|
2 |
Ground |
|
Note: |
Checking Operational Charging:
To check operational charging, use a discharged battery pack or a battery pack that has less than 50% of the total power remaining when installed in the computer.
Perform operational charging. If the battery status indicator does not turn on, remove the battery pack and leave it to return to room temperature. Reinstall the battery pack. If the charge indicator still does not turn on, replace the battery pack.
Checking the Battery Pack:
Battery charging will not start until the Fuel-Gauge shows that less than 95% of the total power remains; with this condition the
battery pack will charge to 100% of its capacity. This protects the battery pack from being overcharged or having a shortened life.
Do the following:
1. Power off the computer.
2. Remove the battery pack and measure the voltage between battery terminals 2 (+ ) and 6 (- ).
See the following figure:
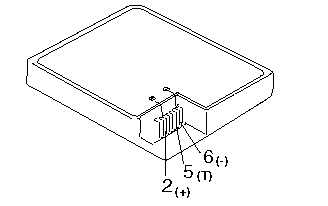
|
Terminal Voltage |
(V dc) / Signal |
|
1 |
- |
|
2 |
+ 8 to+ 13.5 |
|
3 |
- |
|
4 |
- |
|
5 |
Thermal |
|
6 |
Ground(-) |
Note:
Signal lines, not used in these steps, are used for communication between the system and the battery.
3. If the voltage is less than+ 9.6 V dc, the battery pack has been discharged. Recharge the battery pack.
If the voltage is still less than+ 9.6 V dc after recharging, replace the battery.
|
Note: |
4. If the voltage is more than+ 9.6 V dc, measure the resistance between battery terminals 5 and 6. The resistance must be 4 K to 30 K ohm.
If the resistance is not correct, replace the battery pack. If the resistance is correct, replace the system board.
Checking the Backup Battery:
1. Power off the computer and unplug the AC Adapter from the computer.
2. Open the keyboard and remove the battery pack.
3. Lift the right-hand section of the black insulator sheet.
4. Locate the backup battery on the system board, shown at 1.
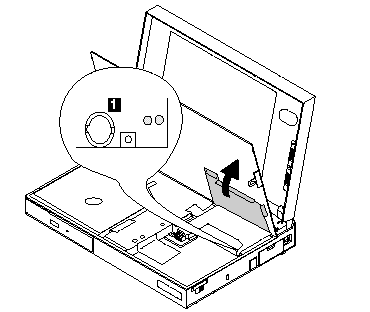
5. Using a plastic tool, remove the backup battery from the system board.
|
DANGER: |
6. Measure the voltage of the backup battery.
Refer to the following table for voltages:
|
Wire |
Voltage (V dc) |
|
+ |
+ 2.5 to+ 3.7 |
|
- |
Ground |
If the voltage is correct, replace the system board.
If the voltage is not correct, the backup battery has been discharged. Replace the backup battery.
If the backup battery discharges quickly after replacement, replace the system board.
Power Management Features:
Three power management modes are provided by the computer to reduce power consumption and prolong battery power.
Standby Mode:
When in standby mode the following occurs:
The LCD backlight turns off.
The hard disk motor stops.
Events that cause the computer to enter standby mode:
Standby requested by the Fn key. (Fn+ F3)
No activity under auto-standby enabled by the ThinkPad Features program.
Events that cause the computer to exit or resume standby mode:
(Resume) Any key operation.
Suspend Mode:
When in suspend mode, the following, in addition to the two actions of standby mode, occur:
The LCD is powered off.
The hard disk is powered off.
The CPU is stopped.
|
Notes: |
Events that cause the computer to enter suspend mode:
Suspend mode is requested by the Fn key (Fn+ F4).
The LCD is closed.
The specified time has elapsed from the last operation with the keyboard, mouse, hard disk drive, parallel connector, or diskette drive; or the AC Adapter is plugged in. The time is specified by Suspend Timer in the ThinkPad Features program. The battery condition is low. The battery power indicator blinks amber.
Either the PS2 OFF or PS2 SUSpend command is set in the ThinkPad Features program.
Events that cause the computer to exit or resume suspend mode:
(Resume) The LCD is opened.
(Resume) The real time clock alarm is signaled.
(Resume) The ring indicator (RI) is signaled by a serial or PCMCIA device.
(Resume) The Fn key is pressed.
(Resume) An external keyboard key is pressed while operating with ac power.
(Exit) Timer (timeout) conditions are satisfied for entering hibernation mode.
Hibernation Mode:
When in hibernation mode, the following occurs:
The system status, RAM, VRAM, and setup data are stored on the hard disk.
The system is powered off.
|
Note: |
Events that cause the computer to enter hibernation mode:
The keyboard is opened.
Hibernation mode is requested by the Fn key (Fn+ F12).
Timer/timeout conditions are satisfied in suspend mode.
A critical low battery condition occurs.
The PS2 HIB ernation command is set in the ThinkPad Features program.
Event that causes the computer to exit hibernation mode:
The power-on switch is operated.
When power is turned on, the hibernation history in the boot record on the hard disk is recognized and system status is restored from the hard disk to resume operation.
|
Search Keywords |
| |
|
Hint Category |
Hardware Maintenance Information | |
|
Date Created |
19-02-97 | |
|
Last Updated |
19-08-98 | |
|
Revision Date |
18-08-99 | |
|
Brand |
IBM ThinkPad | |
|
Product Family |
ThinkPad 365X/XD | |
|
Machine Type |
2625 | |
|
Model |
Various | |
|
TypeModel |
| |
|
Retain Tip (if applicable) |
| |
|
Reverse Doclinks |