
|
31.540 bytes |
Service Hints & Tips |
Document ID: DETR-3TARVV |
Aptiva - 2144/2168 (SL-I) Hard disk drive jumper settings
Applicable to: World-Wide
Hard Disk Drive Jumper Settings:
Up to four drive devices (hard disk drives or CD-ROM drives) can be installed in Service Level I systems. If any drives do not show in the Installed Devices list in the Setup Utility, ensure the jumper settings and connectors are set as shown here. Refer to ¨System Board Layout - Type I -1´ and ¨System Board Layout - Type I -2´ for connector location information.
Primary Hard Disk Drive IDE Local Bus Connector:
At the primary hard disk drive IDE connector, make sure the first drive installed is set as the master drive (1) in the following figures).
Note:
If a second drive is installed, it must be attached to the secondary IDE connector. Set the jumpers as the slave drive (2) in the following figures).
All preloaded software contained on the Recovery Diskettes should be installed on the master hard disk drive on the primary connector.
Secondary Hard Disk Drive Connector:
If additional drives are connected to the secondary hard disk drive connector, set the first drive connected to this connector as the master drive (1) in the following figures). If a second drive is connected to the secondary hard disk drive connector, set the jumpers as the slave drive (2) in the following figures). Ensure all software is set to recognize all installed drives.
In multimedia systems, the CD-ROM drive is connected to the secondary drive connector at the factory as the master drive. If an additional hard disk drive is connected to the secondary connector, it must be set as the master drive, (1) , and the CD-ROM drive jumpers reset as the slave drive (see ¨CD-ROM Drive and Sound Card Jumper Settings´).
Note:
Check the Setup Utility for correct installation:
Hard Disk 1 Master drive
Hard Disk 2 Slave drive
Hard Disk 3 Master drive (CD-ROM if other drive not connected to this connector)
Hard Disk 4 Slave drive (CD-ROM if hard disk installed at secondary connector, Hard Disk 3)
For jumper settings, match your hard disk drive to one of the following figures. (1) = Master Drive (2) = Slave Drive.
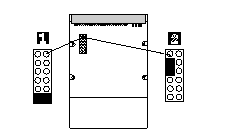
Figure 1-12. 538MB, 1.6GB, 2.0GB Drive
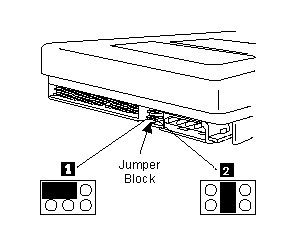
Figure 1-13. 635MB, 850MB Drive
For jumper settings, match your hard disk drive to one of the following figures. (1) = Master Drive (2) = Slave Drive.
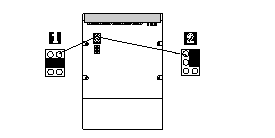
Figure 1-14. 635MB, 850MB, 1.0GB, 1.2GB Drive
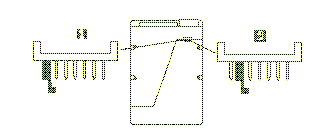
Figure 1-15. 1.2GB, 1.7GB Drive
|
Search Keywords |
| |
|
Hint Category |
Jumper/Switch Settings, Hardware Installation/Configuration, Hard Drives | |
|
Date Created |
24-09-96 | |
|
Last Updated |
23-03-99 | |
|
Revision Date |
23-03-2000 | |
|
Brand |
IBM Aptiva | |
|
Product Family |
Aptiva | |
|
Machine Type |
2144, 2168 | |
|
Model |
A10; A12; A14; A15; A40; A44; A45; A50; A51; A52; A90; A92; A94; C45; 120; 121; 123; 131; 132; 133; 141; 142; 152; 154; 161; 162; 163; 171; 172; 182; L11; L15; L16; K25; K26; L33; K33; L43; K43; L35; K35; L45; K45; KU5; L55; K55; L65; K65; L66; K66; U11; U15; U16; U33; U43; U35; U45; U55; U65; U66; X17; X27; X37; X47; Y17; Y27. Y37; Y47; Z17; Z27; Z37; Z47; S20; S50; S55; S65; S64; S74; S75; W37; W47 | |
|
TypeModel |
| |
|
Retain Tip (if applicable) |
| |
|
Reverse Doclinks |