
|
22.247 bytes |
Service Hints & Tips |
Document ID: MNOK-3ZXNJK |
Aptiva - 2138 Removals and replacements - System board
Applicable to: World-Wide
Ŕ Remove all adapter cards.
Ŕ Disconnect all cables connected to the system board.
Ŕ Remove the screws securing the system board to the chassis.
Ŕ Lift the system board to remove from chassis.
Ŕ Remove memory (DIMM) if applicable.
Ŕ Remove processor.
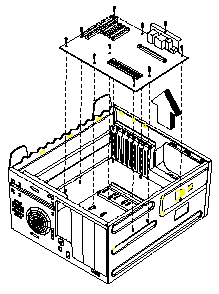
Figure 4- 34 Remove the system board
NOTE: System Board Install
Ŕ Before you re-install the new system board, the CPU retention module and the I/O Port Bracket should be assembled on the system board if they are not already installed. (refer to the illustration in Chapter 7, Assembly 2 )
Ŕ Be sure to reinstall the processor, DIMMs, onto the new system board if applicable.
Ŕ Before reinstallation, position the housing on its side. When reinstalling a new system board, push the board to the rear and align it with the front locating pin. Visually verify that the board is aligned properly, then press the board down.
Ŕ After installing the system board, secure with original screws.
Ŕ Run the Setup Utility after correctly changing the system board.
Ŕ Upgrade the BIOS version on the new system board. See "Flash (BIOS) Update Procedure" on page 1-17.
Ŕ Run the Setup Utility after correctly changing the system board. See "BIOS Setup Utility" on page 1-18.
Ŕ Change the Machine Type and Serial Number in the BIOS for the new system. See "BIOS-contained Model Number and Serial Number" on page 1-16.
|
Search Keywords |
| |
|
Hint Category |
Hardware Installation/Configuration, System Boards | |
|
Date Created |
05-11-98 | |
|
Last Updated |
09-03-99 | |
|
Revision Date |
09-03-2000 | |
|
Brand |
IBM Aptiva | |
|
Product Family |
Aptiva | |
|
Machine Type |
2138 | |
|
Model |
All | |
|
TypeModel |
| |
|
Retain Tip (if applicable) |
| |
|
Reverse Doclinks |