|
@006E.ADF Aox MicroMASTER 386 32bit ADF v1.5
I006E.ADF Initialization File for @006E.ADF
@706D.ADF Aox MicroMASTER 486/386 ADF v1.4
I706D.ADF Init file for @706D.ADF
@706F.ADF Aox MicroMASTER 386 ADF v1.1
@706F.ADF Aox MicroMASTER 386 ADF v1.2 (rename to @706F.ADF)
MICROADF.EXE MicroMaster .ADF files
MCMaster Utilities
MicroMaster 386 32-bit
MicroMaster 386 16-bit
Early MicroMaster 386
Even Earlier MicroMaster 386
Installation
MCMaster Utilities
Files
MCMR236.EXE MCMaster Utility Diskette v2.36, BIOS update to 2.36
MCM235.EXE MCMaster Utility Diskette v2.35, BIOS update to 2.35
MC235I.EXE MCMaster Utility Diskette v2.35I, BIOS update to 2.35i
For early 16- and 32-bit MicroMasters. Thanks to Jiri Zlamal!
AMM124OU.ZIP MicroMaster Utility Diskette v1.24
Usage
MMSETUP.EXE [-mm=xy] sets installed SIMM sizes (x/y = 1/2/4). Requires
UM.HEX = current BIOS ROM Intel Hex file. If no -mm= input then select from
displayed combinations.
MMDIAG.EXE If testing ROM will search for UMvrr.HEX based upon current ROM
v.rr (v=version, rr=release). If not found will try UM.HEX, if it can be
found.
MMIDD New Option v1.03
(common to all AOX / Kingston files)
A new option has been added to the installable device driver MMIDD for the
16 bit MicroMASTER 386. The version is 1.03 and it is to be used with
MicroMASTER code rev 1.21 or later (it checks).
The new option is r where r stands for relocate. This will relocate the
resident interrupts (int 15h, 13h, 75h, 4bh) from the top of conventional
memory (9f00h segment) to lower memory in the device driver. This eliminates
problems with programs that don't know how to deal with memory being used
between end of low memory and the extended BIOS data area (like Windows). It
also sets up to look for emm386 (and possibly some other LIMulators) and
envelops it to work properly with the VDS calls (int 4b).
Overview of Installing an Initializer
In the early days of the PS/2 there was no easy way to install non-IBM
memory adapters in a way that the system 'saw' the memory, so IBM issued an
interim method of installing an initializer on the first track of the hard disk
(track 0). Later IBM changed the set configuration program on the reference
disk (SC.EXE) to allow for installation of these initializers. However, not
everyone has these new set configuration programs.
Because the Adapter Description File (ADF) for the memory adapters would
cause an error if it had the new keyword in it and was run on an old version of
set configuration, some vendors are not using the newer method, but staying
with the older interim method. The new set configuration program also removes
initializers which it does not know about, so if two vendors use different
methods, the older method must be used after the newer method. This, however,
causes the initializer installed later to execute later. Because the
MicroMASTER must be initialized after all other memory boards, the MicroMASTER
initializer must be installed last and that will not be the case if the
MicroMASTER uses the new method and the Above Board uses the old. Therefore Aox
provides a program which will install our initializer after all others. Intel
also provides a program, SOFTSET, which, among other things, will install the
initializer for the Above Board.
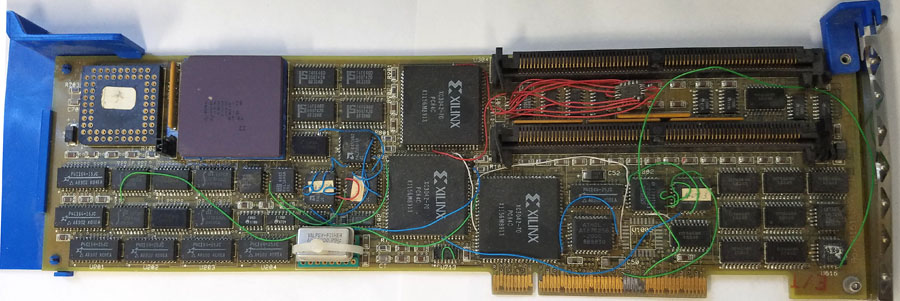
MicroMASTER 386 32-bit
All 32-bit: S/N starting with "AA27..."
20 MHz: FCC ID GZNMM386-20-32
25 MHz: FCC ID GZNMM386-25-32
33 MHz: FCC ID GZNMM386-33-32
U100 386DX-20, -25, or -33
U103 387DX-20, -25, or -33
U301,302,603 MM1200
U401 MM1100
U505 Flash
|
U508,701-706 SDT 7164
U601 MM1000
U903,904 72-pin SIMM socket
U1201 Memory/DMA Controller ASIC
Y1 40.0000, 50.0000 or 66? MHz osc
|
U1201 marked 38620/25, Rev 65-3 suggests
Y1 could be upgraded to 50MHz osc. Maybe.
The serial number is on the reverse of the blue card guide.
Note the addition of a flash ROM chip and a cache chip in the lower right
corner. The Memory/DMA controller ASIC is a Plus Logic chip. Note also that the
adapter is 32 bit.
MicroMASTER 386 16-bit
All 16-bit: S/N starting with "AA16..."
20 MHz: FCC ID GZNMM386-20
![[P]](/other/img/photo.gif "Front") |
|
25 MHz: FCC ID GZNMM386-25
33 MHz: FCC ID GZNMM386-33
Note: Most of the reference designators are
silkscreened on the back (solder side) of the card.

H501 Pads for 10-pin header?
H701 Pads for 3-pin jmp (1-2 shorted)
H801 Pads for 2x2-pin header?
J201 Pads for 3-pin jmp (1-2 shorted)
U101 386DX-20
U109 387DX-20
U201-204 35 ns 2Kx8 SRAM
|
U205,206 25 ns 2Kx8 SRAM
U303,304 72-pin SIMM socket
U605 EPROM
U614 MCM6264J85
U801,901,1001 Xilinx XC3042-70
U1002 Pads for PAL?
Y1 40.0000 MHz osc
|
U201-204
CY7C128-35VC,
VT20C19-35JC, or compatible 35 ns
2Kx8 SRAM. Extra pads for SOJ-28.
U205,206
CY7C128-25VC,
VT20C19-25JC, or compatible 25 ns
2Kx8 SRAM. Extra pads for SOJ-28.
U801,901,1001
Xilinx XC3042-70 PC84C FPGA
2000-3000 gates, 144 CLBs. No AOX P/N.
MMDIAG.EXE has a switch, /TESTPAL which Tests U707 for rev 3 part on type A16
MM 386 boards. We are still confused, but WBST expects U707 (Programmable Array
Logic) chip is responsible for bus interface and address decoding implementation
and the like.
WBST Clarke writes:
It's the earlier/earliest Version 1 386DX-25 16-bit adapter, with
Adapter Id. 706F, presumably the Version 1 486 adapter has adapter Id. 706E,
and the 32-bit Version 2 equivalents have Id.s 006E and 006F (what 008E is I'm
unsure). Jiri/George's software package contained the v1.2 ADF, which works
well, and included the long-missing MMSETUP utility to "flash" the installed
SIMM sizes, as well as the microcode levels v1.19, v1.21 and its current v1..24
HEX files, and Track-0 initializer, device driver etc. The later 32-bit
(Version 2?) adapters are fully POS-configured (and report installed memory)
with the later v2.2 and upwards System Configuration utility, SC.EXE.
"Apparently, the earliest versions of the Aox 386 (Id. 706F) and 486 (Id.
706E?) adapters came with totally different onboard firmware and possibly BIOS
code, as well as an "EEPROM configuration utility" - MMSETUP, which seems to
have been responsible for writing installed SIMM, Interrupt line select and
other details normally done via POS configuration ADFs in the later versions.
This configuration utility (and any associated documentation/help files) has not
been uncovered in many, many years, despite our pillaging of the Kingston
support site when that still contained some related, archived files."
From Dr. Jim
I also have an older, more primitive, AOX 25 MHz version of this
card. Lacks the video local-bus connector and the ASICs are different. Uses the
same ADF and diags, though. Not moddable in the same fashion as the Kingston
version, and I have a hunch it wouldn't handle 33 anyway.
Early MicroMASTER 386
Even Earlier MicroMASTER 386
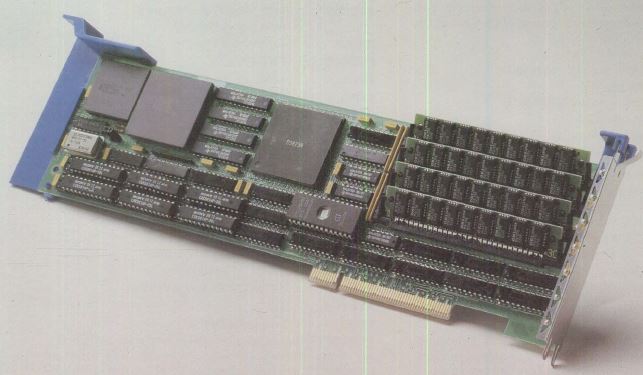
Source: Personal Systems/Issue 4, 1989 (G325-5004-00), Page 103 physical
4x 30 pin SIMMs, looks to be 64KB of L2.
Installation (by William Walsh, original HERE)
So you have one of these cards and want to install it? Here's what you need:
- Blank 1.44MB Floppy Diskette
- Working and complete reference diskette for your PS/2 system
- Clean and well-lit area in which to place your computer and install the card.
- ZIP file containing AOX MCMaster utilities (Kingston-provided ones DO NOT work!)
Throughout this article I am assuming your machine is running PC, MS, or a 100% compatible DOS version. If you are not running DOS on your PS/2 you should make a third and separate DOS boot diskette from which to run the AOX utilities. Don't use the AOX diskette as a boot disk because during the option disk copy process your reference disk will get trashed if you do!
- Download the ZIP file here. Extract all files and place them on a blank 1.44MB floppy diskette.
- Before installing the adapter, start your PS/2 with its reference diskette and choose to "Copy an Options Diskette". When prompted to insert the disk containing new files, insert the 1.44MB floppy that you copied the contents of the ZIP file onto. After completing this process, exit the reference disk and turn off your computer.
- Place your PS/2 in the well-lit work area and open the case. Locate an empty MCA slot in which to place the card. Install the card.
Note: The AOX MCMaster card supports onboard memory. This memory is much faster than memory on your system's planar and any adapter cards with memory that you may have. While you have to leave at least a little bit of planar memory, you may wish to remove any existing memory boards and simply install memory on the AOX card.
It is highly recommended that you use only memory on the AOX board as use of planar or other card-based memory will result in a significant performance loss. It can also make setup vastly easier.
You may use 1 MB, 2 MB or 4 MB SIMMs with this adapter. I used 70 ns 2 MB parity SIMMs with no problems.
- Re-assemble and reconnect your PS/2. Put the reference diskette back in the disk drive. Turn the computer on to be sure everything works. You will see at least a "165" and possibly other errors if you removed memory or memory cards from your system.
- After a few moments you will see the opening screen of the reference diskette. Press enter.
- In most cases, auto-configuration is the way to go. However, you may desire not running autoconfig if you have customized settings that would be destroyed by auto-configuration.
If you choose not to auto-configure, simply go into "Set Configuration > Change Configuration" and make sure all settings are as you desire. Press F10 from that screen to save your settings and exit.
- Remove the reference diskette from the drive. Reboot.
- You should see the MCMaster startup screen appear. It may complain of errors and tell you that the system is being switched back to the main CPU. If so, you will need to use a utility on the diskette called MMSETUP.
- To start the MMSETUP program, get to a PURE DOS prompt. Make sure that no memory managers are running (like EMM386) or the adapter could become damaged.
- When MMSETUP starts, you will be presented with a list of memory options. Select the configuration you have and press ENTER to apply it.
- The MMSETUP program will notify you not to turn your computer off until you are told to. This is because the program actually rewrites a flash ROM.
- After turning your computer off, wait a few seconds and turn it on again. You should see (after the initial POST) the AOX MCMaster start screen.
- Your computer should now be running as a 386.
Note: Some software may require reinstallation or reconfiguration before it can be used with the AOX card. See the readme files in the ZIP to see if your software requires any reconfiguration.
|