Lyman 310 Tool Use
Comments, corrections, pontification? Contact me
Resources
Ideal Quick Reference
(Cartridge, Adapter Die, Priming Die, M/R die, Expander Plugs, Seater
Screws)
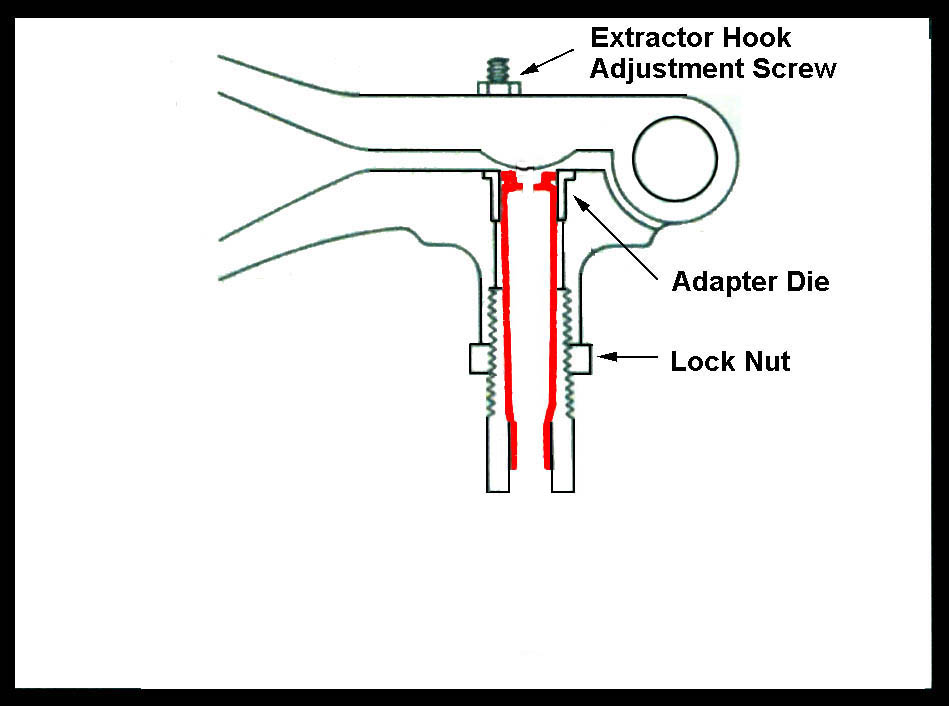
Install Adapter
Die (From LASC's "How to Reload with
a Lyman 310 Tool")
Opening the handles, you will see that the
threaded hole is counter-bored slightly on the inside, and has a screw
adjustable hook projecting into it from the opposite handle. The reason
for the counter-bore is to provide a stop shoulder for the case insert,
which should be threaded into the handle (from the inside) as far as
possible, and stopping with the groove in the case insert aligned with
the hook. In use, this hook will drop into the recess and snag on the
case rim, and pull it out when the handles are opened. Use the
adjustment screw to assure it is set properly for your type of ammo.
The Adapter Die has the same number as the Priming Chamber.
Neck Resizing and Decapping
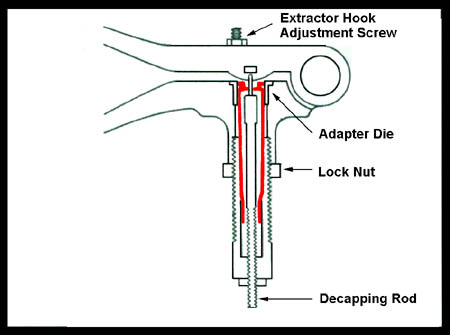
The de-capping chamber is screwed into the handles. By adjusting the
chamber and de-capping rod depth, you can vary how close the handles
close for your best grip strength or reach. This is the replacement die
of the set and it came with three extra de-capping pins. The first time
a crimp primed military case was de-capped, I knew why. They are very
hard to push out and the flash holes are not necessarily in the center
of the primer pocket. After the military crimp is removed or with
commercial cases, de-capping was easily done with light finger
pressure. A hook on the handles extracts the case after each operation.
There is a Universal Decapping Die, I'll need either a line
drawing or one in my hands in order to guesstimate what it looks like.
[ed.]
Muzzle Resizing [MR] Die
 This is my rendition of a Muzzle
Resizing [MR] Die.
(Ed.)
This is my rendition of a Muzzle
Resizing [MR] Die.
(Ed.)
Neck Expanding
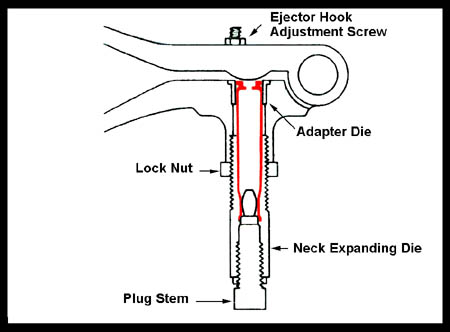 One of the dies will have a white steel plug through the
top, and an apparently oversized button will be visible inside
it. This is the expander die, a most useful accessory whether you
are loading jacketed or cast bullets. I have Tong Tool expanders for
every caliber you can imagine, and use a 7/8x14 bushing to add them to
every set of conventional dies I buy. But just start threading yours
into the handle of your tong tool, and drop an empty neck sized case in
the bushing side. Ideally, it should drop down below level, or nearly
so. Adjust the die and the expander so that the empty case is about 1/4
or 3/8 inch above flush with the handles, and squeeze them shut. Now
open the handles to extract the case, and try to insert a bullet (sized
and lubed if you are using cast) in the mouth of the case. It should
not go in at this point, at least with most cases. Now replace the
case, and squeeze and release the handles. Screw the die or expander
button in a bit further and squeeze the handles again. Repeat until you
feel a very slight ‘pop’ when the handles are squeezed. This signals
the expansion of the mouth of the case, and this operation is generally
referred to as ‘belling’ the case.
One of the dies will have a white steel plug through the
top, and an apparently oversized button will be visible inside
it. This is the expander die, a most useful accessory whether you
are loading jacketed or cast bullets. I have Tong Tool expanders for
every caliber you can imagine, and use a 7/8x14 bushing to add them to
every set of conventional dies I buy. But just start threading yours
into the handle of your tong tool, and drop an empty neck sized case in
the bushing side. Ideally, it should drop down below level, or nearly
so. Adjust the die and the expander so that the empty case is about 1/4
or 3/8 inch above flush with the handles, and squeeze them shut. Now
open the handles to extract the case, and try to insert a bullet (sized
and lubed if you are using cast) in the mouth of the case. It should
not go in at this point, at least with most cases. Now replace the
case, and squeeze and release the handles. Screw the die or expander
button in a bit further and squeeze the handles again. Repeat until you
feel a very slight ‘pop’ when the handles are squeezed. This signals
the expansion of the mouth of the case, and this operation is generally
referred to as ‘belling’ the case.
Priming Chamber
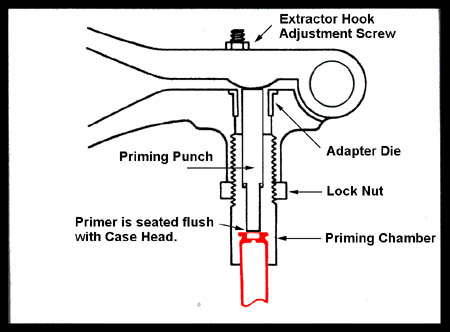 One of the dies will look like half of it has been cut away,
and this will have a recess that fits the base of the case you are
loading. It will also have the large end of a spring loaded plunger on
the other end. This is the primer seating die. Screw the plunger end
into the handles until closing them will press the small end of the
plunger just past flush with the case cutaway, and lock the die in
position.
One of the dies will look like half of it has been cut away,
and this will have a recess that fits the base of the case you are
loading. It will also have the large end of a spring loaded plunger on
the other end. This is the primer seating die. Screw the plunger end
into the handles until closing them will press the small end of the
plunger just past flush with the case cutaway, and lock the die in
position.
Pick up a fresh primer and place it on the small end of
the plunger, with the anvil forward, and the smooth end of the primer
touching the plunger. Place a sized, de-primed case in the recess, and
squeeze the handles. This will cause the plunger to press the fresh
primer into the primer pocket. Check your settings by standing the
primed case on a flat sheet of glass. It should stand firmly, with no
tendency to rock or wobble. If it does wobble, you either have a burr
on the casing, or the primer isn’t deep enough, and the die needs to be
readjusted. This is a fairly slow priming process, but very well
designed: The primer is seated gently and slowly, with no danger of
igniting it by impact, as there is in the Lee Loader. I can’t say it’s
impossible, but I’ve used the Tong Tool for decades, and never
experienced one, even when I encountered very obviously defective cases
with primer pockets so shallow that a primer couldn’t be seated at all.
With a little practice, the process becomes automatic: I’ve spent
untold hours watching television while I primed cases by feel: The feel
of both primers and cases are quite distinctive, and this allows them
to be handled with assurance.
Bullet Seating and Crimping
 Once the sized and re-primed case has
been belled and
charged, it is time to seat the bullet of your choice. There is but one
die left, and it’s the bullet seating die. It’s also readily recognized
by the threaded stem in its center. Thread it into the handles until it
begins to push an empty case above flush. Then back it out several
turns and lock the setting. Now back the threaded stem out as far as it
will go. Holding the handles so that the seating die is tilted upwards,
insert a case (sized, primed and charged with both powder and a bullet)
as far as it will go. It should go past the flush position to indicate
that the bullet has not been seated at all. Close the handles and begin
screwing the center post down until it is stopped by contacting the
bullet. Hold the handles loosely while you screw the center post a bit
further, then squeeze the handles tightly. This should seat the bullet
into the case mouth by the distance you moved the center post. Note the
distance that remains to seat the bullet where you want it, and
approach that point in small steps. Once the settings are producing the
results you want, lock them in with the usual locknut.
Once the sized and re-primed case has
been belled and
charged, it is time to seat the bullet of your choice. There is but one
die left, and it’s the bullet seating die. It’s also readily recognized
by the threaded stem in its center. Thread it into the handles until it
begins to push an empty case above flush. Then back it out several
turns and lock the setting. Now back the threaded stem out as far as it
will go. Holding the handles so that the seating die is tilted upwards,
insert a case (sized, primed and charged with both powder and a bullet)
as far as it will go. It should go past the flush position to indicate
that the bullet has not been seated at all. Close the handles and begin
screwing the center post down until it is stopped by contacting the
bullet. Hold the handles loosely while you screw the center post a bit
further, then squeeze the handles tightly. This should seat the bullet
into the case mouth by the distance you moved the center post. Note the
distance that remains to seat the bullet where you want it, and
approach that point in small steps. Once the settings are producing the
results you want, lock them in with the usual locknut.
[ed.] The cast bullet seating stem is the same as the
Lyman Top Punch number.
Example: the 245496 uses a 203 Top Punch. Therefore you
would use a #203 seating stem.
Bullet Sizing Die
One seldom seen accessory for the tong tool was called a
sizing chamber. No, it didn’t size the case, it sized cast bullets. It
was a threaded sleeve that was bored out for a loose slip fit that
enabled a cast bullet to drop down to the very end. At the end, it was
stopped by a constriction sort of like the choke in a shotgun barrel.
This constriction could be ordered in a variety of diameters, and
determined the size of the bullet that was forced through it by a push
rod that was powered by compressing the handles. Ideally, the bullet
was forced through base first to prevent fins from forming because of
out-of-round bullets from less than ideal molds.
I sure pushed a lot of lead through these sizers, but they had to be
lubed first. They were a real pain at times, because the excess lube
would be scraped off and get everywhere. Some of it got on the base of
the next slug to be pushed through, and forced you to wipe the base on
a bit of cloth before loading it. And some of it got squeezed back
along the push rod, making it harder to remove for the next bullet
unless it was cleaned out periodically. I still have a few of these
sizing chambers, but it’s been many a year since they were used.
Note:
These are available from The 310 Shop
(ed.)
Stock Bullet Sizing Chamber and Plug (The 310 Shop will make darn near
any size you want.)
.223 .224 .225 .226 .228 .243 .244 .245 .257 .264
.266 .278 .280 .285 .287 .299 .301 .308 .309 .310
.311 .312 .313 .320 .321 .323 .338 .350 .356 .357
.358 .360 .366 .375 .379 .401 .403 .410 .412 .424
.427 .428 .429 .430 .431 .439 .446 .448 .450 .451
.452 .454 .457 .509 .512 .515
------------------------------------------------------------
Antique Reloading Tool Collector's Association: Ideal Tools: Ideal Tong
Tool Die Dimensions
------------------------------------------------------------
Posted by Doug Elliott on Saturday, April 21, 2007 - 10:00 am:
I have been casually referring to the threading on the "standard" 310
and earlier Ideal tong tool dies as being 5/8" x 30 threads per inch;
and the oversize ones for the largest cases (.348, .50-70) as 11/16" x
30 tpi. Recently, a correspondent (Mark Steele) had an inquiry about
some "small" dies in .25-20 SS, used in a No. 3 tool inherited from his
father, and these turned out to be threaded 0.400" x 30 tpi.
Apparently, Ideal's founder, John Barlow, had adopted the 30 threads
per inch standard from his days working for Winchester, where that
thread pitch was employed for similar applications - I have also
encountered a 1/4" x 30 tpi on an early Ideal sight adjusting tool.
This was all before the standardization of thread diameters, pitches
and tolerances in the early 1900s by the Society of Automotive
Engineers,
and the 30-tpi pitch is now an "orphan", with taps and dies very much a
specialty item.
I said that I have been referring to the "standard" tong tool die
thread as 5/8" (0.625") diameter. I have just gone out and miked
several dies, and find that the diameter is actually 0.605", plus or
minus a couple of thousandths - twenty thousandths under the nominal
5/8", and well beyond the normal range of tolerance. Similarly, a .348
die set for the 310 tool mikes 0.656" over the threads, well under the
nominal 0.6875" for 11/16". So, one might casually refer to the 0.400"
x 30 tpi "small" dies as being threaded an oversize 3/8" (0.375"), or
even a
grossly undersized 7/16" (0.4375"). (Incidentally, this is the same
thread used on the large decapping stems for the 310 tools.) I guess
the real answer is that Winchester, Barlow, et al., were not working to
specific inch dimensions in the first place, but chose diameters
and threadings that were appropriate and necessary for the job at hand.
This really all came out as Mark, Ken Neeld, Al Krause and I were
comparing and sorting the similar dies made by Earl Naramore and C. C.
Johnson for their little "Red Head" three-station turret press from the
late 1930s and '40's, which adopted the Lyman /Ideal standard die
threads. (The Lyman Tru-Line Junior, a similar concept, did not appear
on the market until 1947.) In this context, it is amusing - and a
little alarming - that Naramore, in his ca. 1940 introductory brochure
for the Red Head, states:
"Ideal tools and chambers [dies] for cartridges larger that 1/2 inch
are of a special large size and these chambers will not fit the
RED-HEAD press. However, these chambers can, in many instances, be
turned down and rethreaded to fit the press ...for $1.00 per set of
three."
Since the root diameter of an 0.605" x 30 tpi thread is approximately
0.550", this would not have been a practical proposition for dies for
the .348 (case head diameter 0.553") or .50-70 (0.565"), though it
might have worked for the oversize dies furnished in earlier years for
cartridges in the .45-70 (0.500") class.
Finally - though it is out of the ARTCA's 50-years+ range for "antique"
loading tools - I should mention the Australian "Super
Simplex" bench three-station (currently expanded to six) turret press,
which partakes of features of both the Red Head and Tru-Line Jr.
presses, with some features of its own. It, too uses dies of nominal
5/8" diameter (actual measurement 0.616"), but threaded to the British
Standard 5/8" x 26 tpi employed for brass fittings.
I will probably continue to refer to the Ideal standard and oversize
dies as 5/8" x 30 tpi and 11/16" x 30 tpi for convenience; but in the
awareness that these are not exact specifications.
Doug Elliott

 This is my rendition of a Muzzle
Resizing [MR] Die.
(Ed.)
This is my rendition of a Muzzle
Resizing [MR] Die.
(Ed.) One of the dies will have a white steel plug through the
top, and an apparently oversized button will be visible inside
it. This is the expander die, a most useful accessory whether you
are loading jacketed or cast bullets. I have Tong Tool expanders for
every caliber you can imagine, and use a 7/8x14 bushing to add them to
every set of conventional dies I buy. But just start threading yours
into the handle of your tong tool, and drop an empty neck sized case in
the bushing side. Ideally, it should drop down below level, or nearly
so. Adjust the die and the expander so that the empty case is about 1/4
or 3/8 inch above flush with the handles, and squeeze them shut. Now
open the handles to extract the case, and try to insert a bullet (sized
and lubed if you are using cast) in the mouth of the case. It should
not go in at this point, at least with most cases. Now replace the
case, and squeeze and release the handles. Screw the die or expander
button in a bit further and squeeze the handles again. Repeat until you
feel a very slight ‘pop’ when the handles are squeezed. This signals
the expansion of the mouth of the case, and this operation is generally
referred to as ‘belling’ the case.
One of the dies will have a white steel plug through the
top, and an apparently oversized button will be visible inside
it. This is the expander die, a most useful accessory whether you
are loading jacketed or cast bullets. I have Tong Tool expanders for
every caliber you can imagine, and use a 7/8x14 bushing to add them to
every set of conventional dies I buy. But just start threading yours
into the handle of your tong tool, and drop an empty neck sized case in
the bushing side. Ideally, it should drop down below level, or nearly
so. Adjust the die and the expander so that the empty case is about 1/4
or 3/8 inch above flush with the handles, and squeeze them shut. Now
open the handles to extract the case, and try to insert a bullet (sized
and lubed if you are using cast) in the mouth of the case. It should
not go in at this point, at least with most cases. Now replace the
case, and squeeze and release the handles. Screw the die or expander
button in a bit further and squeeze the handles again. Repeat until you
feel a very slight ‘pop’ when the handles are squeezed. This signals
the expansion of the mouth of the case, and this operation is generally
referred to as ‘belling’ the case.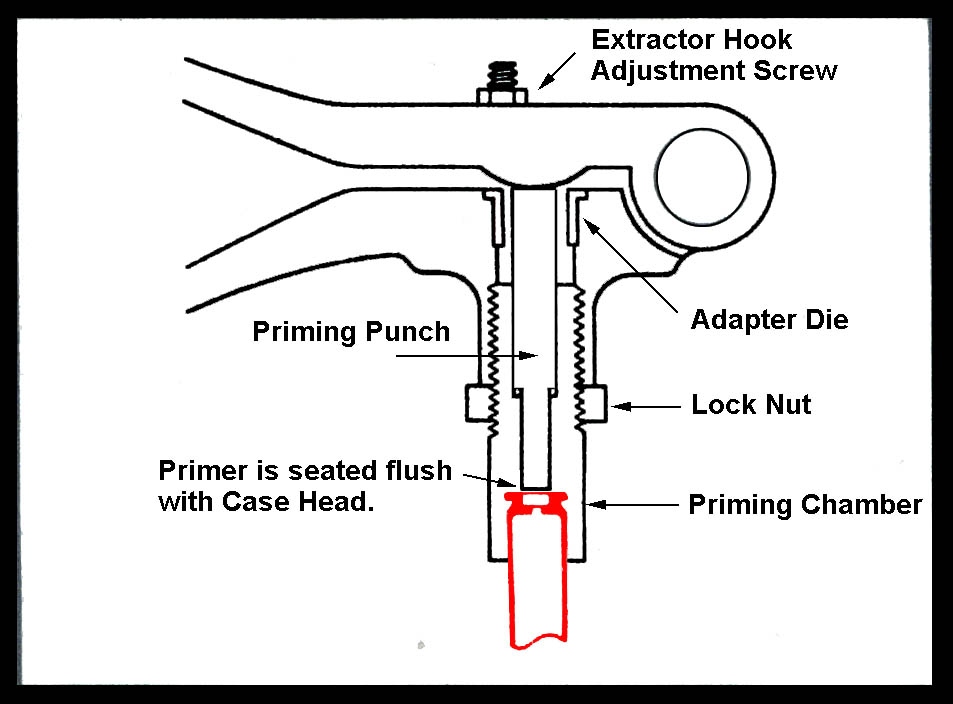 One of the dies will look like half of it has been cut away,
and this will have a recess that fits the base of the case you are
loading. It will also have the large end of a spring loaded plunger on
the other end. This is the primer seating die. Screw the plunger end
into the handles until closing them will press the small end of the
plunger just past flush with the case cutaway, and lock the die in
position.
One of the dies will look like half of it has been cut away,
and this will have a recess that fits the base of the case you are
loading. It will also have the large end of a spring loaded plunger on
the other end. This is the primer seating die. Screw the plunger end
into the handles until closing them will press the small end of the
plunger just past flush with the case cutaway, and lock the die in
position.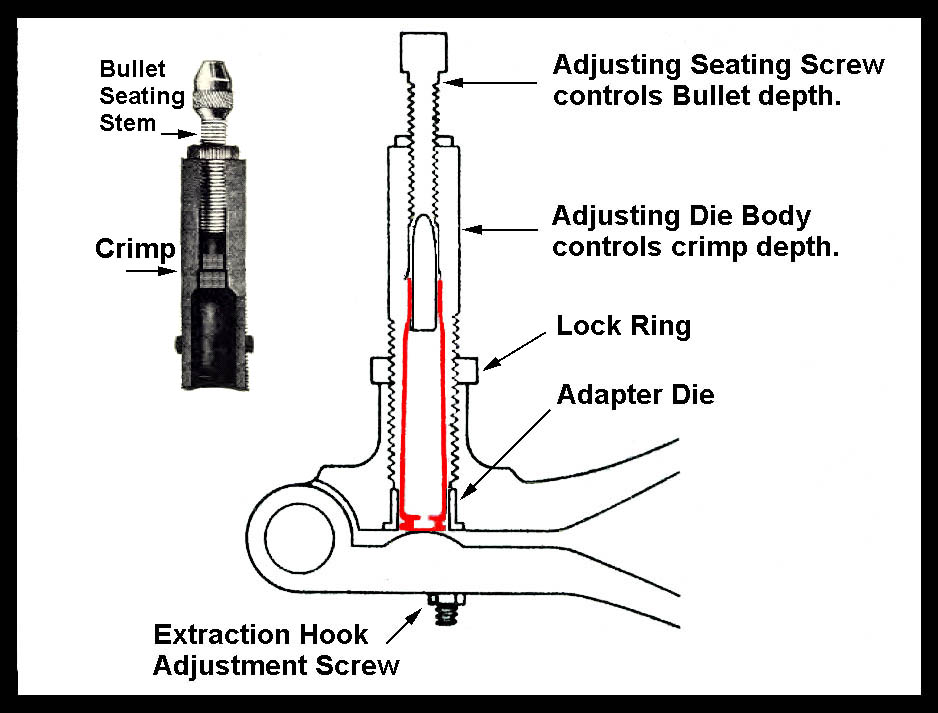 Once the sized and re-primed case has
been belled and
charged, it is time to seat the bullet of your choice. There is but one
die left, and it’s the bullet seating die. It’s also readily recognized
by the threaded stem in its center. Thread it into the handles until it
begins to push an empty case above flush. Then back it out several
turns and lock the setting. Now back the threaded stem out as far as it
will go. Holding the handles so that the seating die is tilted upwards,
insert a case (sized, primed and charged with both powder and a bullet)
as far as it will go. It should go past the flush position to indicate
that the bullet has not been seated at all. Close the handles and begin
screwing the center post down until it is stopped by contacting the
bullet. Hold the handles loosely while you screw the center post a bit
further, then squeeze the handles tightly. This should seat the bullet
into the case mouth by the distance you moved the center post. Note the
distance that remains to seat the bullet where you want it, and
approach that point in small steps. Once the settings are producing the
results you want, lock them in with the usual locknut.
Once the sized and re-primed case has
been belled and
charged, it is time to seat the bullet of your choice. There is but one
die left, and it’s the bullet seating die. It’s also readily recognized
by the threaded stem in its center. Thread it into the handles until it
begins to push an empty case above flush. Then back it out several
turns and lock the setting. Now back the threaded stem out as far as it
will go. Holding the handles so that the seating die is tilted upwards,
insert a case (sized, primed and charged with both powder and a bullet)
as far as it will go. It should go past the flush position to indicate
that the bullet has not been seated at all. Close the handles and begin
screwing the center post down until it is stopped by contacting the
bullet. Hold the handles loosely while you screw the center post a bit
further, then squeeze the handles tightly. This should seat the bullet
into the case mouth by the distance you moved the center post. Note the
distance that remains to seat the bullet where you want it, and
approach that point in small steps. Once the settings are producing the
results you want, lock them in with the usual locknut.