|
USE
ONLY THIS REFERENCE TO SERVICE YOUR
IBM MONITOR!
SHSA380053.BOO
PS/2 Display Hardware Maintenance Manual,Vol 1
|
2.5.2.4.6
Procedure Using a Color Analyzer
The use of a color analyzer is
recommended, if available, for setting color points and
brightness.
All adjustments must be made with the brightness
control set at center detent. Select mode 4 (or mode 3 if
not available) to display the test patterns.
1. Select option 3, pattern C (Full Screen Raster), and
press spacebar to get a black screen.
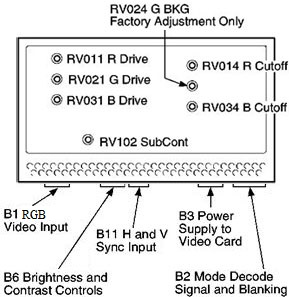
a. Set RV014 (R.BKG) and RV034 (B.BKG)
fully clockwise.
b. Adjust RV508 (G2) until a background
raster is just visible.
c. Adjust RV014 (R.BKG) until raster
has a red tinge, readjust until red tinge just disappears.
d. Adjust RV034 (B.BKG) until raster
has a blue tinge, readjust until blue tinge just
disappears.
e. Adjust RV508 until background raster
just disappears. When background color point is set
correctly, the raster is white or gray until it
disappears. If it is not, repeat this step.
2. Check that the contrast control is set to max and the
brightness control is at center detent.
3. Press PF3 to return to the setup patterns. Select
option 2, pattern B (50 mm square block).
4. Press spacebar to get a white block.
5. Adjust three drive potentiometers (RV011, RV021,
and RV031) for correct white color point.
Using a color analyzer, in accordance with the
manufacturer's instructions, this is:
x=0.297 ± 0.01
y=0.320 ± 0.01.
6. Set RV102 (SUB CONT), using the color analyzer to
give:
(8517) 150 cd/m².
(9517) 130 cd/m².
7. Set contrast control to minimum (CCW). Readjust
RV014 and RV034 for correct color point.
8. Repeat steps 2 to 7, until color point is
maintained at min and max settings of contrast control.
9. Press PF3 to return to setup patterns. Select
option 4, pattern D (Gray Scale). Set contrast control to
max.
10. Check that all levels of scale are visible. If a
background raster is visible, adjust G2 until background
raster just disappears.
11. After adjusting G2 reset the color point, steps 2 to
10.
12. Do focus and convergence adjustments after this
procedure.