Reworking the DS1287 / DS1387 RTC chip

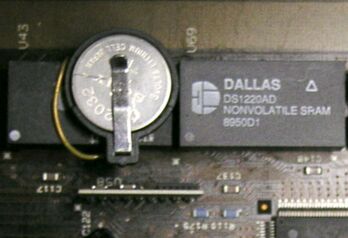
The Situation: You have either a PS/2 25-286, 30-286, 55 or 65 which comes up with a "165 configuration error" and fails to keep the setup once been shut off again.
Well - these have the dreaded Dallas DS1287 "all in one" Real Time Clock (RTC) chip with integrated Xtal and battery. Now the battery is dead, configuration is lost after relatively short time again and you get error-codes constantly. A really new, fresh and unused chip is hard to get. Even its successor DS12887 is pretty hard to get and darn expensive.
At that point you wish you could add an external battery.
But you can't. There are no provisions for one.

Not yet.

The Action: Have a look at the graphics below..

Click to enlarge
Click to enlarge

Drawing © 2006 by Peter H. Wendt / Germany


Basically the DS1287 is a DS1285 chip, where the pins for the xtal-connection and the battery are bended upwards. Then the battery and xtal are placed atop of the chip, connected to the pins and everything is covered with a pretty rigid protective compound.
The DS1387 is the same chip with an additional integrated 4K SRAM. All described modifictions apply to this chip as well.

The only things you need to do is:
  • use a Dremel or a metal saw and cut at pin 16 vertically down until you reach the metal pin surface
  • repeat the procedure at pin 20
  • scratch off the sealing compound around the pins, particularly at the No. 16 pin towards the top
  • use a watchmaker screwdriver or a nail to break the connection to battery minus over pin 16
    Don't be afraid: this chip is really hard to damage. If you have a multimeter test the voltage on pins 16 and 20 before and after. Before it may read anything from some 100mV up to 3V (where you should ask yourself *why* you wish to modify this chip ...?) and after it must be 0 (zero) latest after 5 seconds of measuring.
    The 0V-reading tells you that you successfully disconnected the battery.
  • solder two wires of appropiate length to the pins 16 and 20
  • solder a "3 Volt Cell" to the wires.
    Care for the polarity ! Pin 16 is GND (-), pin 20 is (+)
    This abstract "3 Volt Cell" could be either a battery pack from 2 AA or AAA cells or a 3V-Lithium coin cell - with holder ! Don't ever solder directly on a coin-style Li-Cell. It won't do it no good and may result in early death of that part due to excessive internal heating. Most likely you won't get a wire soldered properly to it. The case is usually pretty much "solder-resistive" because of the anti-corrosion plating.
    Don't use rechargeable batteries. These are intended for short-term use with strong charge and discharge intervals - not for long-term storage with a comparatively small discharge rate. The daily self-discharge rate on some rechargeables is higher than the current taken by the RTC.
  • maybe use some hot glue to re-isolate the pins and fix the battery somewhere on the chip
    The "appropriate length" bit regarding the wires refers on that situation where you use a 2-cell battery holder and want to place it elsewhere inside the computer - further away from the DS1287 chip itself.

Then re-install the reworked chip in the machine - watch out for proper aligment and position of pin 1 - and reconfigure your PS/2 with its reference diskette. Should work like a charm.


Possible Results

Mod 65SX with mod. chip
Reworked chip inside a Mod. 65SX

Chip sideview
Side view of modded chip. Note the battery holder !

the original testchip
Curiosity killed that cat. After the dust cleared .....


All pictures © 2006 by Moritz Hoffmann & his father / Germany


Some more Feedback !

On March, 23rd, 2007 Chris (xrisl [at] yahoo.com) reported the following:

My old computer has been out of action for months, but this week I got it going again by following the instructions on your webpage "Reworking the DS1287 RTC chip".
Without that webpage, I would never have thought of repairing it like that!
So you have my thanks and gratitude for putting that idea on the web.
(Incidentally, my computer is an Compaq 386N, which seems to date from about 1990).

With thanks,
Chris.


On April 24th, 2007 Gary Jay in Ohio, USA (siffert [at] usa.net) reported the following:

Hi Peter...just thought I would let you know that I got the DS1287 reworking on my first try!
I used an iron file that was about the exact width I needed and just slowly went back and forth about 50 times until I saw the metal and then used sandpaper the rest of the way.
Soldered and used a CR2032 battery with holder on top of the 1287.
Worked like a charm and would like to thank you and I am very grateful I stumbled on your web site. I could not have gotten my Compaq DeskPro 286e back to clock life back without you! Regards, Gary


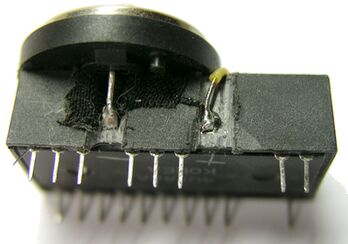
William Walsh, USA finally succeeded in the DS1287 rework

His success-story can be read at his Dallas Rework Page


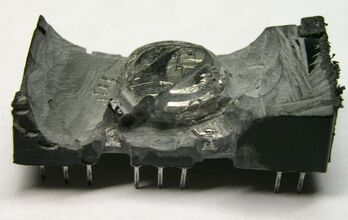
William Walsh, USA also modified the DS1387 chip

The DS1387 is technically near-identical to the DS1287, but has an additional integrated 4K SRAM. William Walsh did the DS-Rework to get an external battery to it as well. His report can be found at his DS1387 Rework Page

Really good job, William !


Go to MCA-Index
Visit my Homepage

© 2006 by Peter H. Wendt / pw-software production