Removing and Replacing the Desktop Library Cover
Removing and Replacing the Desktop Tape Library Cover
This procedure describes how to remove and replace the cover on the desktop tape library.
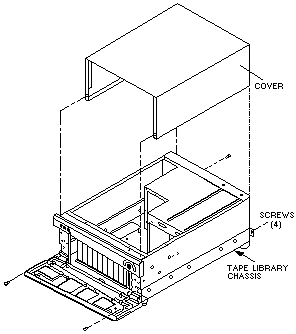
Below figure 41 shows an exploded view of the cover and components that attach the cover to the desktop tape library.

Figure 41. Removing and Replachg the Desktop Tape Library Cover
Four screws secure the cover to the desktop tape library.
Two screws can be reached by opening the front door. The remaining two screws can be reached at the back of the tape library.
- Turn off the power from to tape library by setting the power switch to off.
- Turn the door key to the 9 o'clock position and open the front door.
- Remove the two screws that secure the front edges of the cover to the tape library chassis.
- At the rear of the tape library, remove the two screws that secure the back edges of the cover to the chassis.
- Slide the cover straight up. You may need to pull the bottom edges of the cover away from the tape library to completely free it from the chassis.
- Replace the cover by performing the steps in this procedure in reverse order.
Please see the LEGAL - Trademark notice.
Feel free - send a  for any BUG on this page found - Thank you.


 for any BUG on this page found - Thank you.