Removing and Replacing the Power Supply
Removing and Replacing the Power Supply Fuse
One 5A, 115 V fuse protects the tape library in the event of excessive current flow.
This procedure describes how to replace the fuse in the event it is blown.
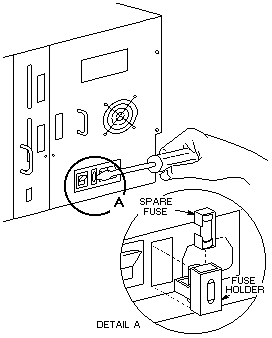
Below figure 40 shows how to replace the fuse.

Figure 40. Removing and Replacing the Fuse
- Turn off the power to the tape library by setting the power switch to off.
- Disconnect the power cord from the power supply.
- Using a slot screw driver, gently pry the fuse holder straight out from the power supply.
- Remove the blown fuse from the clips that hold the fuse.
- A spare fuse is held in a compartment in the fuse holder.
Use the tip of the slot screwdriver to slide the compartment open and remove the spare fuse.
Slide the compartment back into the holder.
- Insert the new fuse into the clips.
- Replace the fuse holder by pressing it straight into the receptacle in the power supply.
- Reconnect the power cord to the power supply.
- Turn on the power to the tape library by setting the power switch to on.
If the fuse continues to blow, perform the problem analysis as described in Chapter 2,
'Maintenance Analysis Procedures'.
Please see the LEGAL - Trademark notice.
Feel free - send a  for any BUG on this page found - Thank you.


 for any BUG on this page found - Thank you.