Removing and Replacing the Controller
Removing and Replacing the Controller
This procedure describes how to remove and replace the controller.
Below figure 38 shows an exploded view of the components for removing or replacing the controller.
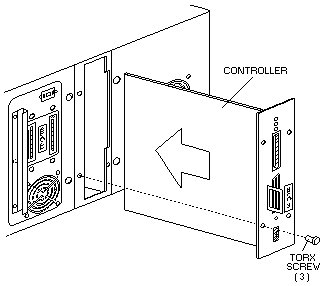
Figure 38. Removing and Replacing the Controller
- Turn off the power to the tape library by setting the power switch to off.
- Disconnect the SCSI cables from the controller.
- Remove the three screws securing the controller to the tape library back panel.
- Remove the controller by grasping the handle and pulling back until the module is free from the tape library.
- Replace the controller by aligning the edges of the controller circuit card in the guides and pushing
the controller into the tape library until the male connector on the controller completely engages the female connector in the tape library.
The connectors are completely engaged when the controller is flush with the tape library back panel.
- Reinstall the three screws securing the controller to the tape library back panel.
- Reconnect the SCSI cables to the controller.
- Turn on the power to the tape library by setting the power switch to on.
- If needed, reset the tape library parameters by performing the 'Setup Procedure'.
Please see the LEGAL - Trademark notice.
Feel free - send a  for any BUG on this page found - Thank you.