Reinstall the System Board
Reinstall the System Board
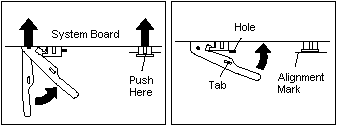
- Make sure that the system-board latch handle is in the extended position.
- Align the system-board rails with the tracks on the
chassis and slide the board in until it is approximately
6 mm (0.25 in) from the riser-card edge connector.
- Rotate the latch handle counterclockwise until the the
system board is properly aligned with the riser-card edge connector.
- Continue rotating the latch handle counterclockwise
while firmly pushing on the system-board rail on the
right-hand side of the system board.
Note:
Do not push on the microprocessor, the DIMMs, or the DIMM sockets to install
the system board.
Make sure that the system board is fully seated in the
riser-card edge connector.
- Re-tighten the riser card mounting screw.
- Push down on the latch to lock the tab on the underside in the opening
(hole) in the chassis. This securely holds the latch in the closed position.
Note:
You cannot see the connection with a full-sized adapter in place.
To make sure that the system board is fully seated, lock the tab on the
underside of the system-board latch in the opening (hole) in the chassis.
- If you want to install or remove any other options, do so now.
Otherwise, go to Completing the Installation.
Please see the LEGAL - Trademark notice.
Feel free - send a  for any BUG on this page found - Thank you.