Rack Installation
Rack Installation
NOTE: Before removing or placing the controller unit in the rack, carefully remove
the battery from the controller unit. See 'Battery Replacement'.
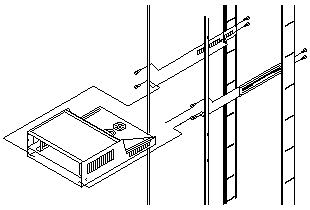
- Loosen the adjustment screws on both side rails and adjust to fit the rack.
- Secure the side rails to the rack cabinet using eight M6 screws and eight rack mounting nuts.
Make sure both side rails are parallel and level to one another in the rack cabinet.
- Tighten the rail adjustment screws.
- Once the side rails are secured to the rack, carefully slide the controller unit onto the side rails.
- Secure the controller unit with two screws on the front sides of the battery compartment.
Please see the LEGAL - Trademark notice.
Feel free - send a  for any BUG on this page found - Thank you.