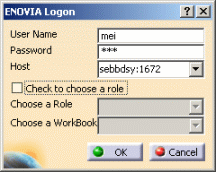
- Creating a Product in ENOVIA V5 VPM and sending it to CATIA.
- Saving the Parts in ENOVIA.
- Opening the Instances and Copying/Pasting them into the Product.
- Saving Data in ENOVIA V5 VPM
- Replacing a part with another one.
-
Create a Product in ENOVIA V5 VPM (Bottle in this scenario). Note that you can close ENOVIA V5 VPM after creating the Product.
Send the Product to CATIA
-
To send the product to CATIA:
 |
|
-
To send the product to CATIA:
- Click the Search ENOVIA data icon (
 ).
The VPM Search dialog box is displayed.
).
The VPM Search dialog box is displayed. - In the Objects scrolling list, select the Product option.
- Enter the Owner's ID.
- Click OK when done. The Product ID is displayed in the Result window.
- Double-click the product.
- Right-click the root product and select Open. The Open Modes dialog box is displayed. Leave the default options and click OK. The CATIA view is displayed.
- Click the Search ENOVIA data icon (
Save the Parts in ENOVIA
-
Open the KwrCap.CATPart file and click the Save data in Enovia V5 icon (
 ).
The Save in ENOVIA dialog box is displayed.
).
The Save in ENOVIA dialog box is displayed. -
Click the
 button. Select the
part in the table and click Modify.
button. Select the
part in the table and click Modify. -
Select the Bottle root product, and click OK. The part is saved in Enovia.
-
Repeat the steps above for the following parts: KwrBottle2.CATPart and KwrBottle3.CATPart. Close the parts in CATIA as well as the Result window.
Open the Parts and Copy/Paste Them into the Product
-
Click the Search ENOVIA data icon (
).
The VPM Search dialog box is displayed. -
In the Objects scrolling list, select the Part version option.
-
Click the Advanced Search tab. Select Owner in the Attributes scrolling list and enter your identifier in the Value field. Click Add and OK. The Parts display in the Results window.
-
Right-click Cap and select Open.
-
In the Open Modes dialog box, check the Document Window and the Automatic lock of all opened Parts and Documents options.

-
Right-click Cap in the specification tree and select Copy and paste it into the ENOVIA5\Bottle window.
-
In the Result window, right-click Bottle2 and select Open.
-
In the Open Modes dialog box, check the Document Window and the Automatic lock of all opened Parts and Documents options. Bottle2 is displayed.
-
Right-click Bottle2 in the specification tree, select Copy, and paste it into the ENOVIA5\Bottle window.
Add Constraints to the Product (Optional)
-
From the Start>Mechanical Design menu, access the Assembly Design workbench.
-
Click the Coincidence Constraint icon (
 )
and add a coincidence constraint to the parts. Click the Update All
icon (
)
and add a coincidence constraint to the parts. Click the Update All
icon ( )
to update the product.
)
to update the product.
Add a Volume Parameter and a Formula to the Product
-
Create a Volume parameter that will compute the bottle total volume.
- Click the
 icon. The Formulas Editor opens.
- Select Volume in the scrolling list. Click New Parameter of type.
- Edit the name of the new parameter (Total_Bottle_Volume in this scenario) in the Edit Name or value of the current parameter and click Add Formula.
- Enter the formula. To do so, select the Cap1.1 publication + Bottle1 publication. Click OK when done.
- The new parameter is displayed under the Parameters node located below the Default-Technological Package.1 node in the Specification tree.
- Right-click the technological package and select Properties. Rename the technological package in the Name field (Bottle in this scenario) and click OK when done.
- Click the
Save Data in ENOVIA V5 VPM
-
Click the Save in ENOVIA icon (
).
The Save in ENOVIA dialog box is displayed. -
In the Result window, right-click Bottle3 and select Open.
-
In the Open Modes dialog box, check the Document Window and the Lock options. Bottle3 is displayed.
Replace bottle2 with bottle3
-
Go back to the ENOVIA5\Bottle window.
-
Right-click Bottle2 in the specification tree and select Components>Replace Component In Session. The Select New Component window is displayed.
-
Select Enovia5\KwrBottle3.CATPart and click OK when done.
-
Click OK in the Impacts On Replace dialog box: The constraints as well as the volume are updated.