 |
The scenario described below aims at
illustrating the reconciliation of a sub-assembly.
Note that this scenario can only be performed using ENOVIAVPM .
When working with ENOVIA V5 VPM, only the whole product can be
reconciled.
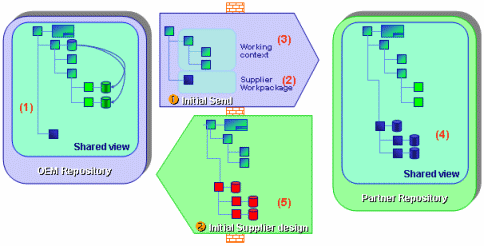
- The OEM creates an assembly (1), a skate board, and wants his
supplier to create a sub-assembly, the back wheels in this
scenario.
- To do so, he sends the workpackage (2) and the working context
(3) to his supplier.
- The supplier modifies the workpackage (4) and sends only this
modified workpackage back to the OEM (5).
|
 |
Before performing this scenario, make sure
you have:
- activated the cache system (Tools->Options->Infrastructure->Product
Structure->Cache Management->check option Work with
the cache system)
- have invoked the reconciliation option (View->Toolbars->Reconcile)
- have activated the ENOVIAVPM
toolbar (View -> Toolbars->ENOVIAvpm)
- have connected to the ENOVIAVPM
database (click the Connect to VPM icon)
|
To perform this scenario, you will need the following documents:
|
 |
-
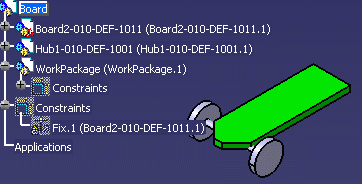
Open the
Board.CATProduct file.
-
Insert a component that will be used by the supplier to
create the back wheels. To do so, from the Insert menu,
select the New component command. The new component is added
to the specification tree.
-
Right-click the new component in the specification tree
and select the Properties command. Rename the new component
into WorkPackage. Click OK when done.
-
Send the files to the supplier.
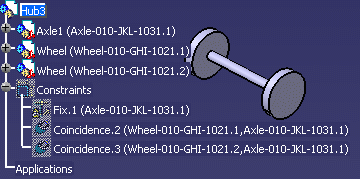
The supplier designs the back wheels and returns the Hub2.CATProduct
file to you, the OEM, looking as follows:
-
Click the Connect to VPM icon to connect to
your ENOVIA V5 VPM database.
-
Open the
Hub3.CATProduct and rename it into Workpackage.CATProduct.
-
Click the Launch Reconciliation icon
 . .
The Reconcile window is displayed.
-
In the Actions toolbar, select the Destination PDM:
ENOVIA VPM V4 (if necessary).
-
Click the Workpackage root in the Objects to reconcile
tree and select the Query by object ID in the Query
scrolling list.
-
Click Query, enter work* in the Query window
and click OK to launch the query.
-
The workpackage stored in the VPDM is displayed in the
VPDM Objects view.
-
Click the Overwrite icon
 to replace the old workpackage with the one sent by the supplier.
-
Click the Apply button to apply the
simulation.
-
Close the Reconciliation transaction and from the
File menu, select the Save in ENOVIA command.
|
|
 |


