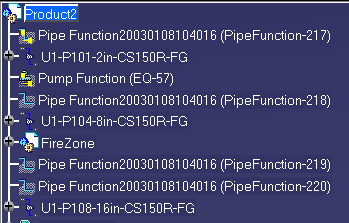
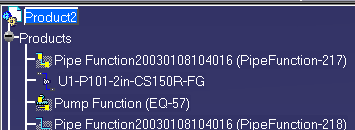
By changing the Tools -> Options settings they can be organized in two ways, by product and, as an additional step, by application group also. If you do not check the option as described below you will be unable to collapse the specification tree display and it looks as shown below. After you check the Products option the objects will be organized under the Products node and the tree can be collapsed. The Products node is simply an organizational element. After you check the Application Grouping option the objects will be further grouped by type.
-
With your document open, go to Tools -> Options -> Infrastructure -> Product Structure and click the Product Structure tab. Check to activate the Products option. The objects in the specifications tree will be organized under the Products node.
-
To organize the specifications tree in application groups go to Tools -> Options -> Equipment & Systems and click the Display tab.
Under Specifications Tree, activate the Show application grouping option: Objects in the specifications tree will be organized under type of object. (You can expand the Products node to see the ungrouped elements.)

When working with Design Rules such as Attribute Filters and FunctionPhysicalMapping, or during parts creation, turn on the Relations and Parameters options. -
Go to Tools -> Options -> Infrastructure -> Product Structure and click the Tree Customization tab.
The Specification Tree Order table displays: You can toggle any of the entries from Yes to No and back by clicking in the Activated column.